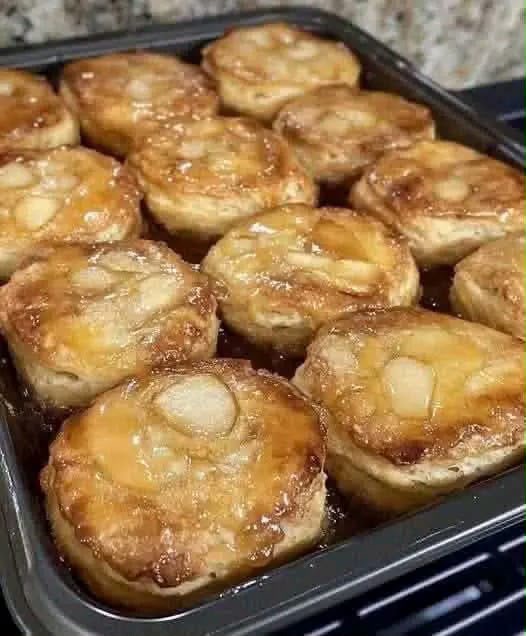
Caramel Apple Biscuit Pies
Imagine biting into a warm, golden biscuit pie and discovering a soft, cinnamon-scented apple filling with rich caramel sauce tucked inside. These caramel apple biscuit pies combine the comforting flavours of homemade apple pie with the convenience of refrigerated biscuit dough, making them a wonderful dessert for busy home cooks.
Each little pie features a beautifully browned exterior, tender apple pieces and a sweet caramel centre. The biscuit dough puffs up in the oven, creating a soft, golden pastry-like shell that surrounds the cooked apple filling. A final drizzle of warm caramel makes every bite even more inviting.
Traditional apple pies can require preparing pastry from scratch, chilling the dough and carefully assembling a large pie. This recipe simplifies the process by using ready-made biscuit dough and a standard muffin tin. You still get the familiar combination of apples, cinnamon, butter and caramel without the lengthy preparation.
These individual pies are particularly appealing for autumn gatherings, family weekends, holiday dessert tables and cosy evenings at home. Their small size makes them easy to serve, and they look lovely arranged on a dessert platter.
Another advantage is the flexibility. You can use your favourite firm baking apples, adjust the filling texture and add optional toppings to suit the occasion. They taste delicious while still slightly warm, especially when the caramel sauce is soft and glossy.
Whether you are making a simple weekend treat or looking for a dessert to share at a family celebration, these caramel apple biscuit pies offer a satisfying combination of sweet fruit, warming spices and golden baked dough.
Recipe Overview
- Recipe Name: Caramel Apple Biscuit Pies
- Category: Dessert
- Style: American-inspired home baking
- Preparation Time: Approximately 15–20 minutes (estimated)
- Apple Filling Cooking Time: 6–7 minutes
- Baking Time: 15–20 minutes
- Total Time: Approximately 40–50 minutes, including brief cooling (estimated)
- Servings: Approximately 4 individual pies if using an 8-biscuit can, with two biscuits per pie
- Difficulty: Easy
- Oven Temperature: 375°F (190°C)
- Cooking Method: Stovetop and oven baking
- Equipment: Standard muffin tin
- Main Ingredients: Refrigerated biscuit dough, apples, brown sugar, cinnamon and caramel sauce
The finished yield depends on the number of biscuits in the can and how large you shape each pie. The supplied method uses one biscuit for the base and another for the lid, so an eight-biscuit package will generally produce four enclosed pies.
The recipe combines two straightforward stages: cooking the cinnamon apple filling and baking the assembled mini pies. Preparing the filling first helps prevent excess moisture from soaking into the biscuit dough.
Why You’ll Love This Recipe
- Convenient ingredients: Refrigerated biscuit dough eliminates the need to prepare pastry from scratch.
- Individual portions: Each pie is easy to serve without slicing a larger dessert.
- Classic apple pie flavour: Cinnamon, nutmeg, brown sugar and butter complement the naturally sweet apples.
- Golden exterior: The egg wash creates an attractive finish while the biscuit dough bakes.
- Rich caramel centre: A little caramel sauce brings a buttery sweetness to the apple filling.
- Beginner-friendly: The recipe requires only basic preparation techniques and everyday kitchen equipment.
- Great for gatherings: Mini pies are practical for dessert platters, family celebrations and seasonal parties.
- Customisable: You can experiment with different apple varieties or optional toppings without changing the basic method.
Ingredients
The following quantities are taken from the original recipe.
For the Biscuit Pie Shells
- 1 can refrigerated biscuit dough
- 1 egg, beaten, for brushing
For the Cinnamon Apple Filling
- 2 medium apples, peeled and finely diced
- ⅓ cup brown sugar
- 1 teaspoon ground cinnamon
- ¼ teaspoon ground nutmeg
- 1 tablespoon butter
- 1 teaspoon vanilla extract
- 1 tablespoon cornflour (cornstarch)
- 2 tablespoons water
For the Caramel Layer
- ½ cup caramel sauce
The caramel sauce is used both inside the pies and as a finishing drizzle. Divide it between the filling and topping according to your preference.
For readers outside the United States, refrigerated American-style biscuit dough is a soft, ready-to-bake raising dough rather than a British biscuit or cookie dough. The exact type matters because it affects how the pies rise and bake.
Ingredient Notes
Refrigerated Biscuit Dough
This is the shortcut ingredient that makes the recipe convenient. The dough should be soft enough to flatten into rounds without tearing. Choose a product suitable for baking and check the package for its recommended handling instructions.
Biscuit dough produces a softer, bread-like pastry texture than traditional shortcrust or puff pastry. That slightly fluffy texture is part of the character of this recipe.
Fresh Apples
Apples provide the main flavour and texture. Firm varieties are especially useful because they soften during cooking without turning completely to purée. Peel the apples and dice them into relatively small, even pieces so they fit neatly inside each biscuit shell.
Brown Sugar
Brown sugar sweetens the filling and adds a subtle molasses-like depth that pairs naturally with caramel. It also helps create a glossy syrup as the apples cook.
Cinnamon
Ground cinnamon delivers the familiar warmth associated with traditional apple desserts. Its flavour becomes particularly fragrant when heated with butter and brown sugar.
Nutmeg
A small amount of nutmeg adds complexity without overwhelming the apples. Because nutmeg has a concentrated flavour, the original quarter-teaspoon measurement is sufficient.
Butter
Butter coats the apple pieces, contributes richness and helps dissolve the brown sugar as the filling cooks. Allow it to melt gently before adding the fruit.
Vanilla Extract
Vanilla rounds out the flavour of the cinnamon apples and complements the caramel sauce. Adding it near the end of cooking helps preserve its aroma.
Cornflour and Water
Cornflour, also called cornstarch in the United States, thickens the juices released by the apples. Mixing it with cold water before adding it to the pan prevents dry lumps from forming.
Caramel Sauce
Caramel sauce provides a rich, sweet centre and an attractive glossy finish. Use a thick sauce intended for dessert toppings so it does not make the filling unnecessarily watery.
Egg Wash
The beaten egg helps produce a shiny, golden surface. Apply a light, even layer rather than allowing excess egg to collect around the edges of the muffin cups.
Equipment You’ll Need
- Standard muffin tin
- Medium frying pan or saucepan
- Wooden spoon or heat-resistant spatula
- Sharp knife
- Chopping board
- Small mixing bowl
- Measuring cups and spoons
- Rolling pin or clean hands for flattening dough
- Pastry brush
- Cooling rack
- Small spoon for filling and caramel
A non-stick muffin tin is helpful, although a standard metal tin also works when lightly greased. Avoid overfilling the cups, as leaking caramel can make the pies difficult to release.
How to Make Caramel Apple Biscuit Pies
Step 1: Preheat the Oven
Preheat your oven to 375°F (190°C). Lightly grease a standard muffin tin, paying particular attention to the base and sides of each cup.
Set out the biscuit dough and other ingredients before beginning. This keeps assembly organised once the apple filling is ready.
Step 2: Prepare the Apples
Peel two medium apples and remove the cores. Cut the flesh into small, evenly sized pieces.
Finely diced apples are important because the pies are relatively small. Large chunks can make the biscuit tops difficult to seal and may leave pockets of air in the filling.
Step 3: Cook the Apples with Butter and Spices
Place a frying pan over medium heat and add one tablespoon of butter. Once melted, add the diced apples, one-third cup of brown sugar, one teaspoon of cinnamon and one-quarter teaspoon of nutmeg.
Stir gently to coat the apples in the buttery sugar mixture. Cook for approximately five minutes, stirring occasionally, until the apples begin to soften and release their juices.
The fruit should become tender around the edges while retaining some structure. There is no need to cook it until completely soft because it will continue heating inside the pies.
Step 4: Thicken the Filling
In a small bowl, mix one tablespoon of cornflour with two tablespoons of water until smooth.
Pour this mixture into the warm apples and stir thoroughly. Continue cooking for another one to two minutes until the liquid thickens and coats the apple pieces.
The filling should look glossy and spoonable rather than watery. Stir in one teaspoon of vanilla extract, then remove the pan from the heat.
Step 5: Shape the Biscuit Bases
Take a piece of refrigerated biscuit dough and flatten it into a small round using your hands or a rolling pin.
Gently press the dough into a prepared muffin cup so it covers the base and extends slightly up the sides. Avoid stretching it so thin that the dough tears.
Repeat with the biscuits needed for the bases, reserving an equal number of biscuits for the tops.
Step 6: Add the Apple Filling
Spoon the warm cinnamon apple mixture into the centre of each biscuit cup.
Distribute the filling evenly, leaving sufficient space around the upper edges to attach the lids. Do not pack the apples too tightly, as this may cause the filling to overflow during baking.
Step 7: Add the Caramel Sauce
Place a small spoonful of caramel sauce over the apple filling in each pie.
The caramel will warm and soften as the pies bake, adding sweetness and a luscious texture to the centre. Reserve the remaining sauce for drizzling over the finished pies.
Step 8: Seal the Biscuit Pies
Flatten another piece of biscuit dough into a round large enough to cover the filling.
Place it over the top and gently pinch the edges of the upper and lower pieces together. Work around the entire circumference so the pie is reasonably well sealed.
Repeat until all the pies are assembled. The tops may look slightly rustic, which is perfectly suitable for this homemade dessert.
Step 9: Brush with Egg
Beat one egg in a small bowl, then brush a thin layer over the tops of the pies.
Cover the visible dough evenly for a golden finish. Keep the egg wash light so it does not collect heavily between the pies and the muffin tin.
Step 10: Bake Until Golden
Place the muffin tin in the preheated oven and bake for 15–20 minutes.
The pies are ready when the biscuit dough has puffed up and the tops are deeply golden brown. Check that the dough around the edges appears properly baked, not wet or raw.
Actual baking time may vary depending on the dough brand, biscuit thickness and oven performance. If the tops brown before the dough is cooked through, loosely cover them with foil and continue baking briefly.
Step 11: Cool and Add Caramel
Remove the muffin tin from the oven and allow the pies to cool for a few minutes.
Carefully loosen the edges with a suitable non-metal utensil if using a non-stick tin. Transfer the pies to a cooling rack or serving plate.
Warm the remaining caramel sauce gently if needed, then spoon or drizzle it over the tops.
Step 12: Serve Warm
Serve while slightly warm so the apple filling is tender and the caramel is soft.
The combination of golden biscuit dough, cinnamon apples and rich caramel makes these mini pies especially appealing as an afternoon treat or comforting dessert.
Choosing the Best Apples for Mini Pies
Choosing the right apples can make a noticeable difference to the finished filling. Because the fruit is cooked in a pan and then baked, a relatively firm apple is usually the best choice.
Granny Smith
Granny Smith apples have a firm texture and a pronounced tart flavour. They provide a pleasant contrast to the brown sugar and caramel, helping the filling taste balanced rather than excessively sweet.
Honeycrisp
Honeycrisp apples offer a crisp bite and naturally sweet flavour. They work particularly well when you want a softer, sweeter apple filling that still retains some texture after cooking.
Braeburn
Braeburn apples combine sweetness with a gentle acidity. Their relatively firm flesh makes them suitable for baking and helps prevent the filling from becoming mushy.
Pink Lady
Pink Lady apples have a bright sweet-tart flavour and good firmness. They complement warm baking spices and contribute a pleasant fruitiness to the caramel filling.
You can also combine two varieties, such as a tart Granny Smith and a sweeter Honeycrisp, for a more layered flavour.
Whatever variety you choose, dice the apples evenly. Aim for pieces small enough to fit comfortably inside the biscuit cups, while leaving enough substance for a satisfying apple texture.
How to Make a Thick, Glossy Apple Filling
The consistency of the filling is one of the most important details in this recipe. If it contains too much free liquid, the biscuit bases may become damp and the caramel can leak during baking.
Begin by cooking the apples with butter, brown sugar and spices until they release some juice. This concentrates their flavour and removes some of the moisture before baking.
Next, make sure the cornflour is fully dissolved in the water. Adding dry cornflour directly to hot apples can produce lumps that are difficult to remove.
Once the slurry is added, allow the mixture to simmer gently for the specified one to two minutes. The juices should thicken visibly and cling to the fruit.
A useful test is to drag a spoon through the filling. The sauce should move slowly and coat the apples rather than immediately pooling like water.
Remove the filling from the heat once it reaches this consistency. It will thicken slightly more as it cools.
Allowing the mixture to cool briefly before assembling the pies is also helpful. Very hot filling can soften the biscuit dough and make it more difficult to shape and seal.
How to Shape and Seal Biscuit Pies
Unlike traditional pie pastry, refrigerated biscuit dough is designed to rise and develop a soft, layered or fluffy texture. For that reason, it needs gentle handling.
Flatten each base evenly so the centre is not excessively thick. At the same time, avoid making the dough paper-thin because it must support the apple and caramel filling.
Press the base into the muffin tin without pulling it too tightly. If it springs back slightly, allow it to relax briefly before adjusting the shape.
When adding filling, leave a narrow rim of dough free from apples and caramel. A clean rim is easier to seal, and it reduces the risk of the lid separating during baking.
Place the top round directly over the filled base and pinch the two layers together. You can make small, gentle crimps around the edges for a more decorative appearance.
Do not worry if every pie looks slightly different. A rustic finish suits this dessert, and the egg wash will help the surfaces develop a consistent golden colour.
For an optional finishing technique, make a tiny steam vent in the top of each pie. This can help release steam from a particularly juicy filling. It is an additional suggestion rather than a step in the original method.
Expert Tips for the Best Caramel Apple Biscuit Pies
- Choose firm apples: They hold their shape better through the two cooking stages.
- Cut small apple pieces: Finely diced fruit fits more evenly into mini pastry shells.
- Keep the heat moderate: Medium heat softens the apples without scorching the sugar.
- Measure the cornflour carefully: Too little may leave a watery filling, while too much can create an overly thick texture.
- Mix the slurry until smooth: This prevents visible lumps in the finished filling.
- Let the filling cool slightly: Warm rather than piping-hot apples are easier to handle during assembly.
- Keep the dough evenly thick: Uneven pastry may produce underbaked areas or fragile bottoms.
- Avoid overfilling: Leave enough space for sealing and dough expansion.
- Keep caramel away from the rim: Sticky sauce between pastry layers can interfere with sealing.
- Use a light egg wash: A thin coating helps achieve an attractive golden surface.
- Check the pies near the end: Biscuit brands and oven temperatures can produce different browning rates.
- Allow brief cooling: This helps the filling settle and makes removing the pies easier.
- Warm caramel gently: Slightly warm sauce is easier to drizzle attractively.
- Serve freshly baked when possible: The biscuit texture is generally at its best shortly after baking.
Common Mistakes to Avoid
1. Using Large Apple Chunks
Large pieces are difficult to fit inside the small biscuit shells and may prevent the tops from sealing properly. Cut the apples into small, even cubes.
2. Leaving the Filling Too Watery
Excess liquid can soften the bases. Make sure the cornflour mixture has thickened the apple juices before assembling the pies.
3. Adding Cornflour Directly to the Pan
Dry cornflour may clump when it meets hot liquid. Always mix it with the measured water first.
4. Overcooking the Apples
Cooking the fruit until completely soft can produce a mushy filling after baking. Stop once the apples have started to soften and the sauce is thick.
5. Stretching the Dough Too Thin
Thin patches may tear or fail to support the filling. Flatten gently and aim for reasonably even thickness.
6. Adding Too Much Caramel Inside
Excess caramel can bubble over and stick to the muffin tin. Use a small spoonful inside and reserve the rest for serving.
7. Failing to Seal the Edges
Poorly sealed tops may lift away during baking. Pinch the pastry layers together around the entire edge.
8. Removing the Pies Immediately
Freshly baked pies are fragile, and the filling will be extremely hot. Allow several minutes of cooling before carefully removing them.
9. Relying Only on Top Colour
Golden tops do not always guarantee the thicker side sections are fully baked. Check that the dough is set around the edges as well.
Optional Caramel Apple Biscuit Pie Variations
The following ideas are optional adaptations and are not part of the original ingredient list.
1. Salted Caramel Apple Pies
Use salted caramel sauce instead of regular caramel for a gentle sweet-and-salty contrast.
2. Apple and Pecan Pies
Add a small amount of finely chopped toasted pecans to the cooled apple filling for extra crunch and a nutty flavour.
3. Maple Apple Biscuit Pies
Replace a portion of the brown sugar with maple syrup for a subtle maple flavour. Adjust the filling thickness if needed because syrup adds extra liquid.
4. Apple and Pear Pies
Replace part of the diced apples with firm diced pear for a fruitier, slightly softer filling.
5. Extra Cinnamon Pies
For a stronger spiced flavour, add a light dusting of cinnamon sugar to the tops before baking.
6. Crunchy Crumble Topping
Instead of a completely enclosed lid, experiment with a suitable oat crumble topping. Baking times may need adjustment.
7. Vanilla Caramel Dessert Pies
Serve the original pies with a small scoop of vanilla ice cream to contrast the warm filling with a cool, creamy topping.
How to Serve Caramel Apple Biscuit Pies
These mini pies are delicious on their own, particularly while still gently warm. The cinnamon apple filling has a comforting aroma, and the caramel sauce provides enough richness to make them a satisfying dessert.
With Vanilla Ice Cream
Serve one warm pie alongside a small scoop of vanilla ice cream. The cool ice cream melts slightly against the pastry and blends with the caramel sauce.
With Whipped Cream
A spoonful of lightly sweetened whipped cream adds a soft, airy contrast to the warm apples and biscuit dough.
With Extra Caramel
For a more indulgent presentation, place the pie on a dessert plate and drizzle a little additional warm caramel over the top.
For Autumn Gatherings
Arrange the pies on a large platter and serve them as individual desserts. Their small size makes them convenient for guests who prefer a portion that does not require slicing.
With Hot Drinks
Fresh coffee, black tea, chai or warm apple cider pairs nicely with the cinnamon and caramel flavours.
If serving children, allow the filling and caramel to cool adequately. Cooked fruit fillings can remain very hot even when the pastry exterior feels comfortable to touch.
Storage, Freezing and Reheating
How to Store Leftovers
Allow the pies to cool, then transfer them to an airtight container. Refrigerate within two hours of baking and keep for up to three to four days.
Place baking parchment between layers if stacking is necessary. This helps prevent caramel-covered surfaces from sticking together.
How to Reheat in the Oven
Preheat the oven to approximately 325°F (160°C). Place the pies on a baking tray and warm for around 8–12 minutes, or until heated thoroughly.
Cover loosely with foil if the tops begin to brown too much. Oven reheating generally produces a better biscuit texture than microwaving.
How to Reheat in the Microwave
Place an individual pie on a microwave-safe plate and heat in short intervals until hot throughout.
Microwave reheating is convenient, but it may make the biscuit dough softer. Always check the filling temperature before eating.
Can You Freeze Them?
Yes. The baked pies can be frozen once completely cooled. Wrap individually and place in a freezer-safe container for up to two to three months for best quality.
Thaw overnight in the refrigerator before reheating in the oven. The texture may be softer than freshly baked pies.
Making the Filling Ahead
The cinnamon apple filling can be prepared in advance and refrigerated in a covered container for up to two days.
Allow it to cool before refrigeration. When ready to bake, assemble the pies with fresh biscuit dough and follow the original baking method.
Best Make-Ahead Strategy
For the best balance of convenience and texture, prepare the filling ahead and assemble the biscuit pies shortly before baking. This helps prevent the uncooked dough from absorbing excess moisture.
Frequently Asked Questions
1. Can I use canned biscuits for apple pies?
Yes. Refrigerated canned biscuit dough is the main shortcut ingredient in this recipe. It creates a soft, golden shell around the apple filling.
2. Do I need to cook the apples before baking?
Yes, according to this method. Cooking the apples first softens the fruit and allows the juices to thicken before they are enclosed in biscuit dough.
3. Which apples are best for caramel apple pies?
Firm varieties such as Granny Smith, Honeycrisp, Braeburn and Pink Lady are suitable choices.
4. Can I leave the apple skins on?
You can, but the original recipe calls for peeled apples. Removing the skins gives the filling a softer, more consistent texture.
5. Can I make these pies without caramel?
Yes, as an optional variation. The cinnamon apple filling is tasty by itself, although the result will no longer have the same caramel flavour.
6. How many pies does one can of biscuit dough make?
It depends on the number of biscuits in the can. Because the original method uses two biscuits per pie, an eight-biscuit can makes approximately four pies.
7. Can I make more pies for a party?
Yes. Double or triple the recipe quantities as needed and use additional muffin tins. Keep the filling proportions consistent for reliable results.
8. Can I use homemade biscuit dough?
Yes, provided it is a suitable soft, oven-bakeable biscuit dough. Its baking behaviour may differ from refrigerated canned dough, so timing may need adjustment.
9. Can I use puff pastry instead?
Puff pastry can be used for a different version, but it will produce a crisp, flaky result rather than the softer texture of biscuit dough.
10. Why are my pie bottoms soggy?
The filling may have contained excess liquid, or the pies may have been overfilled. Thicken the apple juices properly and avoid adding too much caramel.
11. Why did my pies open during baking?
The dough may not have been sealed firmly enough, or the filling may have expanded and pushed against the lid. Leave space at the edges and pinch the dough together carefully.
12. Can I use store-bought caramel sauce?
Absolutely. A ready-made dessert caramel sauce works well and keeps preparation convenient.
13. Can I use salted caramel sauce?
Yes. Salted caramel is a delicious optional substitution and provides a pleasant contrast to the sweet apples.
14. Do I need to grease the muffin tin?
Yes. Light greasing makes removing the baked pies easier, especially if a little caramel escapes during baking.
15. Can I use a mini muffin tin?
Yes, but the biscuit pieces and filling portions must be reduced. The baking time will also need careful adjustment.
16. How do I know when the pies are fully baked?
The tops should be puffed and deeply golden, while the surrounding biscuit dough should be cooked through rather than wet or doughy.
17. Can I prepare the pies the night before?
It is better to prepare the apple filling ahead and assemble the pies just before baking. Fully assembled uncooked pies may become damp during prolonged refrigeration.
18. Can I serve them cold?
Yes. Once properly refrigerated, they can be served chilled, although warming them briefly gives the caramel a softer texture.
19. Can I freeze leftover caramel apple biscuit pies?
Yes. Freeze the cooled pies individually wrapped, and use within two to three months for the best texture.
20. Can I reduce the sweetness?
For an optional adjustment, use a more tart apple variety or reduce the caramel topping. Changing the brown sugar quantity will alter the original filling flavour.
21. What can I serve with these mini apple pies?
Vanilla ice cream, whipped cream, coffee, tea and warm cider are all good accompaniments.
22. Why is my caramel leaking out?
Too much caramel inside the pies, overfilling or incomplete sealing can cause leakage. Use a small spoonful inside and save the remaining sauce for drizzling.
23. Can children help make this recipe?
Children can help flatten dough, assemble cooled filling and brush the tops under adult supervision. Adults should handle hot pans, ovens and freshly cooked caramel.
Caramel Apple Biscuit Pies Recipe Card
Description: Easy individual biscuit pies filled with tender cinnamon apples and rich caramel sauce, baked until golden and finished with a sweet caramel drizzle.
- Course: Dessert
- Style: American-inspired
- Method: Stovetop and oven
- Prep Time: 15–20 minutes (estimated)
- Filling Cook Time: 6–7 minutes
- Oven Time: 15–20 minutes
- Total Time: Approximately 40–50 minutes, including brief cooling
- Yield: Approximately 4 pies from an eight-biscuit can
- Difficulty: Easy
- Oven Temperature: 375°F (190°C)
Ingredients
- 1 can refrigerated biscuit dough
- 2 medium apples, peeled and finely diced
- ⅓ cup brown sugar
- 1 teaspoon ground cinnamon
- ¼ teaspoon ground nutmeg
- 1 tablespoon butter
- 1 teaspoon vanilla extract
- 1 tablespoon cornflour (cornstarch)
- 2 tablespoons water
- ½ cup caramel sauce
- 1 egg, beaten, for brushing
Instructions
- Preheat the oven to 375°F (190°C) and lightly grease a muffin tin.
- Melt the butter in a frying pan over medium heat. Add the diced apples, brown sugar, cinnamon and nutmeg.
- Cook for approximately five minutes until the apples begin to soften.
- Mix the cornflour with the water, then stir it into the apples. Cook for another one to two minutes until thick and glossy. Stir in the vanilla extract.
- Flatten each biscuit into a small round. Press one piece into each muffin cup, allowing the dough to extend slightly up the sides.
- Spoon the warm apple filling into the centre of each biscuit cup.
- Add a small spoonful of caramel sauce over the apple filling.
- Flatten another piece of biscuit dough and place it on top. Gently pinch the edges to seal.
- Brush the tops with beaten egg.
- Bake for 15–20 minutes until puffed and deeply golden brown, checking that the dough is cooked through.
- Allow the pies to cool for a few minutes, then spoon or drizzle the remaining warm caramel sauce over the tops.
- Serve warm while the biscuit exterior is golden, the apple filling is soft and the caramel is rich and glossy.
Recipe Notes
- Use firm apples for the best filling texture.
- Dice the fruit finely so it fits inside the biscuit cups.
- Allow the filling to thicken before assembling.
- Use two biscuit pieces per enclosed pie: one for the base and one for the top.
- Avoid adding too much caramel inside the pies.
- Let the pies cool briefly before removing them from the tin.
- Refrigerate leftovers promptly and consume within three to four days.
Recipe Hashtags
#CaramelApplePies #AppleDesserts #BiscuitPies #EasyBakingRecipes #HomemadeDesserts