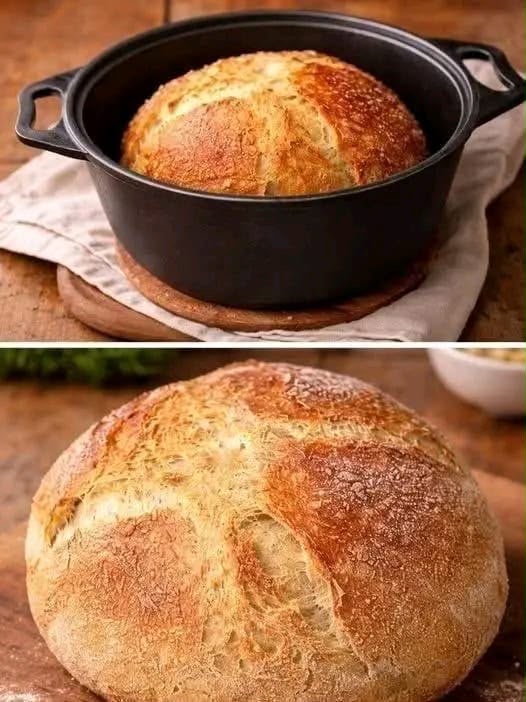
Easy Dutch Oven Bread
There is something wonderfully comforting about pulling a fresh loaf of homemade bread from the oven. The golden crust, warm aroma and soft interior make even a simple meal feel special. This easy Dutch oven bread brings those bakery-style qualities into your own kitchen without requiring a bread machine or complicated equipment.
The beauty of this recipe lies in its simplicity. With flour, yeast, salt, warm water and a little sugar or honey, you can create an impressive round loaf with a crisp outer crust and a tender, airy centre. An optional spoonful of olive oil adds a subtle richness.
A Dutch oven makes this bread especially satisfying. Its heavy walls retain heat, while the lid traps moisture released by the dough during the early stages of baking. This creates a steamy environment that allows the loaf to expand before its crust becomes firm.
You do not need advanced bread-making experience to succeed. The dough comes together with a spoon, rises at room temperature and requires only gentle shaping before baking. There is no lengthy kneading process or complicated folding schedule.
This rustic homemade loaf is ideal for breakfast toast, comforting bowls of soup, sandwiches or serving alongside a family dinner. It also makes a lovely centrepiece for a weekend brunch, especially when presented whole and sliced at the table.
Whether you are baking bread for the first time or simply want an uncomplicated recipe to return to, this easy Dutch oven bread delivers classic homemade flavour with remarkably little hands-on work.
Recipe Overview
- Recipe Name: Easy Dutch Oven Bread
- Category: Bread and Baking
- Style: Rustic Homemade Artisan Bread
- Preparation Time: Approximately 10–15 minutes
- First Rise: 1½–2 hours
- Second Rest: 30 minutes
- Dutch Oven Preheating: Approximately 30 minutes, during the second rest
- Baking Time: 40–45 minutes
- Estimated Total Time: 2 hours 50 minutes to 3 hours 30 minutes, excluding cooling
- Yield: 1 round loaf
- Oven Temperature: 450°F (230°C)
- Difficulty: Easy
- Cooking Method: Covered and uncovered oven baking
- Main Equipment: Oven-safe Dutch oven with lid
- Main Ingredients: Flour, yeast, water, salt and sugar or honey
The approximate total time includes the dough rising, resting and baking. Allow additional time for the loaf to cool before slicing. Actual proofing time may vary according to room temperature and yeast activity.
Why You’ll Love This Recipe
- Simple everyday ingredients: The basic loaf uses familiar kitchen staples rather than speciality bread-making products.
- No extensive kneading: A spoon is enough to bring the dough together, making the recipe suitable for beginners.
- Golden rustic crust: Baking in a covered Dutch oven produces the steamy environment needed for an attractive, crisp exterior.
- Soft homemade centre: The water-rich dough can produce a tender crumb with irregular air pockets when properly risen and baked.
- Minimal hands-on preparation: Most of the recipe involves allowing the dough to rest and rise.
- Versatile serving options: Enjoy the loaf with butter, soups, salads, cheese or your favourite sandwich fillings.
- Beautiful presentation: The naturally rounded shape and scored crust make the finished loaf look impressive without elaborate decoration.
- Easy to personalise: Once you understand the basic method, you can experiment with optional herbs, cheese or different flours.
Ingredients
This bread uses a short ingredient list. For the most consistent results, measure carefully and use fresh yeast.
- 3 cups all-purpose flour (approximately 375 g plain flour)
- 1½ teaspoons salt
- 1 teaspoon instant yeast
- 1½ cups warm water (approximately 355 ml)
- 1 teaspoon sugar or honey
- 1 tablespoon olive oil, optional
- Extra flour, for dusting
Measurement note: The metric flour measurement is approximate because the weight of one cup varies depending on how the flour is filled and levelled. For repeatable results, use a kitchen scale whenever possible.
Ingredient Notes
All-Purpose Flour
All-purpose flour, known as plain flour in the UK, forms the structure of the bread. As it absorbs water and is mixed, proteins develop into gluten, helping the dough stretch and trap gas during fermentation.
Plain flour works well for this recipe, although its protein content varies between brands. Strong white bread flour is an optional substitution if you prefer a slightly chewier loaf with a potentially stronger structure. It may absorb water differently, so judge the dough by its consistency rather than adding large amounts of extra flour.
Instant Yeast
Instant yeast helps the dough rise by producing carbon dioxide as it ferments the available sugars. It can be mixed directly into the flour, which simplifies preparation.
Check the expiry date and store opened yeast according to the packaging instructions. Old or poorly stored yeast may cause disappointing results, even when the other ingredients are measured correctly.
Salt
Salt gives the bread flavour and helps regulate fermentation. Without it, the loaf can taste flat and the dough may behave differently during rising.
Distribute the salt evenly through the dry ingredients before adding the water. This helps prevent concentrated areas of seasoning.
Warm Water
Water hydrates the flour, allows gluten to form and activates the yeast during fermentation. This recipe produces a relatively sticky dough, which is normal for this style of bread.
Use comfortably warm water rather than hot water. Excessive heat can damage the yeast and prevent proper rising.
Sugar or Honey
A teaspoon of sugar or honey provides a little sweetness and contributes to the overall fermentation and flavour profile. The quantity is small, so the finished bread is not intended to taste like sweet bread.
Choose whichever ingredient you prefer. Honey may add a subtle background flavour, while sugar keeps the taste straightforward.
Olive Oil
The tablespoon of olive oil is entirely optional. It can provide a slightly softer eating texture and a gentle richness.
For a very simple rustic loaf, leave it out. The bread can still develop a crisp crust and appealing interior without added oil.
Extra Flour
A little flour prevents sticking during shaping. Use it sparingly because incorporating too much additional flour can make the dough stiffer and reduce the openness of the crumb.
Equipment You’ll Need
- A large mixing bowl
- A sturdy mixing spoon or dough spatula
- Measuring cups and spoons
- A kitchen scale, optional but recommended
- A clean kitchen towel or suitable bowl covering
- A clean, lightly floured work surface
- Oven-safe baking parchment suitable for the baking temperature
- A heavy Dutch oven with a properly fitting lid
- Heat-resistant oven gloves
- A sharp knife or bread lame for scoring
- A wire cooling rack
- A serrated bread knife
Important: Check that the Dutch oven, its lid and all handles are rated for 450°F (230°C). Some lids have knobs with lower temperature limits. Also check the temperature rating of your baking parchment before using it in the hot pot.
Step-by-Step Instructions
Step 1: Mix the Dry Ingredients
Place the 3 cups of all-purpose flour in a large mixing bowl. Add the salt, instant yeast and sugar. If using honey instead of sugar, reserve it for the wet ingredients.
Stir thoroughly so the yeast and salt are evenly distributed. This quick step helps promote consistent fermentation throughout the dough.
Step 2: Add the Warm Water
Pour the 1½ cups of warm water into the bowl. If using honey, stir it into the water before combining it with the dry ingredients.
Mix with a spoon until the flour is hydrated and a sticky, shaggy dough forms. Scrape the sides and bottom of the bowl to incorporate any remaining dry flour.
Step 3: Add Optional Olive Oil
If you are including olive oil, add the tablespoon now and stir until incorporated.
The dough will look softer and stickier than a traditional kneaded sandwich bread dough. Resist the temptation to add more flour simply because it sticks to the spoon.
Step 4: Allow the First Rise
Cover the mixing bowl and leave it at room temperature for approximately 1½–2 hours, or until the dough has roughly doubled in size.
During this time, the yeast produces gas and the dough becomes lighter and more aerated. You may notice small bubbles and an uneven surface.
In a cool kitchen, the dough may take longer. Rather than relying only on the clock, look for visible expansion and a puffy appearance.
Step 5: Shape the Dough Gently
Lightly dust your hands and work surface with flour. Transfer the risen dough onto the floured surface.
Gently draw its outer edges towards the centre, creating a round shape. Turn the dough so the smoother side faces upwards and lightly tuck the edges underneath.
Avoid vigorous kneading at this stage. The aim is to create a rounded loaf while preserving some of the air developed during the first rise.
Step 6: Rest on Baking Parchment
Place the shaped dough onto a piece of suitable baking parchment. Allow it to rest for another 30 minutes.
During this second rest, the dough should become slightly puffier. It does not necessarily need to double again.
Step 7: Preheat the Dutch Oven
While the shaped dough rests, place the Dutch oven and its lid inside the oven.
Preheat the oven to 450°F (230°C) for approximately 30 minutes, allowing the pot to become thoroughly heated.
The hot pot helps the dough begin baking rapidly when it is placed inside. Always use suitable oven gloves when handling the Dutch oven.
Step 8: Transfer the Dough
Carefully remove the hot Dutch oven from the oven and place it on a heat-resistant surface.
Remove the lid, then lift the dough using the baking parchment and lower it gently into the pot.
Keep your hands and arms away from the hot sides. Do not attempt to reposition the dough by touching the heated metal.
Step 9: Score the Bread
Using a sharp knife or bread lame, make a deliberate slash across the surface of the dough.
Scoring creates a controlled place for the loaf to expand while baking. A single confident cut is sufficient for this rustic bread.
For easier handling, you can score the dough immediately before transferring it into the hot pot. Either approach works, provided you keep your hands clear of the hot metal.
Step 10: Bake With the Lid On
Cover the Dutch oven with its lid and carefully return it to the preheated oven.
Bake for 30 minutes at 450°F (230°C).
During this stage, the covered pot traps moisture released by the dough. The steam delays the formation of a firm crust, giving the bread an opportunity to expand.
Step 11: Finish Baking Without the Lid
After 30 minutes, carefully remove the lid and continue baking for another 10–15 minutes.
The exposed loaf should gradually develop a deeper golden-brown colour and a firmer, crispier crust.
The bread is ready when the crust is well browned and the centre is fully baked. For an additional check, a probe thermometer inserted into the centre will generally read around 93–96°C (200–205°F) for a lean loaf of this style.
Step 12: Cool Before Slicing
Remove the loaf from the Dutch oven and transfer it to a wire cooling rack.
Allow it to cool before cutting. Ideally, give the loaf at least 45–60 minutes to allow the interior structure to settle.
Slicing too early can compress the crumb and leave the centre appearing gummy, even when the loaf has baked properly.
Step 13: Slice and Serve
Once the loaf has cooled sufficiently, use a serrated bread knife to cut even slices.
Enjoy the bread plain, toasted or with your favourite accompaniments. The crisp crust and soft centre make it especially enjoyable with butter or a warm bowl of soup.
Understanding the Dough
One of the most common concerns for beginner bread bakers is whether the dough feels too wet. This recipe contains a generous amount of water relative to its flour, so a sticky texture is expected.
When first mixed, the dough may look rough, uneven and slightly loose. It does not need to resemble a smooth, kneaded dough ball immediately.
As it rests, the flour absorbs moisture more evenly, and the dough’s structure develops. Yeast fermentation also produces the small gas bubbles responsible for a lighter crumb.
What Properly Risen Dough Looks Like
After the first rise, the dough should appear noticeably larger and puffier, with visible bubbles near the surface or sides of the bowl.
A dough that has barely expanded probably needs more time, especially in a cool room. A dough that has risen dramatically and then collapsed may have fermented for too long.
How to Handle Sticky Dough
Use lightly floured hands and a dusted worktop. A dough scraper can also make shaping easier, although it is not essential.
Work gently and confidently rather than repeatedly adding flour. Excess flour can change the intended texture and make the finished bread unnecessarily dense.
How the Dutch Oven Creates a Crispy Crust
A Dutch oven is particularly useful for baking rustic bread because it creates a small, enclosed baking environment inside an ordinary household oven.
When the dough enters the hot pot, moisture begins escaping from its surface. With the lid in place, much of that moisture remains inside, surrounding the bread with steam.
This moisture keeps the outer surface flexible during the early part of baking. As a result, the loaf can continue expanding before the crust sets.
Why Preheating Matters
A fully preheated Dutch oven provides strong initial heat around the dough. This contributes to oven spring, the noticeable expansion that happens during the first part of baking.
Preheating also helps the base and sides of the loaf begin setting promptly, supporting a more rounded finished shape.
Why the Lid Is Removed
After the initial 30 minutes, removing the lid allows moisture to escape from the pot.
The bread’s surface can then dry more effectively and develop the deeper golden colour associated with rustic crusty bread.
The final uncovered baking period is especially important if you enjoy a firm exterior with a pleasant crunch.
Choosing the Right Dutch Oven
A round cast-iron Dutch oven is ideal because its shape suits a round loaf and its heavy construction retains heat.
A capacity of approximately 4–6 quarts is a practical option for many homemade bread recipes, although the best size depends on the loaf’s shape and expansion.
Always confirm the manufacturer’s maximum safe oven temperature before baking.
Shaping and Scoring the Loaf
Shaping is not simply about appearance. It helps create surface tension, which can encourage the dough to hold its round shape as it expands in the oven.
After the first rise, gently bring the outer edges towards the centre. Turn the dough over and tuck the edges underneath until it resembles a rough ball.
Do not squeeze the dough aggressively. Keeping some of the trapped gas helps preserve the lighter structure developed during fermentation.
Creating a Rustic Round Loaf
The dough does not need to be perfectly symmetrical. Slight irregularities add to the charm of handmade bread.
Focus on creating a smooth upper surface without incorporating excessive additional flour.
Scoring for Controlled Expansion
A shallow slash may close as the dough expands, while an excessively deep cut can weaken the shape. A cut around 6–12 mm deep is a reasonable starting point.
Use a sharp blade and a decisive movement. A simple cross or single slash gives the finished bread an attractive rustic appearance.
Preventing a Flat Loaf
If the dough spreads excessively during shaping, it may be too weak, too wet for the particular flour or overproofed.
Gentle shaping, appropriate fermentation and a thoroughly heated Dutch oven all help support better oven spring.
Expert Baking Tips
- Measure flour carefully. Scooping directly into a measuring cup can compress the flour and lead to inconsistent quantities.
- Use fresh instant yeast. Properly stored, active yeast gives the dough a more reliable rise.
- Avoid very hot water. Use comfortably warm water so the yeast is not damaged.
- Mix thoroughly. Scrape the bowl to eliminate dry flour pockets before beginning the first rise.
- Accept a sticky dough. This recipe is intended to be relatively soft rather than firm and dry.
- Allow adequate rising time. A cold kitchen may require longer than the suggested 1½–2 hours.
- Shape gently. Handle the risen dough only as much as necessary to create a rounded loaf.
- Use flour sparingly. Flour your work surface lightly rather than incorporating large additional quantities.
- Preheat the Dutch oven fully. A properly heated pot supports the initial expansion of the bread.
- Check parchment temperature limits. Not every brand is designed for baking at 230°C.
- Score confidently. A clean slash allows controlled expansion and improves the finished appearance.
- Keep the lid on initially. Opening the pot prematurely releases the steam that helps form the crust.
- Watch the final browning. Ovens vary, so judge the last few minutes by the loaf’s appearance.
- Cool on a rack. Air circulation beneath the bread reduces trapped moisture and helps maintain the crust.
Common Mistakes to Avoid
1. Adding Too Much Flour
The sticky dough can appear unusual if you are accustomed to firm sandwich bread dough. Adding too much extra flour changes the balance of the recipe and may produce a dense loaf.
2. Using Water That Is Too Hot
Very hot water can damage yeast. Choose water that feels comfortably warm rather than scalding.
3. Not Allowing Enough Rising Time
When the kitchen is cool, the dough may need additional time to double. Baking under-risen dough often results in reduced volume and a tighter crumb.
4. Letting the Dough Overproof
Leaving the dough to ferment well beyond its ideal point may weaken its structure. Watch for a dough that is expanded and airy rather than one that has risen and collapsed.
5. Kneading Aggressively After Rising
The original recipe requires gentle shaping, not another full kneading session. Rough handling can remove much of the gas produced during fermentation.
6. Skipping the Dutch Oven Preheat
Putting the dough into a cold pot changes the baking conditions and may reduce the rapid initial expansion expected from the recipe.
7. Removing the Lid Too Early
The lid traps steam, helping the loaf expand before the crust becomes rigid. Keep it on for the full initial 30-minute baking period.
8. Taking the Bread Out Too Soon
A light golden surface does not always mean the interior is completely baked. Look for a well-developed crust and confirm the centre is cooked if uncertain.
9. Slicing While Very Hot
Freshly baked bread continues to set as it cools. Cutting immediately can make the interior seem sticky or compressed.
Optional Variations
The original bread is delicious as written. The following ideas are optional adaptations and are not part of the supplied base recipe.
1. Rosemary Dutch Oven Bread
Add approximately 1 tablespoon of finely chopped fresh rosemary to the dry ingredients for a fragrant herb loaf that pairs beautifully with roasted vegetables and soups.
2. Garlic and Herb Bread
Mix ½ teaspoon garlic powder and 1 teaspoon dried Italian herbs into the flour before adding the water.
3. Cheddar Cheese Bread
Fold approximately ¾ cup grated mature cheddar into the dough during gentle shaping. Distribute the cheese evenly without aggressively pressing the dough.
4. Wholemeal Bread
As an experiment, replace ½ cup of the plain flour with wholemeal flour. Wholemeal flour absorbs moisture differently and can produce a denser loaf, so additional testing may be needed.
5. Seeded Rustic Loaf
Add 2 tablespoons of mixed sunflower, sesame or pumpkin seeds to the dough for additional texture.
6. Olive Bread
Fold in approximately ½ cup of thoroughly drained and chopped olives during shaping. Pat them dry first to avoid adding excessive moisture.
7. Cracked Black Pepper Bread
Add approximately ½ teaspoon freshly cracked black pepper to the dry ingredients for a mildly savoury loaf suitable for cheese boards.
Each variation may influence dough consistency, rising behaviour or final baking performance. Keep the original recipe as your reference when experimenting.
Serving Suggestions
Fresh Dutch oven bread is wonderfully versatile. Its hearty crust and tender centre make it suitable for both simple snacks and substantial meals.
Serve With Butter
Spread slices with softened salted butter. The butter melts slightly into the tender crumb and complements the crisp exterior.
Pair With Homemade Soup
Serve thick slices alongside tomato soup, vegetable soup, lentil soup or creamy mushroom soup. The bread is excellent for dipping and soaking up the last spoonfuls.
Make Breakfast Toast
Toast slices until lightly crisp and serve with butter, jam, honey or scrambled eggs.
Enjoy With Olive Oil
Offer slices with a small bowl of extra virgin olive oil and a little black pepper for a simple appetiser.
Build Rustic Sandwiches
Slice the bread and fill it with cheese, roasted vegetables, cooked chicken or your favourite sandwich ingredients.
Serve With Stews
The sturdy crust makes this loaf especially suitable for hearty beef stew, bean stew or slow-cooked vegetable dishes.
Create a Bread Board
Arrange slices with cheeses, olives, fresh tomatoes and other appetisers for an informal sharing platter.
Storage and Reheating
Storing at Room Temperature
Allow the loaf to cool completely before storing. For the best eating quality, keep it in a bread box or loosely wrapped in a clean cloth at cool room temperature and enjoy it within approximately 1–2 days.
Avoid sealing warm bread in plastic, as trapped condensation can quickly soften the crust.
Refrigeration
Refrigeration is generally not recommended for ordinary crusty bread because it can accelerate staling and make the crumb feel firm.
If your kitchen is exceptionally warm or humid, consider freezing the bread in portions rather than keeping it for extended periods at room temperature.
Freezing
For longer storage, cool the bread fully, then slice it or leave it whole. Wrap securely and place it in a freezer-safe bag or container.
For the best flavour and texture, aim to use frozen bread within approximately 2–3 months.
Reheating a Whole Loaf
Place thawed bread in a preheated oven at approximately 180°C (350°F) for 8–12 minutes, or until warmed and the crust becomes crisp again. The exact time depends on loaf size.
Reheating Individual Slices
Toast individual slices directly from frozen or after thawing. This is a convenient way to enjoy homemade bread throughout the week.
Making the Bread Ahead
For reliable results, follow the original rising schedule when preparing the dough. If you wish to use an overnight refrigerated rise, treat that as a separate variation requiring adjustments to fermentation timing.
Discard bread showing mould or signs of spoilage. Never attempt to make mouldy bread safe by simply trimming away the affected section.
Frequently Asked Questions
1. Can beginners make Dutch oven bread?
Yes. This recipe is particularly beginner-friendly because the dough requires simple mixing, time to rise and gentle shaping rather than extensive kneading.
2. Do I need a bread machine?
No. A mixing bowl, spoon, oven and suitable Dutch oven are enough to make this loaf.
3. Why is my bread dough sticky?
The recipe contains a generous amount of water, creating a softer dough. Stickiness is normal, provided the dough has enough structure to be shaped after rising.
4. Can I use bread flour instead of plain flour?
Yes. Strong white bread flour is a reasonable substitute, although its higher protein content may change water absorption and make the finished bread slightly chewier.
5. Can I leave out the olive oil?
Absolutely. The original recipe identifies olive oil as optional. The bread can be made without it.
6. Can I use honey instead of sugar?
Yes. Use the original quantity of 1 teaspoon honey in place of the sugar.
7. How warm should the water be?
It should feel comfortably warm, not hot. Water around 35–40°C is a useful general guide, although instant yeast can also work with cooler water.
8. Can I use active dry yeast?
Active dry yeast may work as a substitution, but its preparation and fermentation performance can differ. Follow the manufacturer’s instructions and allow extra rising time if needed.
9. How long should the dough rise?
The original recipe specifies approximately 1½–2 hours for the first rise, followed by a 30-minute rest after shaping.
10. What if my dough has not doubled after two hours?
Give it more time in a comfortably warm room. Cool conditions or older yeast can slow fermentation considerably.
11. Why did my bread turn out dense?
Possible causes include insufficient rising, inactive yeast, excess flour or overhandling after the first rise.
12. Why did the loaf spread instead of rising upwards?
The dough may have been overproofed, too weak or insufficiently shaped. Check the flour measurement and use gentle shaping to create surface tension.
13. Why must the Dutch oven be preheated?
A thoroughly heated pot supplies strong initial heat, encouraging oven spring and helping the crust develop properly.
14. Do I have to use parchment paper?
The original method uses parchment to simplify transferring the sticky dough into the hot pot. Use only parchment rated for the required temperature, or follow a suitable alternative recommended for your cookware.
15. Why should I score the bread?
Scoring creates a controlled opening so the loaf can expand during baking instead of tearing randomly across its surface.
16. Why is the bread baked with the lid on first?
The lid traps moisture, allowing the bread’s exterior to remain flexible during early expansion and helping create a rustic crust.
17. Why remove the lid for the final 10–15 minutes?
Removing the lid allows more moisture to escape, encouraging browning and a crisper outer crust.
18. Can I make this bread without a Dutch oven?
Other bread-baking methods are possible, but the cooking environment changes. A different vessel or baking method may require adjustments and will not necessarily produce the same crust.
19. How do I know when the bread is fully baked?
Look for a deeply golden crust and a fully set interior. An internal temperature of approximately 93–96°C is a helpful additional check.
20. Why is the middle of my bread gummy?
It may have been underbaked, sliced too early or made with too much moisture for the flour used. Allow proper baking and cooling time.
21. How long should I wait before slicing?
Ideally, allow at least 45–60 minutes of cooling on a wire rack. This gives the crumb time to set.
22. Can I freeze Dutch oven bread?
Yes. Cool it completely, wrap it securely and freeze it whole or in slices for convenient future use.
23. Can I add herbs or cheese?
Yes. Optional ingredients such as rosemary, garlic powder or grated cheddar can create different flavours, although they may influence the dough and baking results.
24. How can I make the crust crispy again?
Warm the loaf briefly in the oven or toast individual slices. Dry oven heat can restore some of the crispness lost during storage.
25. What meals go well with this bread?
It pairs beautifully with homemade soups, hearty stews, breakfast eggs, salads, cheese and simple sandwiches.
Complete Recipe Card
Easy Dutch Oven Bread
Description: A simple rustic homemade loaf with a beautifully golden, crisp crust and a soft, airy centre. Made with everyday ingredients and baked in a covered Dutch oven.
- Category: Bread
- Method: Dutch oven baking
- Preparation: Approximately 10–15 minutes
- First Rise: 1½–2 hours
- Second Rest: 30 minutes
- Baking: 40–45 minutes
- Total Time: Approximately 2 hours 50 minutes to 3 hours 30 minutes, plus cooling
- Yield: 1 round loaf
- Oven: 450°F (230°C)
- Difficulty: Easy
Ingredients
- 3 cups all-purpose flour
- 1½ teaspoons salt
- 1 teaspoon instant yeast
- 1½ cups warm water
- 1 teaspoon sugar or honey
- 1 tablespoon olive oil, optional
- Extra flour, for dusting
How to Make
- In a large bowl, mix the flour, salt, instant yeast and sugar.
- Pour in the warm water and stir until a sticky dough forms. Add the olive oil if using. If using honey instead of sugar, stir it into the water before adding.
- Cover the bowl and let the dough rise at room temperature for about 1½–2 hours, until doubled in size.
- Lightly flour your hands and work surface. Gently shape the dough into a round ball without over-kneading it.
- Place the dough on parchment paper and let it rest for another 30 minutes.
- While the dough rests, place a Dutch oven with its lid inside the oven and preheat to 450°F (230°C) for about 30 minutes.
- Carefully remove the hot Dutch oven. Lift the dough with the parchment paper and place it inside.
- Score the top of the dough with a sharp knife.
- Cover and bake for 30 minutes.
- Remove the lid and bake for another 10–15 minutes, until the bread is deeply golden brown and crisp.
- Remove the loaf from the Dutch oven and let it cool on a wire rack before slicing.
- Serve once sufficiently cooled for a crisp crust and soft, airy centre.
Recipe Notes
- The dough should feel sticky rather than dry.
- Use warm water, not very hot water.
- Allow the dough to rise until visibly doubled, even if your kitchen is cooler than expected.
- Handle the risen dough gently to preserve its airy structure.
- Check that your Dutch oven, lid and parchment are safe for the baking temperature.
- Leave the lid on for the first 30 minutes to retain steam.
- Allow adequate cooling time before slicing for the best crumb texture.
- Freeze leftover slices if you will not finish the loaf within a couple of days.
Hashtags: #DutchOvenBread #HomemadeBread #EasyBreadRecipe #CrustyBread #BreadBaking