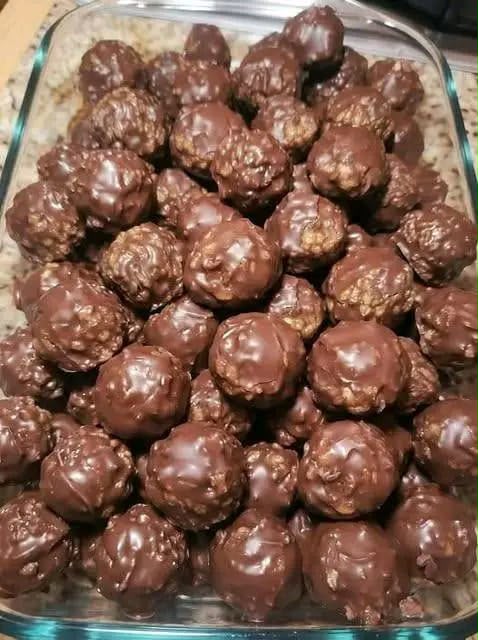
Chocolate Peanut Butter Crunch Balls
Chocolate peanut butter crunch balls are the perfect little treat when you want something rich, sweet and satisfyingly crunchy without switching on the oven. Each bite combines a creamy peanut butter centre, crispy rice cereal and a smooth chocolate coating that sets into a delicious shell.
These homemade chocolate bites are wonderfully simple to prepare. You only need seven everyday ingredients, a mixing bowl and a little patience while the mixture chills. There is no baking, no complicated equipment and no difficult confectionery technique involved.
The combination of chocolate and peanut butter is a familiar favourite, but adding crispy rice cereal makes these treats especially enjoyable. The cereal creates a delicate crunch that contrasts beautifully with the softer peanut butter mixture and the chocolate exterior.
They are a lovely choice for Christmas sweet trays, birthday celebrations, family gatherings, afternoon treats or edible homemade gifts. Their small size makes them easy to serve, and they look particularly tempting piled into a glass dish.
Another advantage is that they can be prepared ahead of time. Once the chocolate has set, you can keep the finished balls chilled until you are ready to serve them. This makes them especially convenient when preparing several desserts for a celebration.
If you love easy no-bake desserts with familiar ingredients and plenty of chocolate flavour, these chocolate peanut butter crunch balls deserve a place in your recipe collection.
Recipe Overview
- Recipe: Chocolate Peanut Butter Crunch Balls
- Category: Dessert, sweets and no-bake treats
- Style: American-inspired homemade chocolate treats
- Preparation Time: Approximately 20 minutes
- Cooking Time: No baking required
- First Chilling Time: 20–30 minutes
- Final Chilling Time: 20–30 minutes
- Total Time: Approximately 60–80 minutes
- Yield: Approximately 20–24 balls, depending on size
- Difficulty: Easy
- Method: Mixing, rolling, chilling and chocolate dipping
- Main Ingredients: Peanut butter, crispy rice cereal, powdered sugar and chocolate
This is a completely no-bake recipe. The only heat needed is for gently melting the chocolate coating. Most of the preparation involves mixing the filling, shaping it into balls and allowing each layer to firm up in the refrigerator.
Why You’ll Love This Recipe
- No oven needed: Ideal for warm days or when oven space is limited.
- Just seven ingredients: Everything is easy to find in most supermarkets.
- Wonderful texture: Creamy peanut butter, crunchy cereal and smooth chocolate create a satisfying combination.
- Beginner-friendly: No specialist baking skills are required.
- Make-ahead convenience: Prepare a batch before parties or special occasions.
- Great for sharing: Their bite-sized shape makes them perfect for dessert platters.
- Easy to customise: Different chocolate types and optional toppings offer plenty of possibilities.
- Homemade gift idea: Once thoroughly chilled and packed appropriately, these make lovely treats for friends and family.
Ingredients
The original recipe uses seven simple ingredients to create a rich peanut butter filling and a smooth chocolate coating.
For the Peanut Butter Crunch Filling
- 1 cup creamy peanut butter
- ½ cup powdered sugar (icing sugar)
- 2 tablespoons softened butter
- 1 teaspoon vanilla extract
- 1½ cups crispy rice cereal
For the Chocolate Coating
- 1½ cups milk chocolate or semi-sweet chocolate chips
- 1 tablespoon coconut oil or vegetable oil
Ingredient tip: Conventional creamy peanut butter usually produces a more consistent filling than a very runny natural peanut butter. If using natural peanut butter, stir it thoroughly before measuring.
Ingredient Notes
Creamy Peanut Butter
Peanut butter provides the main flavour and creates the soft, rich centre. Choose a creamy variety that is thick enough to hold its shape. A heavily separated or oily peanut butter can make rolling more difficult.
Powdered Sugar
Also called icing sugar, this ingredient sweetens the filling and helps absorb some of the moisture and fat from the peanut butter. Its fine texture blends smoothly into the mixture without creating noticeable sugar grains.
Softened Butter
Butter adds richness and helps the ingredients combine. It should be soft enough to mix easily but not melted. Melted butter may make the filling too loose before chilling.
Vanilla Extract
Vanilla brings a gentle sweetness and rounds out the roasted peanut flavour. Pure vanilla extract works well, although a standard vanilla extract is also suitable.
Crispy Rice Cereal
This is the ingredient responsible for the signature crunch. Lightweight, crisp rice pieces become coated in the peanut butter mixture while maintaining little pockets of crispness.
Chocolate Chips
Milk chocolate creates a sweeter finish, while semi-sweet chocolate offers a more balanced contrast to the filling. Either works with the original recipe.
Coconut Oil or Vegetable Oil
A tablespoon of oil helps thin the melted chocolate so the balls can be dipped more easily. Coconut oil may produce a coating that becomes firmer when chilled, while vegetable oil provides a neutral flavour.
Equipment You’ll Need
- Large mixing bowl
- Wooden spoon or sturdy spatula
- Measuring cups and spoons
- Small cookie scoop or tablespoon
- Baking tray or flat plate
- Baking parchment
- Microwave-safe bowl or heatproof bowl
- Fork or chocolate dipping tool
- Refrigerator
- Airtight storage container
A small cookie scoop is particularly useful because it makes portioning quicker and helps produce evenly sized balls.
How to Make Chocolate Peanut Butter Crunch Balls
Step 1: Prepare the Peanut Butter Mixture
Place 1 cup of creamy peanut butter, ½ cup of powdered sugar, 2 tablespoons of softened butter and 1 teaspoon of vanilla extract into a large mixing bowl.
Stir thoroughly until the ingredients form a smooth, evenly combined mixture. Scrape the sides of the bowl as needed so there are no pockets of unmixed sugar or butter.
Step 2: Fold in the Crispy Rice Cereal
Add 1½ cups of crispy rice cereal to the peanut butter mixture.
Use a spatula to fold the cereal into the filling gently. Continue until every piece is coated, taking care not to crush the cereal excessively. Keeping the cereal intact helps preserve the crunchy texture.
Step 3: Roll into Balls
Scoop small portions of the mixture using a tablespoon or small cookie scoop. Roll each portion between your palms until it forms a compact, rounded ball.
Place the balls onto a baking tray lined with parchment paper, leaving a little space between them.
Step 4: Chill the Filling
Transfer the tray to the refrigerator and chill for 20–30 minutes, or until the balls feel firm enough to dip without falling apart.
This initial chilling period is important because warm or soft peanut butter filling can lose its shape when dipped into melted chocolate.
Step 5: Melt the Chocolate
Place 1½ cups of milk or semi-sweet chocolate chips and 1 tablespoon of coconut oil or vegetable oil in a microwave-safe bowl.
Heat in short intervals of approximately 15–20 seconds, stirring between each interval until the chocolate is smooth. Alternatively, melt the mixture gently over a pan of barely simmering water, making sure the bowl does not touch the water.
Remove the chocolate from the heat as soon as it has melted. Allow it to cool slightly if it feels very hot, but keep it fluid enough for dipping.
Step 6: Dip the Peanut Butter Balls
Remove the chilled balls from the refrigerator. Working with one at a time, lower each ball into the melted chocolate using a fork or dipping tool.
Turn gently until the filling is completely covered. Lift the ball out and let the excess chocolate drip back into the bowl.
Step 7: Return to the Tray
Place each chocolate-coated ball back onto the parchment-lined tray. Continue until all the balls have been dipped.
If the melted chocolate begins to thicken, warm it very gently for a few seconds and stir until smooth again.
Step 8: Chill Until Set
Return the tray to the refrigerator for another 20–30 minutes, until the chocolate coating is firm.
The finished balls should hold their shape and have a chocolate exterior surrounding a creamy, lightly crunchy filling.
Step 9: Serve and Enjoy
Arrange the finished chocolate peanut butter crunch balls in a serving dish or on a dessert platter. Serve chilled for the firmest coating and a satisfying contrast between the chocolate and peanut butter centre.
How to Get the Perfect Crunchy Texture
The defining feature of these chocolate peanut butter balls is the combination of a creamy filling and little pieces of crispy cereal. Achieving that balance depends on how the filling is mixed and handled.
First, blend the peanut butter, sugar, butter and vanilla completely before adding the cereal. This creates a smooth base that coats the cereal evenly without requiring excessive mixing afterwards.
Second, fold the rice cereal into the filling rather than beating it vigorously. Although some pieces may naturally break, keeping most of them intact gives each bite a more noticeable crunch.
Finally, avoid leaving the uncoated mixture at room temperature for unnecessarily long periods. Chilling the balls promptly helps them firm up and makes them easier to handle. For the best texture, enjoy them while the cereal is still pleasantly crisp.
How to Make a Smooth Chocolate Coating
Chocolate can be sensitive to excessive heat and moisture. A little care during melting makes the coating smoother and much easier to work with.
Use a completely dry bowl and utensils. Even a small amount of water can cause melted chocolate to seize and become grainy. Heat it slowly, stirring regularly rather than trying to melt everything in one long burst.
The tablespoon of oil in this recipe helps the coating flow over the balls. It also encourages excess chocolate to drip away instead of forming a heavy layer around the filling.
When dipping, make sure the peanut butter balls are firm and the chocolate is warm rather than hot. This reduces the risk of the centres softening and breaking apart.
If using coconut oil, remember that the finished coating may soften when left in a warm room. Keep the treats refrigerated until shortly before serving.
How to Shape and Dip the Balls Neatly
Uniformly shaped balls look more attractive on a dessert platter and help the chocolate coating set at a similar rate.
Use a small scoop to divide the filling before rolling. If the mixture feels sticky, briefly chill it until easier to handle. Roll gently but firmly, pressing the mixture together without crushing all the cereal.
During dipping, rest each coated ball on a fork and tap the fork lightly against the edge of the chocolate bowl. This removes excess coating and prevents large puddles of chocolate from collecting underneath the sweets.
Transfer the balls onto fresh parchment paper and allow them to set without touching one another. This makes the finished treats easier to lift once chilled.
Expert Tips for the Best Results
- Use thick, creamy peanut butter: It helps the filling maintain its shape.
- Soften the butter properly: Butter at room temperature blends more evenly than cold butter.
- Measure the cereal gently: Avoid crushing it when filling the measuring cup.
- Mix the filling first: Add cereal only after the creamy ingredients are combined.
- Fold rather than beat: Gentle mixing preserves more cereal crunch.
- Use a cookie scoop: Consistent portions create a more attractive batch.
- Compact the filling: Press each portion together before rolling.
- Chill before dipping: Firm balls are much less likely to break apart.
- Keep the chocolate dry: Water can spoil the melted coating.
- Melt chocolate gradually: Short microwave intervals help prevent scorching.
- Dip in small batches: Leave the remaining filling chilled while working.
- Remove excess coating: A light, even layer is easier to bite through.
- Use parchment paper: It allows the set chocolate to release cleanly.
- Store in a cool place: Refrigeration keeps the coating firm and the filling stable.
Common Mistakes to Avoid
1. Using Very Runny Peanut Butter
Oily peanut butter can result in a mixture that is difficult to shape. Stir separated peanut butter thoroughly, or choose a thicker conventional variety.
2. Adding Melted Butter
The recipe calls for softened butter. Melted butter can make the filling too loose and may require additional chilling before rolling.
3. Crushing the Cereal Too Much
Overmixing breaks down the crispy rice pieces and reduces the characteristic crunch. Fold gently once the cereal has been added.
4. Making the Balls Too Large
Oversized balls can be difficult to dip and eat. Small, even portions produce the best bite-sized treats.
5. Skipping the First Chill
Unchilled filling may soften or fall apart in the melted chocolate. Allow the full 20–30 minutes in the refrigerator.
6. Overheating the Chocolate
Chocolate can become thick, scorched or grainy if heated aggressively. Use low heat and stir often.
7. Getting Water into the Chocolate
Moisture may cause the chocolate to seize. Dry all equipment before melting and dipping.
8. Handling the Balls Before Setting
Moving freshly coated balls too soon can leave fingerprints or damage the finish. Let the chocolate firm up completely.
9. Storing Them Uncovered
Uncovered sweets may absorb refrigerator odours or become dry over time. Use a well-sealed container.
Optional Recipe Variations
These variations are suggestions and are not part of the original seven-ingredient recipe.
1. Dark Chocolate Peanut Butter Balls
Replace the milk or semi-sweet chocolate chips with dark chocolate for a richer, slightly less sweet finish.
2. White Chocolate Crunch Balls
Use white chocolate instead of the standard chocolate coating for a sweeter, creamier outer layer. Melt carefully because white chocolate can scorch easily.
3. Chocolate Drizzle Finish
After the coating has set, drizzle a small amount of contrasting melted chocolate over each ball for decoration.
4. Sea Salt Chocolate Balls
Sprinkle a tiny pinch of flaky sea salt over the freshly dipped chocolate before it sets. The salt complements the sweetness of the peanut butter filling.
5. Extra Crispy Rice Topping
Scatter a few extra pieces of crispy rice cereal over the wet chocolate coating for a decorative crunchy finish.
6. Crunchy Peanut Butter Version
Replace creamy peanut butter with a thick crunchy variety for additional peanut pieces throughout the centre.
7. Festive Chocolate Treats
Add a few festive sprinkles to the chocolate before it sets. This is an easy way to adapt the recipe for Christmas, birthdays or other celebrations.
Serving Suggestions
Chocolate peanut butter crunch balls are delicious served straight from the refrigerator, but they also work beautifully as part of a larger dessert selection.
For family gatherings: Arrange them on a large plate alongside biscuits, brownies or other small homemade sweets. Their rounded shape and glossy coating add variety to a dessert platter.
For Christmas: Place each ball into a small paper sweet case and arrange them in a festive tin or serving tray. Keep them cool until serving.
For afternoon treats: Enjoy one or two with coffee, tea or a glass of cold milk. The chocolate coating and peanut butter filling pair especially well with warm drinks.
For homemade gifts: Pack fully set balls in food-safe containers with parchment between layers. Label the treats clearly as containing peanuts and dairy, and include appropriate storage instructions.
For parties: Set the balls out in small batches, replenishing them from the refrigerator as needed so the chocolate stays firm.
Storage, Freezing and Make-Ahead Tips
Refrigerator Storage
Store the finished chocolate peanut butter crunch balls in an airtight container in the refrigerator for approximately 5–7 days. Separate layers with parchment paper to prevent them sticking together.
Freezer Storage
For longer storage, place the fully set balls in a freezer-safe airtight container with parchment between layers. Freeze for up to 2 months for the best quality.
Thaw in the refrigerator before serving. This helps reduce sudden temperature changes that can cause condensation on the chocolate.
Make-Ahead Preparation
You can prepare the peanut butter filling, roll it into balls and refrigerate it before dipping. Keep the filling covered and chilled, ideally coating it within 24 hours for the best cereal texture.
Food Safety and Allergen Advice
These treats contain peanuts and commonly contain milk. Some cereals and chocolate products may also contain other allergens, so always check ingredient labels when preparing them for guests.
Keep them refrigerated when not being served, especially in warm conditions. Use clean utensils and avoid leaving the treats out for extended periods.
Frequently Asked Questions
1. Are chocolate peanut butter crunch balls no-bake?
Yes. There is no oven baking involved. You only need to melt the chocolate before dipping the chilled peanut butter balls.
2. How many ingredients does this recipe need?
The original recipe uses seven ingredients: peanut butter, powdered sugar, butter, vanilla, crispy rice cereal, chocolate chips and oil.
3. Can I use crunchy peanut butter?
Yes. Crunchy peanut butter adds extra texture, although the original recipe uses creamy peanut butter for a smoother filling.
4. Can I use natural peanut butter?
Yes, provided it is thoroughly stirred and reasonably thick. Very oily peanut butter can make the balls harder to shape.
5. What cereal works best?
Plain crispy rice cereal is ideal because its delicate texture provides crunch without overpowering the peanut butter flavour.
6. Can I use milk chocolate?
Yes. Milk chocolate creates a sweeter coating that pairs beautifully with the peanut butter centre.
7. Is semi-sweet chocolate better?
That depends on your preference. Semi-sweet chocolate offers a slightly more intense cocoa flavour and balances the sweetness of the filling.
8. Why are my peanut butter balls too sticky?
The peanut butter may be unusually oily, or the mixture may be too warm. Chill it briefly before rolling and check that your butter was softened rather than melted.
9. Why are the balls falling apart?
The mixture may not have been pressed together firmly enough, or it may need additional chilling. Compact each portion before rolling.
10. Can I make them without coconut oil?
Yes. The original recipe allows vegetable oil as an alternative to coconut oil.
11. Why is my melted chocolate thick?
It may have cooled too much or been overheated. Gently warm it and stir. If the chocolate has seized because of moisture, it may not be suitable for a smooth dipping coating.
12. How long should I chill the filling?
Refrigerate the rolled balls for 20–30 minutes, until firm enough to dip.
13. How long does the final chocolate coating take to set?
The recipe recommends another 20–30 minutes in the refrigerator after dipping.
14. Can I freeze these chocolate balls?
Yes. Freeze them in an airtight container for up to 2 months for the best texture and flavour.
15. How long will they last in the refrigerator?
For best quality, enjoy them within approximately 5–7 days when stored correctly in an airtight container.
16. Can I prepare them the day before a party?
Absolutely. These treats are ideal for making the day before because the chocolate will have plenty of time to set.
17. Do they need to be refrigerated?
Refrigeration is recommended because the filling contains butter and the chocolate coating can soften at room temperature.
18. Can I make smaller balls?
Yes. Use a teaspoon-sized scoop for smaller party treats. The yield will increase, but the preparation method remains the same.
19. Are these suitable for Christmas sweet trays?
Yes. Their rich chocolate coating, easy preparation and convenient bite-sized shape make them a lovely addition to festive dessert platters.
20. Can children help make this recipe?
Children can help stir the filling and roll the balls with appropriate supervision. An adult should handle the hot melted chocolate.
21. Can I use chocolate bars instead of chocolate chips?
Yes. Finely chopped chocolate bars suitable for melting can be used in place of chocolate chips, keeping the same overall amount.
22. Why has my chocolate coating become soft?
A warm room or the added oil can make the chocolate softer. Refrigerate the balls again until the coating firms up.
23. Can I double the recipe?
Yes. Double every ingredient quantity and work in batches if your mixing bowl or refrigerator space is limited.
24. Do these taste like traditional peanut butter candy?
They share the familiar flavour of chocolate-covered peanut butter sweets, but the crispy rice cereal gives them a noticeably lighter, crunchier centre.
Chocolate Peanut Butter Crunch Balls Recipe Card
Description: Easy homemade chocolate peanut butter crunch balls filled with creamy peanut butter and crispy rice cereal, then dipped in a rich chocolate coating. A delicious no-bake dessert for parties, holidays and everyday sweet treats.
- Course: Dessert
- Method: No-bake
- Preparation: Approximately 20 minutes
- Chilling: 40–60 minutes total
- Total: Approximately 60–80 minutes
- Yield: Approximately 20–24 balls
- Difficulty: Easy
Ingredients
- 1 cup creamy peanut butter
- ½ cup powdered sugar
- 2 tablespoons softened butter
- 1 teaspoon vanilla extract
- 1½ cups crispy rice cereal
- 1½ cups milk or semi-sweet chocolate chips
- 1 tablespoon coconut oil or vegetable oil
Instructions
- In a large bowl, combine the creamy peanut butter, powdered sugar, softened butter and vanilla extract. Mix until smooth.
- Gently fold in the crispy rice cereal until evenly coated.
- Scoop small portions of the mixture and roll them into compact balls.
- Arrange the balls on a parchment-lined tray.
- Refrigerate for 20–30 minutes until firm.
- Melt the chocolate chips with the coconut oil or vegetable oil, stirring until smooth.
- Dip each chilled peanut butter ball completely into the melted chocolate.
- Allow excess chocolate to drip off, then return the balls to the parchment-lined tray.
- Refrigerate for another 20–30 minutes until the chocolate coating is firm.
- Serve chilled and store any leftovers in an airtight container in the refrigerator.
Recipe Notes
- Use thick, creamy peanut butter for easier shaping.
- Mix the cereal gently to preserve its crunch.
- Chill the balls thoroughly before dipping.
- Melt the chocolate slowly to prevent scorching.
- Keep the finished treats refrigerated for the firmest coating.
- The estimated yield depends on the size of each ball.
Hashtags: #ChocolatePeanutButter #NoBakeDessert #PeanutButterBalls #ChocolateTreats #EasyDessertRecipes
Final Thoughts
Chocolate peanut butter crunch balls bring together everything that makes a homemade sweet treat irresistible: creamy peanut butter, delicate crispy rice cereal and a rich chocolate shell. With only seven ingredients and no baking required, they are wonderfully practical for busy days, special celebrations and homemade dessert gifts.
Try this recipe, share your results with friends and family, and save it for the next time you need a quick chocolate treat. If you enjoyed making these crunchy peanut butter balls, leave a comment and follow along for more easy homemade recipes.