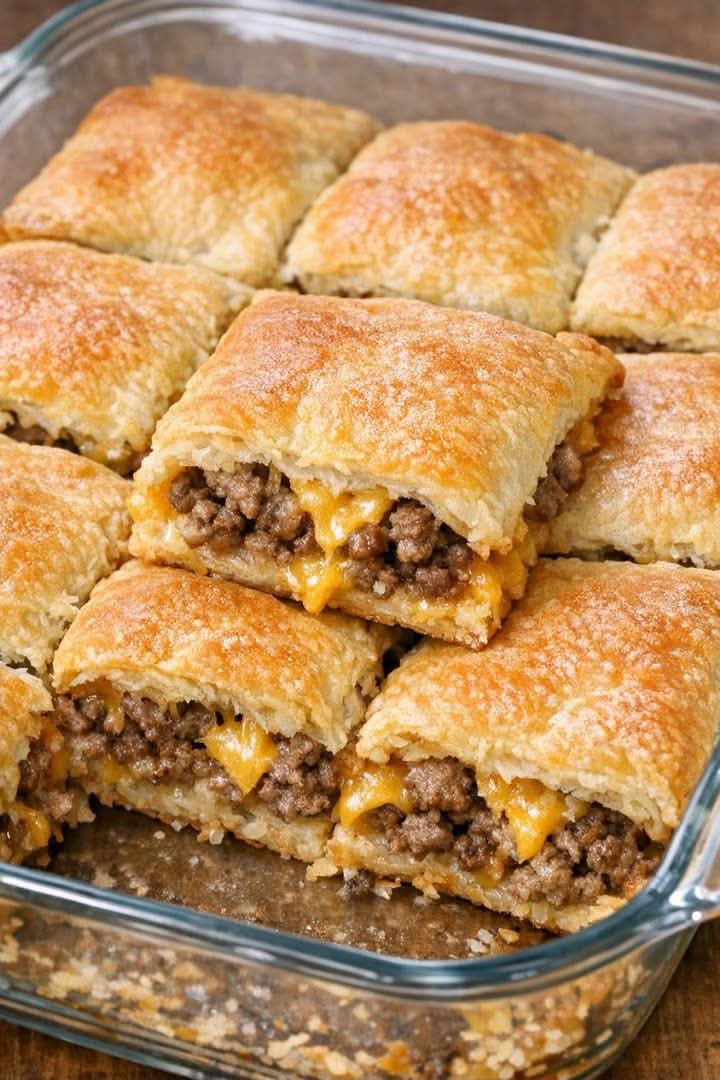
Cheesy Beef Biscuit Pockets
Golden, buttery biscuit pockets stuffed with savoury beef and deliciously melted cheese make a wonderfully satisfying homemade dinner. These Cheesy Beef Biscuit Pockets combine familiar ingredients in a comforting, easy-to-prepare dish that is perfect for busy evenings and relaxed family meals.
Each pocket has a softly layered biscuit exterior that turns beautifully golden in the oven. Inside, seasoned minced beef is surrounded by melted cheddar and mozzarella, creating a rich, savoury filling with a lovely combination of textures.
The beauty of this recipe lies in its simplicity. Refrigerated biscuit dough provides a convenient shortcut, so there is no need to make pastry from scratch or spend time waiting for dough to rise.
The filling begins with minced beef and finely chopped onion, cooked together until tender and full of flavour. Worcestershire sauce, garlic powder and onion powder add depth without requiring a complicated seasoning mixture.
These stuffed biscuits are equally suitable for family dinners, casual gatherings, weekend lunches and comforting snacks. They are especially enjoyable when served warm, while the cheese is still soft and stretchy.
Whether you are looking for a new way to use minced beef or simply want a comforting baked dinner, this recipe offers a delicious combination of convenience, flavour and homemade appeal.
Recipe Overview
- Recipe: Cheesy Beef Biscuit Pockets
- Category: Main course, family dinner
- Style: American-inspired comfort food
- Preparation Time: Approximately 15–20 minutes
- Cooking Time: Approximately 25–32 minutes, including browning the beef
- Resting Time: 5 minutes
- Total Time: Approximately 45–55 minutes
- Servings: Approximately 4, depending on biscuit count
- Oven Temperature: 375°F (190°C)
- Method: Stovetop cooking and oven baking
- Equipment: Frying pan and baking dish
- Main Ingredients: Biscuit dough, minced beef, cheddar, mozzarella and onion
The number of pockets depends on how many biscuits are included in your refrigerated dough package. If the package contains eight biscuits, the original two-piece assembly method makes four generous pockets.
Why You’ll Love This Recipe
- Easy ingredients: The recipe uses everyday supermarket staples.
- Convenient dough: Refrigerated biscuits save time without sacrificing the comforting baked texture.
- Rich cheesy filling: Cheddar adds flavour while mozzarella provides a lovely melted texture.
- Family friendly: The familiar beef-and-cheese combination works well for family meals.
- Simple preparation: There are no complicated shaping techniques or specialist tools.
- Versatile serving: Enjoy the pockets as a dinner, lunch or substantial snack.
- Customisable: The filling can be adapted with different cheeses or seasonings.
- Great leftovers: Properly stored pockets can be reheated for another meal.
Ingredients
These quantities follow the original recipe.
For the Biscuit Pockets
- 1 can refrigerated biscuit dough
- 2 tablespoons melted butter
For the Beef Filling
- 1 lb (454 g) minced beef
- 1 small onion, finely chopped
- 1 tablespoon Worcestershire sauce
- ½ teaspoon garlic powder
- ½ teaspoon onion powder
- ½ teaspoon salt
- ¼ teaspoon black pepper
For the Cheese Filling
- 1 cup shredded cheddar cheese, approximately 110–115 g
- ½ cup shredded mozzarella cheese, approximately 55–60 g
Ingredient Notes
Refrigerated Biscuit Dough
Refrigerated biscuit dough is the foundation of this recipe. It bakes into a soft, layered exterior with a beautifully golden surface. American-style canned biscuit dough works particularly well because it is easy to flatten, fill and seal.
Choose dough pieces that are large enough to accommodate the filling. Smaller biscuits may require smaller portions of beef and cheese.
Minced Beef
Minced beef provides the hearty, savoury centre. Beef with moderate fat content gives good flavour, but excess fat should be drained after browning to prevent the biscuit bases from becoming greasy.
Onion
Finely chopped onion adds sweetness and moisture. Small pieces blend more evenly into the filling and are less likely to push against the sealed pastry edges.
Cheddar Cheese
Cheddar delivers the characteristic rich, cheesy flavour. A mature cheddar creates a stronger taste, while mild cheddar is a good choice for a gentler flavour.
Mozzarella Cheese
Mozzarella melts smoothly and complements cheddar. Using both cheeses creates a pleasing balance between flavour and texture.
Worcestershire Sauce
This sauce adds savoury depth and a slightly tangy finish to the beef mixture. It helps the simple filling taste more developed.
Garlic and Onion Powder
These seasonings distribute evenly throughout the beef. They reinforce the savoury flavour without introducing additional moisture.
Melted Butter
Brushing the pockets with butter before baking encourages an appealing golden finish and adds richness to the exterior.
Equipment You’ll Need
- Large frying pan or skillet
- Wooden spoon or spatula
- Knife and chopping board
- Measuring spoons and cups
- Rectangular baking dish
- Pastry brush
- Fork or fingers for sealing
- Kitchen thermometer, recommended
- Oven gloves
How to Make Cheesy Beef Biscuit Pockets
Step 1: Preheat the Oven
Preheat your oven to 375°F (190°C). Lightly grease a baking dish so the pockets can be removed easily after baking.
Step 2: Brown the Beef and Onion
Place a large frying pan over medium heat. Add the minced beef and finely chopped onion. Cook for approximately 7–10 minutes, breaking the meat into small pieces as it browns and stirring occasionally.
For food safety, cook the minced beef thoroughly to an internal temperature of 160°F (71°C).
Step 3: Season the Filling
Add the Worcestershire sauce, garlic powder, onion powder, salt and black pepper. Stir well to coat the beef evenly and distribute the seasonings.
Step 4: Drain and Cool
Carefully drain away excess grease. Allow the beef mixture to cool slightly before assembling the pockets. A very hot filling can soften refrigerated biscuit dough and make it difficult to handle.
Step 5: Prepare the Biscuit Dough
Open the refrigerated biscuit dough package and separate the pieces. Gently flatten each biscuit into a square or rectangle, keeping the thickness as even as possible.
Step 6: Add the Beef
Arrange half of the flattened dough pieces on a clean work surface. Place a spoonful of the seasoned beef mixture in the centre of each piece, leaving a clear border around the edges.
Step 7: Add Both Cheeses
Divide the shredded cheddar and mozzarella over the beef filling. Keep the cheese away from the outer edges to make sealing easier.
Step 8: Seal the Pockets
Place the remaining flattened biscuit pieces over the filled bases. Press the edges firmly together, working around each pocket to seal the filling inside. You can gently crimp the edges with a fork if necessary.
Step 9: Arrange in the Baking Dish
Transfer the sealed pockets into the prepared baking dish, arranging them in a single layer. Leave a little room for the biscuit dough to expand.
Step 10: Brush with Butter
Lightly brush the tops with the 2 tablespoons of melted butter, dividing it between the pockets.
Step 11: Bake Until Golden
Place the baking dish in the preheated oven and bake for 18–22 minutes, until the biscuit pockets are puffed, deeply golden and cooked through.
If the tops colour before the thicker edges are fully baked, loosely cover the dish with foil and continue cooking briefly until the dough is done.
Step 12: Rest Before Serving
Remove the baking dish from the oven and allow the pockets to rest for approximately 5 minutes. This makes them easier to lift and gives the hot filling a chance to settle.
Step 13: Serve Warm
Serve while the pastry is warm and the cheddar and mozzarella are melted. A simple salad or vegetable side turns these pockets into a complete dinner.
How to Prepare the Best Beef Filling
A successful filling starts with evenly browned minced beef. Use a pan large enough to allow moisture to evaporate while the beef cooks. An overcrowded pan can cause the meat to steam rather than brown.
Break larger pieces of beef apart with a spatula so the filling can be distributed evenly between the pockets. Small crumbles are easier to enclose than large chunks.
The onion should soften as the beef cooks. Finely chopping it helps ensure there are no noticeably firm pieces inside the finished biscuits.
Once the meat is cooked, remove excess grease thoroughly. A filling that is too oily can soak into the bottom biscuit layer and interfere with baking.
Finally, allow the mixture to cool slightly. It should still be warm enough to handle comfortably, but not steaming hot when placed onto the dough.
How to Fill and Seal Biscuit Pockets
Sealing is one of the most important stages of preparing stuffed biscuits. A properly sealed pocket holds the filling together and reduces the amount of cheese escaping during baking.
Flatten the dough gently rather than pulling it aggressively. Overstretching can create thin spots that split as the biscuits rise.
Keep the beef and cheese concentrated in the centre of each base. Although generous filling is appealing, overstuffed pockets are difficult to close.
Leave a clear border of dough and press the top and bottom pieces together firmly. Check the corners carefully, particularly when shaping square or rectangular pockets.
If a little cheese escapes during baking, the pockets are still perfectly enjoyable. However, careful sealing will help retain the delicious melted centre.
How to Get Golden, Flaky Biscuit Tops
A fully preheated oven is essential. Placing the pockets into an oven that has not reached 375°F (190°C) can affect how the dough rises and browns.
Brush the tops evenly with melted butter, making sure not to leave large pools around the bases.
A glass baking dish works well, although baking times can vary depending on the size of the dish and the thickness of the dough.
Look for a deep golden colour, a puffed appearance and fully cooked dough around the seams. The filling is already cooked, so the main purpose of oven baking is to cook the biscuit dough and melt the cheese.
Allowing the finished pockets to rest briefly before serving also helps them keep their shape when transferred to plates.
Expert Cooking Tips
- Use chilled biscuit dough so it is easier to shape.
- Chop the onion finely for an evenly distributed filling.
- Break the minced beef into small pieces while cooking.
- Drain excess fat before assembling the pockets.
- Let the beef cool slightly to avoid softening the dough.
- Shred cheese freshly if you prefer a smooth melted texture.
- Keep a border around the filling for effective sealing.
- Avoid stretching the dough too thin.
- Crimp the edges carefully to limit cheese leakage.
- Preheat the oven completely before baking.
- Check the biscuit seams for uncooked dough.
- Use a spatula to lift the baked pockets gently.
- Rest the pockets for 5 minutes before serving.
- Reheat leftovers in the oven or air fryer to refresh the exterior.
Common Mistakes to Avoid
1. Using Beef That Is Too Greasy
Excess grease can make the pastry bottoms heavy and soggy. Drain the cooked beef thoroughly.
2. Overfilling the Dough
Too much beef and cheese makes the pockets difficult to seal and increases the likelihood of leaking.
3. Not Sealing the Edges
Loose seams may separate as the dough rises. Press the edges together firmly before baking.
4. Using Very Hot Filling
Steaming-hot beef can make refrigerated dough sticky and fragile. Allow it to cool slightly.
5. Flattening the Dough Too Thin
Thin sections may tear, exposing the filling. Aim for an even, sturdy layer.
6. Skipping the Butter
The melted butter contributes richness and helps create an appealing golden surface.
7. Removing the Pockets Too Early
Golden tops do not always guarantee completely baked seams. Check the dough carefully before serving.
8. Cutting Immediately After Baking
The melted cheese and beef filling will be extremely hot. A short rest improves handling and serving.
Optional Recipe Variations
The following ideas are optional adaptations and are not part of the original ingredient list.
1. Bacon Cheeseburger Pockets
Mix a little cooked, crumbled bacon into the beef for a smoky cheeseburger-inspired flavour.
2. Spicy Beef Pockets
Add finely chopped jalapeños or a pinch of chilli flakes to the cooked filling.
3. Mushroom and Beef Pockets
Cook finely chopped mushrooms with the onion, allowing their moisture to evaporate before filling the dough.
4. Pepper Jack Cheese Pockets
Replace some of the cheddar with pepper Jack for a mild spicy kick.
5. Italian-Style Beef Pockets
Try Italian seasoning and a little tomato-based sauce in the filling, keeping the mixture thick rather than watery.
6. Garlic Butter Tops
Mix a small amount of garlic powder into the melted butter before brushing the pockets.
7. Mini Party Pockets
Use smaller dough portions and reduce the amount of filling per pocket. Adjust the baking time according to size and check that the dough is cooked through.
What to Serve with Cheesy Beef Biscuit Pockets
Because these pockets are rich and filling, they pair especially well with fresh, colourful sides.
- Green salad: Crisp lettuce and a light dressing balance the buttery pastry.
- Coleslaw: Crunchy cabbage provides a refreshing contrast to the warm filling.
- Roasted vegetables: Broccoli, carrots or courgettes make an easy accompaniment.
- Tomato soup: A warm bowl of soup turns the pockets into an extra comforting meal.
- Pickles: Their tangy flavour cuts through the richness of the cheese.
- Dipping sauces: Tomato ketchup, barbecue sauce or a mustard-based dip work well.
For a casual family dinner, serve one generous pocket with salad and roasted vegetables. For a gathering, arrange smaller pockets on a platter with a selection of dipping sauces.
Storage and Reheating
Refrigeration
Allow leftovers to cool briefly, then refrigerate promptly in an airtight container within 2 hours of cooking. Store at 4°C (40°F) or below and use within 3–4 days.
Freezing
Fully baked and cooled pockets can be frozen individually before transferring them to a freezer-safe container or bag. For best quality, aim to use them within 2–3 months.
Oven Reheating
Place refrigerated pockets in an oven preheated to approximately 350°F (175°C). Heat for about 10–15 minutes, depending on size, until thoroughly hot in the centre.
Air Fryer Reheating
Reheat at approximately 325–350°F (160–175°C) for several minutes, checking frequently to prevent the biscuit exterior from becoming too dark.
Microwave Reheating
The microwave is convenient, although the pastry may soften. Heat in short intervals until the centre is steaming hot.
Making Ahead
The beef filling can be cooked in advance and refrigerated in a sealed container. Assemble the pockets with chilled filling when ready to bake, keeping the dough refrigerated until use.
Reheat leftovers to a thoroughly hot centre, ideally 165°F (74°C), and follow appropriate food-safety guidance when storing cooked meat and dairy.
Frequently Asked Questions
1. Can I use homemade biscuit dough?
Yes. Homemade American-style biscuit dough can work well, provided it is sturdy enough to hold the filling and can be sealed securely.
2. Can I replace minced beef with minced turkey?
Yes. Minced turkey is a suitable alternative, but it must be cooked thoroughly to 165°F (74°C) before assembly.
3. Can I use only cheddar cheese?
Yes. Cheddar alone will produce a flavourful filling, although the melted texture may differ slightly.
4. Why are my biscuit pockets soggy?
Excess beef grease, filling moisture or underbaked dough can cause sogginess. Drain the filling and bake until the seams are fully cooked.
5. Can I add vegetables?
Yes. Finely chopped, pre-cooked vegetables can be added as an optional variation. Remove excess moisture before assembling.
6. How do I stop cheese from leaking?
Avoid overfilling and press the seams together firmly. Keep cheese away from the edges.
7. Can I use puff pastry instead?
Yes, but this creates a different dish. Puff pastry requires preparation and baking according to its own package instructions.
8. Can I make the filling the day before?
Yes. Cook the beef completely, cool it safely and refrigerate in an airtight container until needed.
9. What size baking dish should I use?
Choose a dish that holds all the pockets in one layer with a little room to expand. The exact size depends on the number of biscuits.
10. Can I make smaller pockets?
Yes. Divide the dough and filling into smaller portions, adjusting the cooking time and checking for fully cooked pastry.
11. How do I know the beef is cooked?
Use a food thermometer to confirm the minced beef reaches 160°F (71°C) during stovetop cooking.
12. Can I freeze uncooked pockets?
It may be possible, depending on the biscuit dough brand, but some refrigerated dough products do not freeze or bake well after freezing. Check the package guidance.
13. Can I prepare these without onion?
Yes. Omit the fresh onion if preferred, although the filling will have a slightly different flavour and texture.
14. What is the best cheese combination?
Cheddar and mozzarella are excellent together because cheddar brings flavour and mozzarella melts smoothly.
15. Why did my pockets open during baking?
The seams may not have been pressed tightly enough, or the pockets may have contained too much filling.
16. Can I cook these in an air fryer?
Potentially, provided the dough fits safely and bakes evenly. Follow your appliance guidance and check the centre and seams carefully.
17. Are these suitable for lunchboxes?
Yes, if kept properly chilled until eating. Use an insulated lunch bag with cold packs when refrigeration is not available.
18. Can I use lean minced beef?
Yes. Lean minced beef works well and generally produces less grease that needs draining.
19. How can I keep the pastry crisp when reheating?
Use an oven or air fryer rather than the microwave. Avoid overheating, which can dry the pastry.
20. Can I double the recipe?
Yes. Double the original ingredients and use additional baking dishes as needed. Bake in batches if necessary to avoid overcrowding.
Cheesy Beef Biscuit Pockets Recipe Card
Description: Buttery golden biscuit pockets stuffed with seasoned minced beef, cheddar and mozzarella cheese.
- Course: Main course
- Style: American-inspired
- Prep Time: Approximately 15–20 minutes
- Cooking Time: Approximately 25–32 minutes, including browning the beef
- Resting Time: 5 minutes
- Total Time: Approximately 45–55 minutes
- Yield: Approximately 4 large pockets if using 8 biscuit pieces
- Oven: 375°F (190°C)
- Method: Stovetop and oven
Ingredients
- 1 can refrigerated biscuit dough
- 1 lb (454 g) minced beef
- 1 small onion, finely chopped
- 1 cup shredded cheddar cheese
- ½ cup shredded mozzarella cheese
- 1 tablespoon Worcestershire sauce
- ½ teaspoon garlic powder
- ½ teaspoon onion powder
- ½ teaspoon salt
- ¼ teaspoon black pepper
- 2 tablespoons melted butter
Instructions
- Preheat the oven to 375°F (190°C) and lightly grease a baking dish.
- Cook the minced beef and onion in a frying pan over medium heat until the beef is browned and thoroughly cooked, reaching 160°F (71°C).
- Add Worcestershire sauce, garlic powder, onion powder, salt and black pepper. Stir well.
- Drain excess grease and allow the mixture to cool slightly.
- Separate the biscuit dough and flatten each piece into a square or rectangle.
- Place a spoonful of beef filling in the centre of half the dough pieces.
- Divide the cheddar and mozzarella over the beef.
- Cover each filled piece with another piece of dough and press the edges firmly to seal.
- Arrange the sealed pockets in the prepared baking dish.
- Brush their tops with melted butter.
- Bake for 18–22 minutes, or until puffed, deeply golden and cooked through.
- Rest for approximately 5 minutes before serving.
- Serve warm while the cheese is melted.
Recipe Notes
- Keep the biscuit dough chilled until assembly.
- Drain the beef filling thoroughly to prevent soggy bases.
- Avoid overfilling the pockets.
- Check that the biscuit seams are completely cooked.
- The finished yield depends on the biscuit package size.
Hashtags: #CheesyBeefPockets #BiscuitRecipes #EasyDinnerIdeas #BeefRecipes #ComfortFood
Share Your Cheesy Beef Biscuit Pockets
There is something especially satisfying about breaking open a freshly baked biscuit pocket and discovering the warm, cheesy beef filling inside.
If you try this recipe, share how your pockets turned out in the comments. Did you keep the classic cheddar and mozzarella combination or experiment with another cheese?
Save this recipe for your next family dinner, share it with a friend who loves easy comfort food, and follow along for more homemade meal ideas.