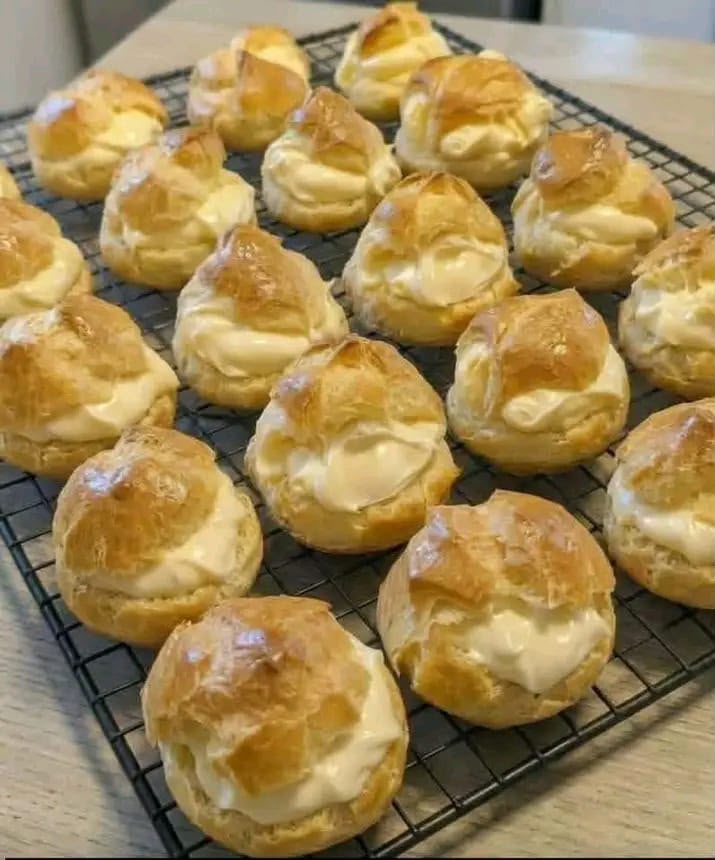
Vanilla Cream Puffs
Homemade vanilla cream puffs are a lovely combination of delicate golden pastry and light, fluffy vanilla filling. Each little puff has a crisp outer shell, a soft interior and a generous layer of smooth cream that makes every bite wonderfully satisfying.
These classic pastries may look as though they belong in a professional bakery, but they are surprisingly achievable in an ordinary home kitchen. With a handful of everyday ingredients and a little attention to technique, you can prepare beautiful cream puffs from scratch.
The secret is choux pastry, a special dough that cooks briefly in a saucepan before being baked. Unlike ordinary pastry, it uses steam to expand in the oven, creating the hollow centres needed for a generous cream filling.
Once the shells have cooled, they are filled with a rich but airy mixture of whipping cream, powdered sugar, vanilla and softened cream cheese or mascarpone. The resulting filling is sweet, smooth and stable enough to hold its shape inside the pastries.
Vanilla cream puffs are perfect for birthday celebrations, afternoon tea, holiday dessert tables, family gatherings or a special weekend treat. Their individual size makes them easy to serve, and their golden appearance is especially inviting when arranged together on a platter.
Whether this is your first time making choux pastry or you are looking to improve your existing technique, this guide explains how to achieve well-risen shells, prevent soggy pastry and prepare a delicious vanilla cream filling.
Recipe Overview
- Recipe: Vanilla Cream Puffs
- Category: Dessert and Baking
- Style: French-inspired choux pastry
- Preparation Time: Approximately 25 minutes
- Baking Time: 20–25 minutes
- Oven Resting Time: 5 minutes
- Additional Time: Approximately 30–45 minutes for cooling and filling
- Total Time: Approximately 1 hour 25 minutes to 1 hour 40 minutes
- Yield: Approximately 18–22 small cream puffs, depending on size
- Difficulty: Intermediate
- Oven Temperature: 400°F (200°C)
- Method: Stovetop preparation, oven baking and chilled filling
The exact yield depends on how large you pipe the pastry mounds. Small, evenly sized cream puffs are ideal for serving as individual desserts or sharing at parties.
Why You’ll Love These Cream Puffs
- Light, crisp pastry: The golden choux shells create a delicate contrast with the creamy centres.
- Delicious vanilla flavour: Vanilla adds a gentle sweetness without overwhelming the pastry.
- Simple ingredients: The recipe uses common baking essentials.
- Beautiful presentation: The finished pastries look impressive on a dessert platter.
- Individual portions: Each puff is easy to serve without slicing a large cake.
- Versatile filling: Cream cheese or mascarpone provides a smooth, rich finish.
- Make-ahead potential: The pastry shells and filling can be prepared separately before serving.
- Great for celebrations: They suit everything from casual family gatherings to special occasions.
Ingredients
For the Choux Pastry
- 1 cup water (240 ml)
- ½ cup unsalted butter (approximately 113 g)
- 1 cup all-purpose flour or plain flour (approximately 125 g)
- 4 large eggs
- ¼ teaspoon salt
- 1 teaspoon sugar
For the Vanilla Cream Filling
- 2 cups heavy whipping cream or suitable whipping cream (approximately 480 ml)
- ½ cup powdered sugar or icing sugar (approximately 60 g)
- 1 teaspoon vanilla extract
- 4 oz cream cheese or mascarpone, softened (approximately 113 g)
Optional Finishing Touch
- A little extra powdered sugar for dusting, if desired
Use the original ingredient quantities for the best consistency. The gram conversions are approximate, as cup measurements can vary slightly depending on how ingredients are measured.
Ingredient Notes
Water
Water is essential for creating steam inside the choux dough. As the pastry bakes, this steam helps the dough expand and develop its characteristic hollow centre.
Unsalted Butter
Butter adds flavour, tenderness and richness to the pastry. Cutting it into smaller pieces before heating helps it melt evenly before the water reaches a full boil.
Plain Flour
Plain flour provides the structure that allows the pastry to expand while maintaining its shape. Measure carefully, as too much flour can produce heavy shells.
Eggs
Eggs give choux pastry its flexible structure, golden colour and smooth texture. They should be incorporated gradually to achieve a glossy dough that can be piped or spooned into mounds.
Sugar and Salt
The small amount of sugar adds subtle sweetness, while salt balances the buttery flavour. Neither should dominate the finished pastry.
Heavy Whipping Cream
Cold whipping cream creates the light, airy filling. Choose cream with sufficient fat for whipping, ideally around 35% fat or higher, so it forms stable peaks.
Powdered Sugar
Powdered sugar dissolves easily into the cream and provides a smooth sweetness without a grainy texture.
Vanilla Extract
Vanilla is the main flavour of the filling. A good-quality extract provides a warm, aromatic finish.
Cream Cheese or Mascarpone
Cream cheese contributes a gentle tang, while mascarpone produces a softer, richer flavour. Both help give the whipped filling additional body.
Equipment You’ll Need
- Medium saucepan
- Wooden spoon or sturdy silicone spatula
- Large mixing bowl
- Electric hand mixer or stand mixer
- Baking tray
- Baking parchment
- Piping bag or two spoons
- Wire cooling rack
- Serrated knife
- Measuring cups and spoons
A piping bag makes the cream puffs more uniform, but using two spoons is perfectly suitable for a more rustic homemade appearance.
How to Make Vanilla Cream Puffs
Step 1: Preheat the Oven
Preheat your oven to 400°F (200°C). Line a large baking tray with baking parchment.
Leave enough room between the pastry mounds because they will expand significantly as they bake.
Step 2: Heat the Water and Butter
Add the water, unsalted butter, salt and sugar to a medium saucepan.
Place over medium heat and bring to a gentle boil. Stir occasionally until the butter has melted completely.
Step 3: Add the Flour
Add the flour all at once and immediately stir vigorously with a wooden spoon or sturdy spatula.
Continue mixing until the ingredients form a smooth dough that pulls away from the sides of the saucepan.
The dough should come together into one cohesive ball rather than remaining wet and loose.
Step 4: Cool the Dough Slightly
Remove the saucepan from the heat and allow the dough to cool for approximately 5 minutes.
It should still be warm but no longer piping hot. This helps prevent the eggs from cooking immediately when they are added.
Step 5: Incorporate the Eggs
Add the eggs one at a time, mixing thoroughly after each addition.
The mixture may briefly look separated or slippery, but continue beating until each egg is fully incorporated before adding the next.
When finished, the dough should be smooth, thick and glossy, and it should hold its shape when spooned onto the tray.
Step 6: Shape the Cream Puffs
Transfer the dough to a piping bag fitted with a large round nozzle, or use a spoon to portion the dough.
Pipe or spoon small, evenly sized mounds onto the prepared baking tray.
Leave approximately 2 inches between each mound to give the pastry enough space to expand.
Step 7: Bake Until Golden
Place the tray in the preheated oven and bake for 20–25 minutes, until the pastries are puffed, firm and deeply golden brown.
Do not open the oven during the first 20 minutes. A sudden loss of heat can cause the expanding pastry to collapse before its structure has set.
The shells should feel light and have a relatively dry, crisp exterior when finished.
Step 8: Allow the Shells to Dry
Turn off the oven, open the door slightly and allow the cream puffs to rest inside for 5 minutes.
This gentle transition helps excess moisture escape and reduces the risk of the shells collapsing suddenly.
Step 9: Cool Completely
Transfer the baked cream puffs to a wire rack and allow them to cool completely.
Do not add the filling while the pastry is warm, as heat will soften and melt the whipped cream.
Step 10: Prepare the Cream Base
Place the softened cream cheese or mascarpone in a mixing bowl.
Beat until smooth, creamy and free from lumps.
Step 11: Whip the Vanilla Filling
Add the cold whipping cream, powdered sugar and vanilla extract.
Beat with an electric mixer until the mixture becomes thick, fluffy and holds firm peaks.
Stop mixing once the filling is stable. Overwhipping can make it grainy or cause it to separate.
Step 12: Slice the Pastry Shells
Use a serrated knife to carefully slice each cooled cream puff horizontally.
Keep the top and bottom halves together so the pastries are easy to reassemble.
Step 13: Fill the Cream Puffs
Pipe or spoon a generous amount of vanilla cream into the bottom half of each pastry shell.
Replace the top halves gently, allowing a little of the filling to remain visible around the edges.
Step 14: Chill and Serve
Refrigerate the filled pastries briefly before serving to help the cream settle.
For an optional finishing touch, lightly dust the tops with powdered sugar.
How to Make Perfect Choux Pastry
Choux pastry behaves differently from biscuit dough, cake batter or ordinary pie pastry. Its success depends on the balance between moisture, eggs, flour and heat.
The first important stage occurs in the saucepan. Bringing the water and butter to a boil allows the flour to absorb the hot liquid quickly. Stirring the flour into the liquid forms a thick paste that can hold steam during baking.
Continue cooking and stirring briefly until the dough pulls away cleanly from the sides of the pan. This helps remove excess surface moisture and develops a cohesive texture.
The next stage is incorporating the eggs. Adding one egg at a time allows you to judge how the dough changes. Each egg contributes moisture and elasticity, making the mixture smoother and more suitable for piping.
The finished dough should be glossy and thick enough to form rounded mounds without immediately spreading flat.
Because egg sizes and flour absorption can vary, it is helpful to assess the texture as you mix. The original recipe uses four large eggs. If the dough appears sufficiently smooth and pipeable before the final egg is fully incorporated, avoid forcing in additional liquid that would make it runny.
How to Bake Hollow Cream Puffs
The hollow centre of a cream puff forms naturally as moisture inside the pastry turns into steam. That steam expands the dough, while the flour and egg structure gradually sets around the growing cavity.
A properly preheated oven is particularly important. At 400°F (200°C), the initial heat encourages the shells to rise quickly and develop a golden exterior.
Opening the oven too early interrupts this process. During the first part of baking, the pastry may look fully inflated even though its internal structure remains soft.
Allowing the cream puffs to reach a deep golden colour helps ensure that the exterior is sufficiently dry and sturdy.
Once the oven is switched off, leaving the pastries inside with the door slightly open allows steam to escape more gradually.
For especially crisp results, you can optionally make a tiny opening in each baked shell after removing it from the oven to release trapped steam. This is an additional technique rather than a required step in the original recipe.
Always cool the shells fully on a wire rack before adding the vanilla filling.
How to Make Fluffy Vanilla Cream
The vanilla filling should be rich enough to complement the pastry but light enough to maintain the delicate texture of the cream puffs.
Begin by softening the cream cheese or mascarpone. This allows it to blend smoothly without leaving small lumps in the finished filling.
The whipping cream, however, should remain cold. Cold cream develops a better whipped structure and is less likely to become loose during preparation.
Beat the softened cheese first, then add the whipping cream, powdered sugar and vanilla as directed.
Start mixing at a moderate speed, increasing gradually as the mixture begins to thicken. Stop when the filling holds firm peaks and looks smooth and airy.
If using cream cheese, expect a slightly tangy flavour similar to a light cheesecake filling. Mascarpone produces a more mellow, buttery taste.
Both versions are delicious, and either can be spooned directly into the pastry shells or transferred to a piping bag for a neater presentation.
Expert Tips for the Best Cream Puffs
- Preheat thoroughly: Give the oven enough time to reach 400°F before baking.
- Measure the flour accurately: Excess flour can produce dense pastry.
- Melt the butter completely: The liquid should be evenly combined before the flour is added.
- Add the flour in one addition: This helps the mixture form a smooth paste quickly.
- Stir the dough firmly: A sturdy spatula makes it easier to eliminate dry patches.
- Allow a short cooling period: Very hot dough can partially cook the eggs.
- Add eggs gradually: Incorporate each egg thoroughly before adding another.
- Keep portions similar: Uniform mounds bake more consistently.
- Leave adequate spacing: Choux pastry expands considerably.
- Keep the oven closed early: Avoid disturbing the rising shells.
- Look for golden colour: Pale pastry may retain too much moisture.
- Cool on a wire rack: Air circulation helps prevent condensation beneath the shells.
- Use cold whipping cream: It produces a more stable filling.
- Fill close to serving: This gives the best contrast between crisp pastry and soft cream.
Common Mistakes to Avoid
1. Adding the Flour Too Slowly
Adding flour in small amounts can create an uneven mixture. Add it all at once and stir firmly to form a cohesive dough.
2. Failing to Cook the Flour Mixture
If the flour paste remains excessively wet, the finished dough may not hold its shape. Stir until it forms a smooth ball that pulls away from the saucepan.
3. Adding Eggs to Extremely Hot Dough
Very hot dough may cook the eggs before they mix in properly. Allow the recommended short cooling period.
4. Making the Dough Too Runny
Excess moisture can cause the mounds to spread rather than rise. Aim for a thick, glossy consistency.
5. Opening the Oven Too Early
This can cause the shells to deflate. Keep the oven closed for at least the first 20 minutes.
6. Underbaking the Pastry
Pale shells may collapse or become soggy. Bake until the exterior is firm and deeply golden.
7. Filling Warm Pastry
Warm shells soften the whipped cream. Allow them to cool completely before assembling.
8. Overwhipping the Cream
Excessive mixing can cause the filling to become grainy. Stop as soon as it holds stable peaks.
9. Filling Too Far in Advance
Moisture from the cream gradually softens the pastry. Assemble close to serving whenever possible.
Optional Vanilla Cream Puff Variations
The following variations are optional suggestions and are not part of the original ingredient list.
Chocolate Cream Puffs
Fold a little cooled melted chocolate into the prepared filling for a chocolate-flavoured centre.
Strawberry Cream Puffs
Add a small amount of finely chopped, well-drained strawberries to the filling just before assembling.
Lemon Cream Puffs
Stir a little finely grated lemon zest into the vanilla cream for a fresh citrus flavour.
Espresso Cream Puffs
Add a small amount of cooled concentrated espresso to the filling, adjusting carefully to avoid making it too loose.
Chocolate-Drizzled Cream Puffs
Finish the filled pastries with thin lines of melted dark or milk chocolate.
Berry-Filled Cream Puffs
Add a few fresh raspberries or blueberries inside each shell before piping in the cream.
Mini Party Cream Puffs
Pipe smaller pastry mounds for bite-sized desserts. Reduce the baking time as needed and check for a firm golden exterior.
Serving Suggestions
Vanilla cream puffs are delicious served slightly chilled, when the filling is cool and the pastry still retains some crispness.
For afternoon tea, arrange the pastries on a large serving plate alongside freshly brewed tea or coffee. Their creamy sweetness pairs particularly well with unsweetened drinks.
For celebrations, stack the pastries neatly on a cake stand or platter. Their golden colour and visible cream filling make them an attractive dessert without elaborate decoration.
Fresh berries can be served on the side to provide a slightly tart contrast to the sweet filling.
If you prefer a more indulgent presentation, offer a small bowl of chocolate sauce separately for drizzling immediately before eating.
For casual family desserts, serve the cream puffs straight from the refrigerator after a short chilling period.
Storage and Make-Ahead Tips
Storing Filled Cream Puffs
Place filled cream puffs in an airtight container and refrigerate promptly. For the best texture, enjoy them within 24 hours, although properly refrigerated pastries may keep for up to 2 days.
Because the filling contains dairy, do not leave the pastries at room temperature for more than 2 hours.
Storing Unfilled Pastry Shells
Allow the shells to cool completely before storing. Keep them in an airtight container for up to a day at room temperature, or freeze them for longer storage.
Freezing Pastry Shells
Unfilled shells can be frozen in a suitable airtight container for approximately 1–2 months for best quality.
When ready to use, warm them briefly in a moderate oven until dry and crisp, then allow them to cool completely before filling.
Can You Freeze Filled Cream Puffs?
Freezing the assembled pastries is not ideal because the cream filling may change texture as it thaws, and the pastry can become soft.
For the best results, freeze the shells separately and prepare the cream filling fresh.
Make-Ahead Preparation
You can bake the shells in advance and prepare the filling separately. Store the filling in the refrigerator and assemble the pastries shortly before serving.
Reheating
Only reheat unfilled pastry shells. Never place cream-filled pastries in a hot oven, as the filling will melt.
Frequently Asked Questions
1. What are vanilla cream puffs?
Vanilla cream puffs are small baked choux pastry shells filled with a sweet, fluffy vanilla cream mixture.
2. Are cream puffs difficult to make?
They require some attention to technique, but the process is manageable for home bakers who follow the instructions carefully.
3. Why did my cream puffs collapse?
They may have been underbaked, exposed to a sudden temperature change or removed before their structure had fully set.
4. Why are my cream puffs soggy?
Excess internal moisture, insufficient baking or filling too far ahead can soften the pastry.
5. Can I use plain flour?
Yes. Plain flour is the British equivalent of all-purpose flour and works well in this recipe.
6. Can I make cream puffs without a piping bag?
Yes. Use two spoons to place rounded mounds of dough onto the baking tray.
7. Why is my choux pastry too runny?
The dough may contain too much moisture or more egg than the flour can support. Add eggs gradually and monitor the consistency.
8. How do I know when the pastry is ready to bake?
The dough should be smooth, glossy and thick enough to hold a rounded mound.
9. Can I open the oven while baking?
Avoid opening the oven during the first 20 minutes, when the pastry is expanding and setting.
10. How do I know when the cream puffs are baked?
They should be noticeably puffed, firm and deeply golden brown rather than pale or soft.
11. Should cream puffs be hollow inside?
Yes. Steam creates the central cavity that makes them suitable for filling.
12. Can I substitute mascarpone for cream cheese?
Yes. The original recipe allows either option. Mascarpone produces a milder, richer flavour.
13. Can I use ordinary pouring cream?
Only if it contains enough fat to whip properly. Low-fat pouring cream generally will not create the required stable texture.
14. Why is my filling too soft?
The cream may not have been whipped sufficiently, or it may have become too warm. Refrigerate briefly and check its consistency.
15. Can I prepare the filling a day in advance?
Yes. Keep it covered in the refrigerator and use it within a suitable refrigerated storage period.
16. Can I make the pastry shells ahead of time?
Yes. Bake them in advance, store them without filling and refresh their crispness if necessary before assembling.
17. Can I freeze homemade cream puff shells?
Yes. Unfilled choux shells freeze well when stored in an airtight freezer-safe container.
18. How much filling should I use?
Add enough cream to fill the hollow centre generously without making the pastry difficult to handle.
19. Should vanilla cream puffs be served cold?
They are particularly enjoyable chilled or cool, with a light cream filling and a delicately crisp shell.
20. How long can filled cream puffs stay outside the refrigerator?
As a general food-safety rule, refrigerate perishable cream-filled pastries within 2 hours, or within 1 hour if the surrounding temperature is above 32°C (90°F).
21. Can I use vanilla bean paste?
Yes. As an optional substitution, vanilla bean paste can replace vanilla extract and will add visible vanilla specks.
22. How do I keep cream puffs crisp?
Bake them until fully golden, let them cool on a wire rack and add the filling close to serving time.
Vanilla Cream Puffs Recipe Card
Homemade Vanilla Cream Puffs
Description: Light golden choux pastry shells filled with a thick, fluffy vanilla cream made with whipping cream and cream cheese or mascarpone.
- Course: Dessert
- Style: French-inspired
- Preparation: Approximately 25 minutes
- Baking: 20–25 minutes
- Oven Rest: 5 minutes
- Cooling and Filling: Approximately 30–45 minutes
- Yield: Approximately 18–22 small puffs
- Oven: 400°F (200°C)
Choux Pastry Ingredients
- 1 cup water
- ½ cup unsalted butter
- 1 cup all-purpose flour
- 4 large eggs
- ¼ teaspoon salt
- 1 teaspoon sugar
Vanilla Cream Ingredients
- 2 cups heavy whipping cream
- ½ cup powdered sugar
- 1 teaspoon vanilla extract
- 4 oz softened cream cheese or mascarpone
Instructions
- Preheat the oven to 400°F (200°C) and line a baking tray with baking parchment.
- Add the water, butter, salt and sugar to a saucepan. Bring to a gentle boil.
- Add the flour all at once and stir vigorously until a smooth ball forms and pulls away from the sides.
- Remove from the heat and allow the dough to cool for approximately 5 minutes.
- Add the eggs one at a time, mixing thoroughly after each addition until the dough becomes smooth and glossy.
- Pipe or spoon small mounds of dough onto the prepared baking tray, leaving space between them.
- Bake for 20–25 minutes until puffed and deeply golden. Do not open the oven during the first 20 minutes.
- Turn off the oven, crack the door slightly and leave the puffs inside for 5 minutes.
- Transfer to a wire rack and cool completely.
- Beat the softened cream cheese or mascarpone until smooth.
- Add the whipping cream, powdered sugar and vanilla extract. Whip until thick and fluffy.
- Slice each cooled cream puff horizontally.
- Pipe or spoon vanilla cream into the bottom half of each shell.
- Replace the tops and chill briefly before serving.
- Dust lightly with powdered sugar if desired.
Recipe Notes
- Use cold whipping cream for the filling.
- Allow the pastry to cool completely before filling.
- Do not open the oven too early.
- For the crispest pastry, assemble shortly before serving.
- Store filled pastries in the refrigerator.
Hashtags: #VanillaCreamPuffs #CreamPuffRecipe #HomemadeDesserts #ChouxPastry #EasyBakingRecipes
Final Thoughts
Homemade vanilla cream puffs are a wonderful dessert for anyone who enjoys crisp, golden pastry and a smooth, delicate filling. Their beautiful appearance makes them perfect for celebrations, yet their simple ingredients make them equally suitable for everyday baking.
With careful preparation, properly baked choux shells and freshly whipped vanilla cream, you can create delicious homemade pastries that look and taste like a special bakery treat.
If you try this recipe, share how your cream puffs turned out, save the recipe for your next baking day and follow along for more homemade dessert ideas.