Cheesy Bread Muffin Cups
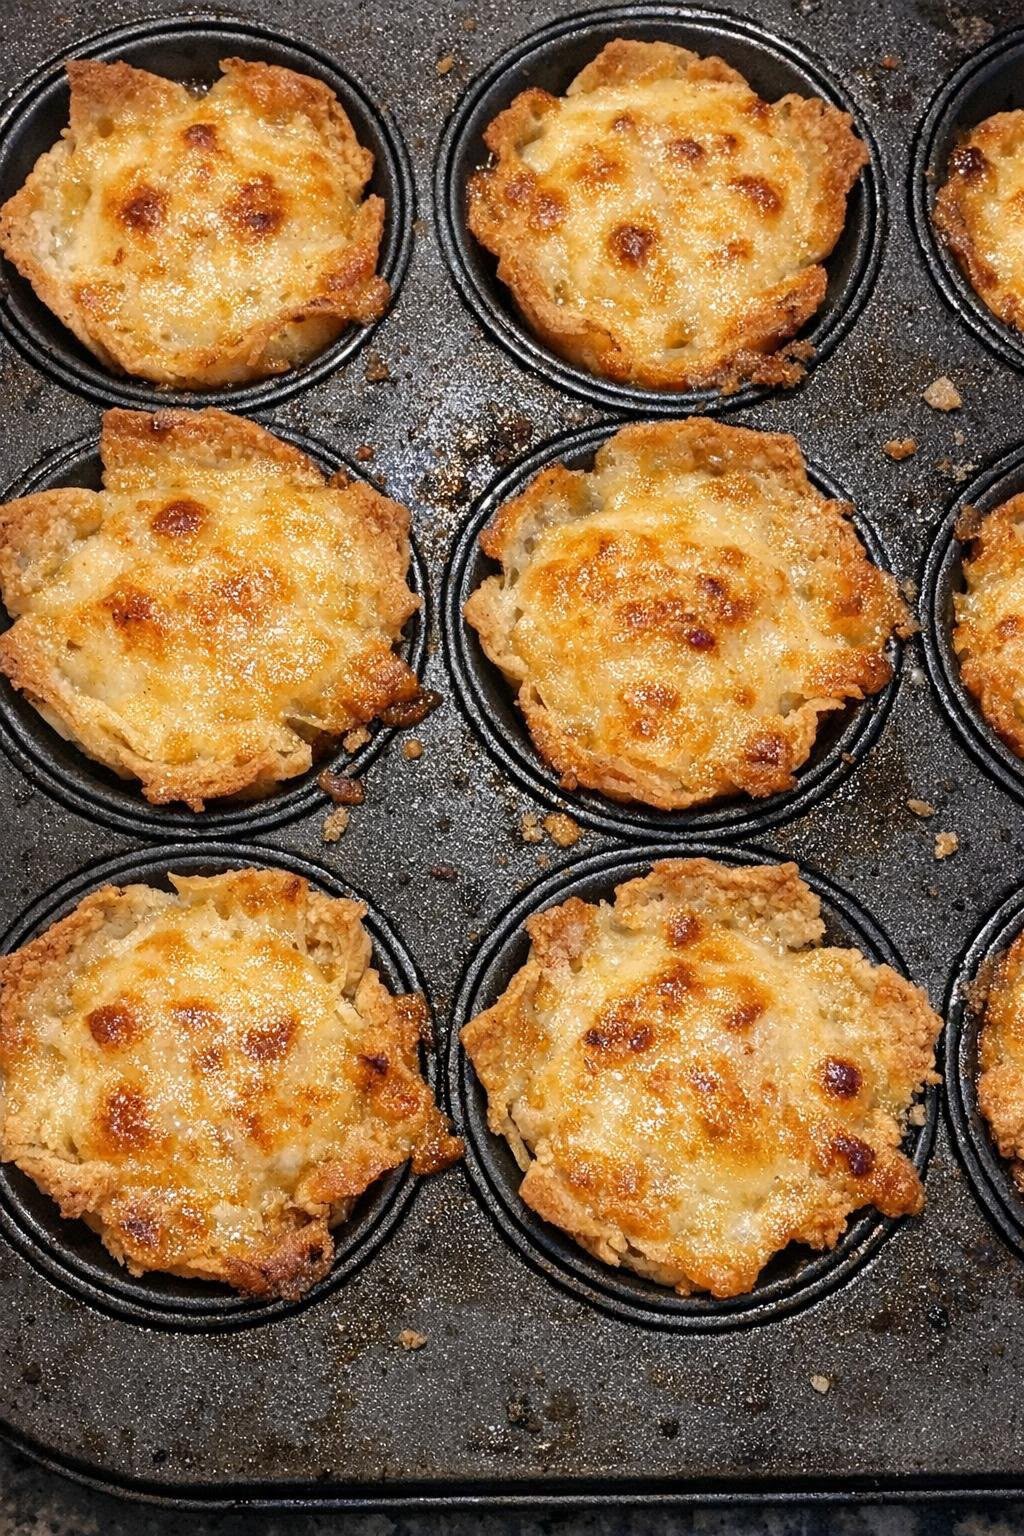
Golden, crispy around the edges and wonderfully cheesy in the middle, these cheesy bread muffin cups are an easy way to turn everyday sandwich bread into a delicious homemade snack.
Each little cup combines buttery toasted bread with a rich mixture of mozzarella, cheddar and Parmesan. As the cups bake, the bread becomes beautifully crisp while the cheese melts into a soft, savoury filling with a lightly browned top.
One of the best things about this recipe is its simplicity. You don’t need homemade pastry, complicated techniques or unusual ingredients. A few slices of sandwich bread, some cheese, eggs, milk and pantry seasonings are all you need.
These little cheese cups are ideal for weekend breakfasts, afternoon snacks, casual family gatherings and party appetisers. They’re also a convenient choice when you want something warm and comforting without spending a long time in the kitchen.
The muffin tin gives each portion its own individual shape, making the cups easy to serve and enjoy. Their rustic, golden edges add extra crunch, while the cheesy filling stays tender and satisfying.
Whether you serve them straight from the oven or prepare a batch for later, these cheesy bread muffin cups are a practical recipe worth keeping in your collection.
Recipe Overview
- Recipe: Cheesy Bread Muffin Cups
- Category: Snack, breakfast or appetiser
- Style: Homemade savoury baking
- Preparation Time: Approximately 10 minutes
- Cooking Time: 15–20 minutes
- Resting Time: A few minutes
- Total Time: Approximately 30–35 minutes
- Servings: Approximately 8 cups
- Difficulty: Easy
- Oven Temperature: 375°F (190°C)
- Cooking Method: Oven baking
- Equipment: Muffin tin
- Main Ingredients: Sandwich bread, mozzarella, cheddar, Parmesan, eggs and milk
The estimated yield assumes one slice of bread per muffin cup. Actual portion size can vary depending on the dimensions of your tin and the size of the bread slices.
Why You’ll Love This Recipe
- Simple everyday ingredients: Everything comes together with common kitchen staples.
- Delicious texture: The contrast between crisp bread and soft melted cheese makes every bite enjoyable.
- Quick preparation: You can assemble the cups in approximately ten minutes.
- Individual portions: The muffin tin creates convenient, easy-to-serve snacks.
- Three-cheese flavour: Mozzarella, cheddar and Parmesan combine for a rich, savoury filling.
- Versatile: Enjoy them for breakfast, brunch, lunchboxes or party platters.
- Customisable: You can experiment with different cheeses, herbs and optional fillings.
- Family-friendly: Their small size and familiar ingredients make them suitable for sharing.
Because the recipe uses sandwich bread instead of pastry, it is especially convenient when you want a warm baked treat without preparing dough from scratch.
Ingredients
Gather the following ingredients before you begin.
For the Bread Cups
- 8 slices sandwich bread, crusts removed
- 2 tablespoons melted butter
For the Cheese Filling
- 1½ cups shredded mozzarella cheese
- ½ cup shredded cheddar cheese
- ¼ cup grated Parmesan cheese
- 2 large eggs
- ½ cup milk
- 1 teaspoon garlic powder
- ½ teaspoon Italian seasoning
- ¼ teaspoon black pepper
- Pinch of salt
These ingredients create a creamy, savoury cheese filling that sets gently during baking while the surrounding bread becomes crisp.
The original method also calls for a little extra cheese on top. If you want a particularly generous topping, reserve a small amount from the measured cheese before mixing the filling.
Ingredient Notes
Sandwich Bread
Soft sandwich bread is ideal because it flattens easily and can be pressed into the muffin tin without too much resistance. White bread produces a delicate flavour, while wholemeal bread offers a slightly nuttier result.
Remove the crusts before shaping. This allows the bread to fold more comfortably into the muffin cups and helps prevent particularly thick edges.
Mozzarella Cheese
Mozzarella gives the filling its characteristic stretchy, melted texture. Low-moisture shredded mozzarella works especially well because it melts smoothly without introducing excessive liquid.
Cheddar Cheese
Cheddar adds depth and a stronger cheese flavour. A mature cheddar produces a more pronounced savoury taste, while mild cheddar gives a gentler result.
Parmesan Cheese
Parmesan brings a salty, nutty flavour that balances the creaminess of the other cheeses. Finely grated Parmesan distributes evenly through the filling.
Eggs
The eggs help bind the milk and cheese into a soft, lightly set filling. They also give the mixture enough structure to stay inside the bread cups after baking.
Milk
Milk keeps the mixture tender and helps the eggs cook into a soft custard-like base rather than a dry filling. Whole milk is a good choice, although semi-skimmed milk can also work.
Butter
Melted butter helps the bread edges brown and adds a rich flavour. Brush it lightly over the bread instead of soaking the slices.
Garlic Powder and Italian Seasoning
Garlic powder introduces savoury warmth, while Italian seasoning adds aromatic herbal notes. Together, they complement the cheese without overpowering it.
Black Pepper and Salt
Black pepper adds a gentle hint of spice. Because cheddar and Parmesan already contain salt, use only the small pinch specified in the recipe.
Equipment You’ll Need
- Standard muffin tin
- Rolling pin
- Mixing bowl
- Whisk or fork
- Measuring cups and spoons
- Pastry brush
- Spoon for portioning the filling
- Small silicone spatula or butter knife for removing the cups
- Wire cooling rack, optional
A non-stick muffin tin makes removal easier. Even with a non-stick tin, greasing the wells thoroughly is important because melted cheese can stick around the edges.
How to Make Cheesy Bread Muffin Cups
Step 1: Preheat the Oven
Preheat your oven to 375°F (190°C). Generously grease the muffin tin, paying particular attention to the bottom and sides of each well.
Allow the oven to heat fully before baking so that the bread begins to crisp as soon as the tin goes in.
Step 2: Prepare the Bread
Remove the crusts from all eight slices of sandwich bread.
Place each slice on a clean work surface and flatten it gently with a rolling pin. The goal is to make the bread thinner and more flexible without tearing it.
Step 3: Shape the Bread Cups
Cut or shape each flattened slice so that it fits inside a muffin cup.
Press the bread gently into the bottom and sides of each well, creating a small edible cup. It’s perfectly normal for the edges to overlap or form rustic folds.
Try to keep the base reasonably even so that the filling sits securely inside.
Step 4: Brush with Butter
Brush the shaped bread cups lightly with the two tablespoons of melted butter.
Pay attention to the exposed edges, as these will become golden and crisp during baking.
Step 5: Prepare the Egg Mixture
In a mixing bowl, add the eggs, milk, garlic powder, Italian seasoning, black pepper and pinch of salt.
Whisk until the eggs are completely combined with the milk and seasonings. The mixture should look smooth and uniform.
Step 6: Add the Cheese
Add the shredded mozzarella, cheddar and grated Parmesan to the egg mixture.
Stir gently until the cheese is evenly distributed. Some cheese may settle towards the bottom, so stir again before portioning if necessary.
Step 7: Fill the Bread Cups
Spoon the cheese mixture into the prepared bread cups, dividing it as evenly as possible.
Avoid filling beyond the top of the bread, as the egg mixture may expand slightly during baking.
Step 8: Add the Cheese Topping
Sprinkle a little extra cheese over the tops of the filled cups. You can use a small amount reserved from the measured cheese mixture.
This creates a lightly browned, bubbling cheese topping.
Step 9: Bake Until Golden
Place the muffin tin in the preheated oven and bake for 15–20 minutes.
The cups are ready when the bread edges look crisp and golden, the cheese is bubbling and lightly browned, and the egg filling has set in the centre.
If the cheese browns before the filling has set, loosely cover the tin with foil and continue baking briefly. The egg mixture should be fully cooked, reaching 160°F (71°C) in the centre.
Step 10: Allow to Rest
Remove the muffin tin from the oven and allow the cups to rest for a few minutes.
This short resting time helps the filling firm up and makes the cups easier to lift without breaking.
Step 11: Remove and Serve
Carefully loosen the edges with a small silicone spatula or butter knife, then lift the cups from the tin.
Serve warm while the bread is crisp and the cheese remains soft and delicious.
How to Get Crispy Bread Edges
The crisp bread shell is one of the most enjoyable parts of these cheesy bread muffin cups. Achieving the right texture begins before the cups go into the oven.
First, flatten the bread evenly. Thick sections tend to remain soft, while thinner edges brown more readily. A rolling pin helps create a consistent thickness.
Second, use melted butter sparingly. The butter encourages golden browning, but adding too much can make the bread greasy.
Third, make sure the bread fits securely against the muffin tin. Loose folds can trap excess egg mixture, which may prevent those sections from becoming crisp.
Finally, leave the exposed bread edges uncovered by the filling whenever possible. This allows the oven’s dry heat to toast them rather than steam them.
How to Make the Perfect Cheesy Filling
The filling should be creamy and tender, with enough structure to hold its shape when the cups are removed from the tin.
Using three different cheeses helps create a balanced result. Mozzarella contributes a soft, stretchy melt, cheddar provides flavour, and Parmesan adds savoury depth.
Shredding cheese from a block is a useful option because freshly grated cheese often melts more smoothly than some packaged shredded varieties.
Whisk the eggs and milk thoroughly before adding the cheese. This helps the egg mixture cook evenly throughout each cup.
It’s also important not to overfill the bread shells. Leave a little room near the top so that the mixture can expand slightly without spilling onto the muffin tin.
Once baked, the filling should be softly set rather than loose or watery. A brief rest allows the cheese and egg mixture to become easier to handle.
How to Know When They’re Ready
Because ovens and muffin tins vary, use the 15–20-minute baking time as your main guide and check the cups towards the end.
The edges should have a deep golden appearance with a crisp, lightly toasted texture. The cheese topping should have melted completely and developed attractive brown spots.
Look closely at the centre. It should appear set rather than liquid. If the cups wobble significantly or the egg mixture remains visibly wet, they need a little more time.
For reliable food safety, the egg filling should reach 160°F (71°C). An instant-read food thermometer is useful when checking a particularly full cup.
Remember that the cups will continue to firm slightly as they rest, but they must be fully cooked before leaving the oven.
Expert Cooking Tips
- Choose soft bread: Fresh, flexible sandwich bread is less likely to crack during shaping.
- Flatten evenly: Use gentle pressure with the rolling pin to avoid tearing the bread.
- Grease thoroughly: Melted cheese can stick to the sides of the muffin tin.
- Don’t overload the butter: A light coating gives better results than a heavy soak.
- Use low-moisture mozzarella: It reduces the likelihood of a watery filling.
- Combine the seasonings first: Whisking them with the eggs and milk ensures even distribution.
- Stir the filling before portioning: Shredded cheese can settle at the bottom of the bowl.
- Fill evenly: Similar portions help all the cups bake at the same rate.
- Leave the bread edges exposed: This encourages a pleasantly crisp finish.
- Watch the final minutes: Cheese can brown quickly towards the end of baking.
- Allow a short rest: A few minutes makes the cups easier to remove.
- Use a gentle lifting tool: A silicone spatula helps prevent the bread from tearing.
- Serve warm: The contrast between crisp bread and melted cheese is best shortly after baking.
Common Mistakes to Avoid
1. Using Bread That Is Too Thick
Very thick slices are difficult to press into a muffin tin and may stay soft inside. Use regular sandwich bread and flatten it lightly.
2. Forgetting to Grease the Tin
The cheese can stick to the sides as it melts. Grease each muffin well carefully before adding the bread.
3. Overfilling the Cups
Too much filling may spill over the sides and stick to the pan. Divide the mixture evenly without filling beyond the rim of the bread.
4. Adding Too Much Milk
Excess liquid makes the filling slower to set and can soften the bread. Keep the original quantity of half a cup.
5. Overworking the Bread
Pressing too firmly can tear the slices. Shape them gradually and use light pressure.
6. Using Excessively Wet Cheese
Very moist fresh mozzarella can release water during baking. Shredded low-moisture mozzarella is the more reliable option.
7. Removing the Cups Too Early
Taking them out before the egg mixture sets can leave the centres soft and unstable. Check that the filling is fully cooked.
8. Leaving Them in the Tin Too Long
Allowing the cups to sit in a hot, steamy tin for an extended period can soften the bottoms. Remove them carefully after their short resting time.
9. Reheating at Excessively High Heat
Very high temperatures may burn the bread before the centres are warm. Use moderate oven heat for reheating.
Optional Variations
The original three-cheese recipe is delicious as written, but you can experiment with these optional additions.
1. Spinach and Cheese Cups
Add a small amount of cooked spinach that has been squeezed thoroughly to remove excess moisture. It adds colour and a mild earthy flavour.
2. Bacon and Cheddar Cups
Mix in a little fully cooked, finely chopped bacon for a smoky, savoury variation.
3. Mozzarella and Tomato Cups
Add a few very small pieces of drained, deseeded tomato. Keep the amount modest to avoid introducing too much moisture.
4. Herb and Garlic Cups
Add finely chopped parsley or chives for a fresher herbal flavour.
5. Spicy Cheese Cups
Mix a small pinch of chilli flakes or finely chopped jalapeño into the cheese filling for gentle heat.
6. Mushroom and Cheese Cups
Add finely chopped mushrooms that have been sautéed until their moisture has evaporated.
7. Four-Cheese Cups
Replace a portion of the mozzarella with Gouda or Gruyère for a richer cheese flavour.
When adding vegetables or other fillings, keep the quantities small so that the egg mixture can cook evenly and the bread shells remain crisp.
Serving Suggestions
These cheesy bread muffin cups are satisfying on their own, but they also work beautifully with simple accompaniments.
For Breakfast
Serve with fresh fruit, sliced tomatoes or a small bowl of yoghurt for a balanced breakfast spread.
For Brunch
Pair the cups with a leafy green salad, fresh cucumber or lightly sautéed mushrooms.
For an Afternoon Snack
Serve warm alongside a little tomato sauce or a mild garlic yoghurt dip.
For Parties
Arrange the cups on a large platter with other finger foods, such as vegetable sticks, savoury pastries and small sandwiches.
For Lunch
Enjoy two cups with a bowl of tomato soup or a crisp mixed salad for a comforting light meal.
The cups are especially appealing when served shortly after baking, while their tops are still golden and the cheese is soft.
Storage and Reheating
Refrigeration
Allow leftover cups to cool briefly, then transfer them to an airtight container. Refrigerate within two hours of cooking and use within 3–4 days.
Reheating in the Oven
Place the refrigerated cups on a baking tray and heat in a preheated oven at approximately 350°F (175°C) for 8–12 minutes, or until piping hot throughout.
The oven is the preferred method for restoring some of the bread’s crisp texture.
Reheating in the Air Fryer
For an alternative method, warm the cups at approximately 325°F (160°C) for 3–5 minutes, checking regularly to prevent over-browning.
Microwave Reheating
The microwave is convenient but may soften the bread. Heat in short intervals until thoroughly hot.
Freezing
Fully cooked cups can be frozen after cooling. Arrange them separately until firm, then transfer to a freezer-safe container or bag.
For the best texture, enjoy within approximately two months. Thaw overnight in the refrigerator before reheating thoroughly.
Make-Ahead Preparation
You can flatten and shape the bread ahead of time, keeping it covered to prevent drying. The cheeses can also be grated in advance.
For the best result, prepare the egg filling and assemble the cups shortly before baking. Leaving wet filling in unbaked bread cups for too long can make the bases soggy.
Frequently Asked Questions
1. Can I use white sandwich bread?
Yes. White sandwich bread is an excellent choice because it is soft, easy to shape and develops crisp edges during baking.
2. Can I use wholemeal bread?
Yes. Wholemeal bread adds a slightly nuttier flavour. Choose slices that are soft enough to flatten without breaking.
3. Do I have to remove the bread crusts?
Removing the crusts makes the bread easier to shape and gives more evenly textured cups. You can leave them on, but the edges may be firmer and more difficult to fold.
4. Can I use only cheddar cheese?
Yes. You can replace the mozzarella and Parmesan with cheddar, although the filling will have a stronger flavour and a different melting texture.
5. Is mozzarella necessary?
No, but mozzarella provides the soft, stretchy texture that makes these cups particularly appealing.
6. Can I use freshly grated cheese?
Absolutely. Freshly grated cheese is a good choice and often melts very smoothly.
7. Why are my bread cups soggy?
Excess liquid, wet cheese, overfilling or underbaking can make the bread soft. Measure the milk carefully and bake until the egg filling has set.
8. Can I use a mini muffin tin?
Yes, but you’ll need smaller pieces of bread and less filling per cup. Begin checking earlier because miniature portions may bake more quickly.
9. How do I stop the cups from sticking?
Generously grease the muffin tin and allow the cups to rest briefly before loosening them gently with a silicone spatula.
10. Can I make these without eggs?
The eggs help bind the filling, so omitting them changes the structure significantly. An egg-free version would require a different filling formula.
11. Can I use plant-based milk?
Unsweetened, unflavoured plant-based milk may work, but the filling’s texture can vary depending on the product.
12. How long do cheesy bread muffin cups take to bake?
The original recipe calls for 15–20 minutes at 375°F (190°C), until the bread is golden and the filling is fully cooked.
13. Why didn’t my cheese turn golden?
Some cheeses brown more readily than others. The amount of cheese on top and the oven’s heat distribution also affect the colour.
14. Can I add cooked chicken?
Yes. Finely chopped, fully cooked chicken can be added in small quantities. Avoid adding too much, as this can interfere with even baking.
15. Can I prepare the filling in advance?
You can prepare it ahead and keep it covered in the refrigerator, but it is best to assemble the bread cups shortly before baking.
16. Can I freeze the finished cups?
Yes. Cool them, freeze in a suitable container and reheat thoroughly before serving. The bread may be slightly softer after freezing.
17. How do I keep the bread crispy after baking?
Remove the cups from the muffin tin after their brief resting period and place them on a wire rack so steam can escape.
18. Can I serve these cold?
Yes, provided they have been cooked and stored safely. However, their texture and cheese flavour are generally more enjoyable when warm.
19. Can I use sourdough bread?
Thin, relatively soft sourdough slices can work, but dense or thick sourdough may be difficult to shape into small muffin cups.
20. Are these suitable for a party buffet?
Yes. Their individual portions make them convenient for gatherings. Keep them hot or refrigerated as appropriate rather than leaving them at room temperature for extended periods.
Cheesy Bread Muffin Cups Recipe Card
Description: Crispy golden bread cups filled with a creamy blend of mozzarella, cheddar, Parmesan, eggs and aromatic seasonings.
- Category: Snack / Appetiser
- Method: Baking
- Preparation: Approximately 10 minutes
- Cooking: 15–20 minutes
- Total: Approximately 30–35 minutes including resting
- Yield: Approximately 8 muffin cups
- Oven: 375°F (190°C)
Ingredients
- 8 slices sandwich bread, crusts removed
- 1½ cups shredded mozzarella cheese
- ½ cup shredded cheddar cheese
- ¼ cup grated Parmesan cheese
- 2 large eggs
- ½ cup milk
- 2 tablespoons melted butter
- 1 teaspoon garlic powder
- ½ teaspoon Italian seasoning
- ¼ teaspoon black pepper
- Pinch of salt
Instructions
- Preheat the oven to 375°F (190°C) and generously grease a muffin tin.
- Remove the crusts from eight slices of sandwich bread.
- Flatten each slice gently using a rolling pin.
- Cut or shape the bread to fit inside the muffin wells, pressing gently to create individual cups.
- Brush the bread cups lightly with melted butter.
- In a mixing bowl, whisk together the eggs, milk, garlic powder, Italian seasoning, black pepper and salt.
- Stir in the mozzarella, cheddar and Parmesan until evenly combined.
- Spoon the cheesy mixture into the bread cups, dividing it evenly.
- Sprinkle a little additional cheese over each cup, using cheese reserved from the measured amounts if desired.
- Bake for 15–20 minutes, until the bread edges are golden, the cheese is bubbling and the egg filling is fully set.
- Allow to rest for a few minutes before carefully removing the cups from the tin.
- Serve warm with crispy bread edges and a soft, cheesy centre.
Recipe Notes
- Use soft sandwich bread for easy shaping.
- Low-moisture mozzarella gives a more reliable texture than fresh, wet mozzarella.
- Grease the muffin tin well to prevent sticking.
- Do not overfill the bread cups.
- Check that the egg filling reaches 160°F (71°C).
- Store leftovers in the refrigerator for up to 3–4 days.
Hashtags
#CheesyBreadCups #EasySnackRecipes #CheeseLovers #HomemadeAppetizers #MuffinTinRecipes
Final Thoughts
These cheesy bread muffin cups show just how easy it is to transform ordinary ingredients into something warm, crisp and delicious. With golden bread edges, a soft three-cheese filling and a simple muffin tin method, they’re a lovely choice for breakfast, snacks or sharing with family and friends.
Give them a try, save the recipe for later and share your favourite cheese combinations in the comments. Follow along for more easy homemade recipes and comforting food ideas.