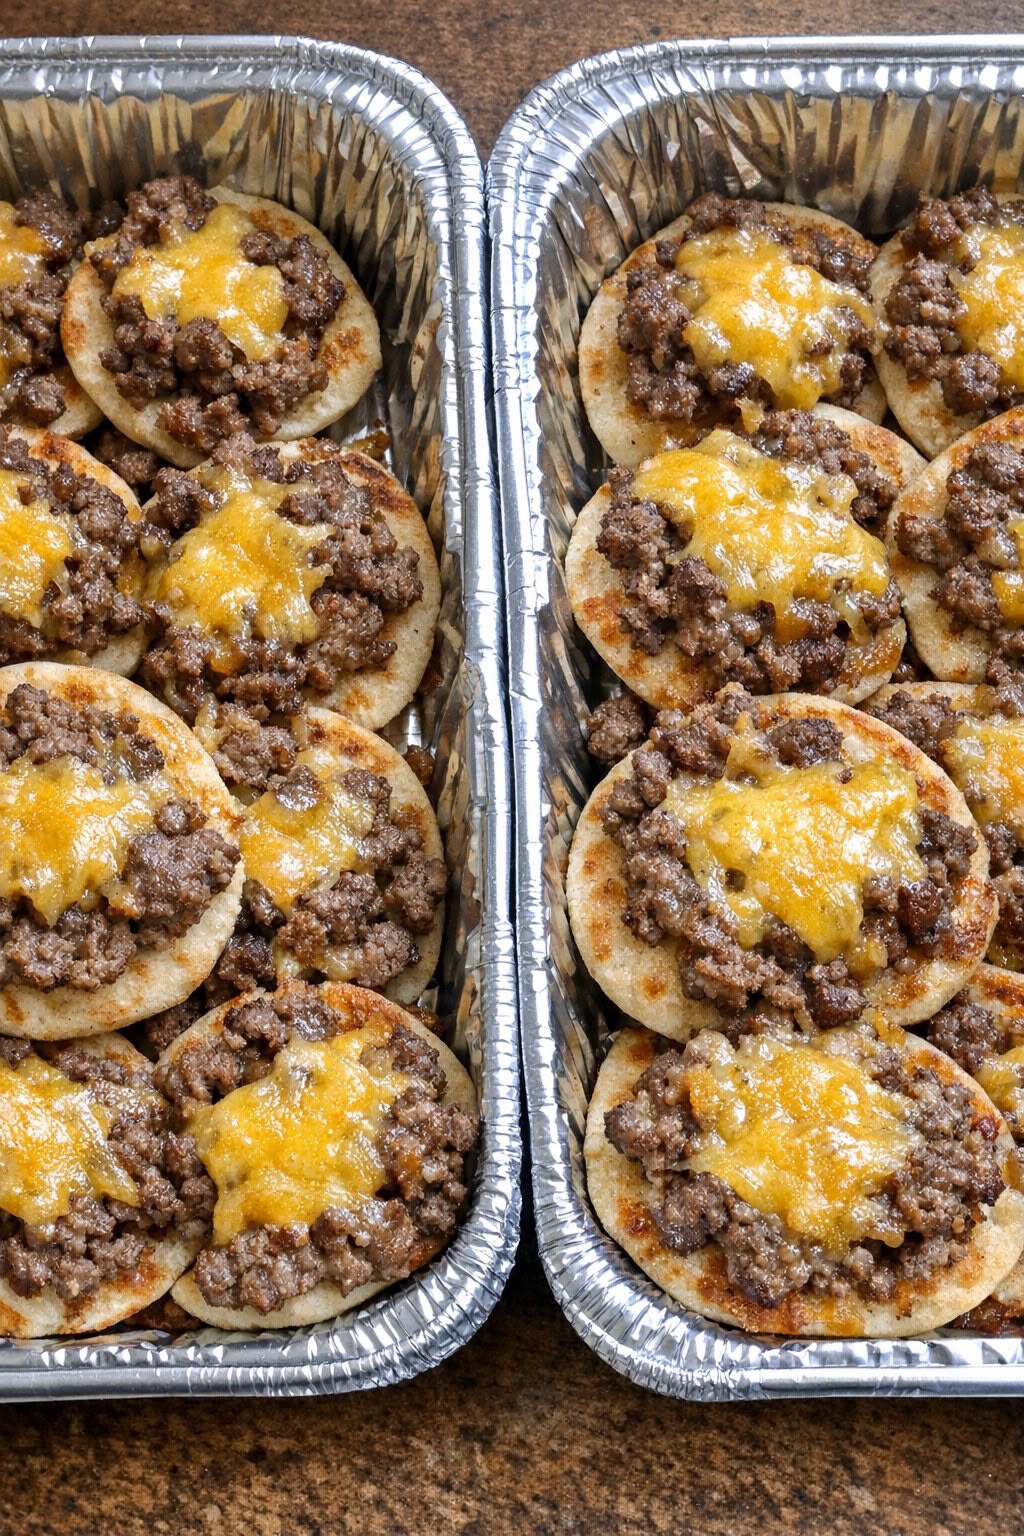
Cheesy Beef Mini Pizzas
Cheesy Beef Mini Pizzas are a wonderfully simple way to turn everyday ingredients into a satisfying homemade meal. With golden mini pita bread bases, juicy seasoned minced beef and a generous topping of melted cheddar cheese, these little pizzas deliver comforting flavour in every bite.
There is something particularly appealing about individual pizzas. Everyone gets their own portion, the toppings are easy to customise, and the smaller bases make serving straightforward. They are equally suitable for a relaxed family dinner, an after-school snack or a platter of warm party food.
Unlike a traditional homemade pizza that requires preparing dough and waiting for it to rise, this recipe uses ready-made mini pita breads or English muffin halves. That simple shortcut saves time while still giving you a delicious golden base with a satisfying bite.
The minced beef is cooked with onion, garlic, Worcestershire sauce and paprika to create a savoury topping with plenty of depth. The cheddar melts over the warm beef, bringing everything together into a rich, cheesy finish.
Another advantage is how easy these mini pizzas are to prepare in batches. You can cook the beef filling ahead of time, assemble the pizzas shortly before serving and bake them until the cheese is bubbling.
Whether you are looking for an easy weeknight dinner, a crowd-pleasing snack or a practical way to use minced beef, these Cheesy Beef Mini Pizzas are a recipe worth keeping close at hand.
Recipe Overview
- Recipe Name: Cheesy Beef Mini Pizzas
- Category: Main course, snack or appetiser
- Style: American-inspired comfort food
- Preparation Time: Approximately 10 minutes
- Cooking Time: Approximately 15–18 minutes, plus optional broiling
- Total Time: Approximately 25–30 minutes
- Yield: 12 mini pizzas
- Servings: Approximately 4–6, depending on appetite
- Oven Temperature: 400°F (200°C)
- Cooking Method: Stovetop and oven
- Main Ingredients: Minced beef, mini pita breads, cheddar cheese, onion and garlic
- Difficulty: Easy
The preparation and total times are estimates based on the supplied method. Actual cooking time depends on your oven, the thickness of the breads and the size of your frying pan.
Why You’ll Love This Recipe
- Simple everyday ingredients: The recipe uses familiar supermarket staples without complicated preparation.
- No homemade dough required: Ready-made pita breads eliminate kneading and proving.
- Rich beef flavour: Worcestershire sauce, onion, garlic and paprika give the topping a satisfying savoury taste.
- Delicious melted cheese: Cheddar adds creaminess and a lightly sharp flavour.
- Individual portions: Mini pizzas are easy to serve and share.
- Family-friendly: The mild original seasoning makes these suitable for a range of preferences.
- Easy to prepare ahead: The beef filling can be cooked in advance.
- Flexible serving options: Enjoy them as dinner, lunch, appetisers or a warm party snack.
Ingredients
This recipe makes 12 Cheesy Beef Mini Pizzas using the following original ingredients.
For the Mini Pizza Bases
- 12 mini pita breads or English muffin halves
For the Seasoned Beef Topping
- 1 lb (approximately 450 g) minced beef
- 1 small onion, finely chopped
- 2 cloves garlic, minced
- 1 tablespoon Worcestershire sauce
- 1 teaspoon paprika
- ½ teaspoon salt
- ¼ teaspoon black pepper
- 1 tablespoon olive oil
For the Cheese Topping
- 1½ cups shredded cheddar cheese (approximately 170 g)
Ingredient Notes
Mini Pita Breads
Mini pita breads make convenient pizza bases because they hold their shape and support a generous quantity of toppings. Their slightly chewy texture becomes pleasantly crisp around the edges after baking. English muffin halves are another excellent choice, especially if you prefer a thicker, bread-like base.
Minced Beef
Minced beef is the main protein and gives these pizzas their hearty character. Choose fresh beef with a moderate amount of fat for flavour, but drain away excessive grease after browning. Breaking the meat into small crumbles makes it easier to distribute evenly over the breads.
Cheddar Cheese
Cheddar melts into a rich, creamy topping and complements the seasoned beef particularly well. Mature cheddar offers a stronger flavour, while mild cheddar creates a softer, less pronounced taste. Grating cheese from a block often gives a smoother melt than some pre-shredded varieties.
Onion and Garlic
Finely chopped onion adds gentle sweetness as it softens in the frying pan. Garlic brings an aromatic savoury note that supports the beef without overwhelming it.
Worcestershire Sauce
This sauce contributes tangy, savoury depth. A small amount helps round out the flavour of the minced beef. Check the label if you need an anchovy-free or otherwise specialised version.
Paprika
Paprika provides a warm, mild flavour and attractive colour. Regular sweet paprika is ideal for the original recipe.
Olive Oil
Olive oil helps soften the onion and provides an even cooking surface for the beef. If the mince releases plenty of fat, there is no need to add any more oil.
Equipment You’ll Need
- Large frying pan or skillet
- Wooden spoon or heatproof spatula
- Sharp knife and chopping board
- Measuring spoons
- Cheese grater, if using block cheddar
- Large baking tray or disposable aluminium baking trays
- Oven gloves
- Serving spatula
Use baking trays large enough to hold the mini pizzas without overcrowding. When using disposable foil trays, place them on a sturdy baking tray for easier and safer handling.
How to Make Cheesy Beef Mini Pizzas
Step 1: Preheat the Oven
Preheat your oven to 400°F (200°C). Arrange the 12 mini pita breads or English muffin halves on a baking tray, leaving a little room between them so heat can circulate.
Step 2: Heat the Olive Oil
Place a large frying pan over medium heat and add 1 tablespoon of olive oil. Allow it to warm briefly without smoking.
Step 3: Soften the Onion
Add the finely chopped onion and cook for 2–3 minutes, stirring occasionally, until it begins to soften and becomes slightly translucent.
Step 4: Brown the Minced Beef
Add 1 lb of minced beef to the pan. Break it into small crumbles with a wooden spoon and continue cooking until browned and cooked through. The beef should reach a safe internal temperature of 160°F (71°C). Drain any excessive fat if necessary.
Step 5: Add the Seasonings
Stir in the minced garlic, Worcestershire sauce, paprika, salt and black pepper. Mix thoroughly so the seasonings are distributed throughout the beef.
Step 6: Finish Cooking the Beef
Cook for another 1–2 minutes, stirring gently, until the garlic becomes fragrant and the meat is evenly seasoned. Remove the frying pan from the heat.
Step 7: Add the Beef Topping
Spoon the cooked beef mixture generously over each mini pita bread. Spread it towards the edges while keeping the topping reasonably even. Avoid piling too much beef into the centre.
Step 8: Sprinkle with Cheddar
Divide the 1½ cups of shredded cheddar cheese evenly between the pizzas. Scatter the cheese over the beef so it can melt into the small spaces between the crumbles.
Step 9: Bake the Mini Pizzas
Place the baking tray in the preheated oven and bake for 8–10 minutes. The cheese should be completely melted and bubbling, while the exposed edges of the pita breads become lightly golden.
Step 10: Optional Golden Finish
For a slightly more golden topping, place the pizzas under the broiler or grill for 1–2 minutes. Watch continuously because cheese can brown very quickly under direct heat.
Step 11: Serve Warm
Remove the pizzas from the oven and allow them to settle briefly before serving. Enjoy them while the cheese is warm and soft, the seasoned beef is juicy and the bread has a lightly crisp edge.
How to Brown Minced Beef Properly
Good browning makes a noticeable difference to the finished pizzas. Start with a properly heated frying pan and avoid adding too much beef at once if your pan is small.
As the beef cooks, break large pieces apart with a spatula. Smaller crumbles are better for mini pizzas because they are easier to portion and less likely to fall off when someone takes a bite.
Give the meat occasional contact with the hot pan rather than stirring constantly. This encourages savoury browning. However, continue stirring often enough to prevent burning.
Once the beef is thoroughly cooked, remove excess grease if necessary. A very oily mixture can soak into the pita bases and reduce their crispness.
The Worcestershire sauce, paprika, garlic and seasoning should be stirred in towards the end, following the original method. This allows the aromatic ingredients to flavour the meat without exposing the garlic to prolonged cooking.
How to Keep Mini Pizza Bases Crispy
The key to a good mini pizza is balancing a soft interior with a lightly crisp bottom. Pita breads naturally work well because their structure is sturdy enough to support the beef and cheese.
Start by choosing breads that are fresh but not excessively moist. Arrange them in a single layer instead of stacking them together.
The beef topping should be cooked until any excess liquid has mostly evaporated. If the mixture looks particularly wet, allow it to cook for another short moment before spooning it over the breads.
Do not overload the centre of each pizza. Spreading the beef evenly helps the base bake more consistently.
For an optional crispier version, briefly pre-toast the pita breads before adding toppings. This is an additional technique rather than part of the original method. Keep the toasting short to prevent the bases becoming too hard during the final bake.
After baking, serve the pizzas promptly. Leaving them in a closed container while still steaming can soften the bottoms.
How to Get Perfectly Melted Cheddar
Cheddar is one of the most important elements in this recipe. Its creamy texture complements the savoury beef and makes the mini pizzas particularly satisfying.
For even melting, distribute the shredded cheese in a relatively thin, generous layer rather than placing one large mound in the middle of each pizza.
Freshly grated cheddar can be especially useful because it usually melts more smoothly. If using packaged shredded cheese, choose a variety intended for cooking and melting.
The original recipe calls for baking at 400°F (200°C) for 8–10 minutes. At this temperature, the cheese should soften and bubble without the bread needing a lengthy cooking period.
If you want a golden finish, use the broiler for only 1–2 minutes and watch carefully. The aim is a lightly browned surface, not dried or burnt cheese.
Expert Cooking Tips
- Choose evenly sized breads. This helps all 12 pizzas bake at a similar rate.
- Finely chop the onion. Small pieces blend into the beef topping more naturally.
- Use a large frying pan. Extra space encourages proper browning.
- Break up the mince thoroughly. Small crumbles make assembling and eating easier.
- Drain excess fat. This helps prevent greasy pizza bases.
- Add garlic towards the end. It retains its aroma without scorching.
- Taste the cooked filling. Adjust seasoning before assembly if desired.
- Keep toppings evenly distributed. Each pizza should have a similar balance of beef and cheese.
- Avoid excessive cheese in one spot. An even layer melts more consistently.
- Do not overcrowd the baking tray. Leave space for hot air to circulate.
- Watch the grill closely. The golden topping can turn dark very quickly.
- Serve soon after baking. The contrast between melted cheese and crisp bread is best while fresh.
Common Mistakes to Avoid
1. Using Beef That Is Too Greasy
Excess fat can soak into the bread. Drain unnecessary grease after cooking the beef, while retaining enough moisture for a juicy topping.
2. Leaving the Beef in Large Chunks
Large pieces are difficult to spread over small breads. Break the mince into small, even crumbles.
3. Adding the Cheese Before the Beef
The original method places beef on the bread first, followed by cheddar. This creates a melted cheese layer that helps hold the topping together.
4. Overloading Each Pizza
Too much filling makes the pizzas difficult to lift and can prevent the base from crisping.
5. Baking at the Wrong Temperature
Use the specified 400°F (200°C) oven temperature. A cooler oven may soften the bread before the cheese melts properly.
6. Overcooking the Garlic
Burnt garlic creates bitterness. Add it towards the end of cooking the beef.
7. Leaving the Pizzas Under the Grill
Broiling is optional and very quick. Do not leave the oven unattended during this stage.
8. Storing Pizzas While Still Hot
Sealing steaming pizzas immediately traps moisture and can make the bread soggy. Cool leftovers promptly before refrigerating them.
Optional Recipe Variations
The following ideas are optional adaptations and are not included in the original ingredient list.
1. Mozzarella and Cheddar Beef Pizzas
Replace part of the cheddar with shredded mozzarella for a milder, stretchier cheese topping.
2. Spicy Beef Mini Pizzas
Add a small pinch of chilli flakes or finely chopped jalapeños to the cooked beef.
3. Barbecue Beef Mini Pizzas
Stir a small quantity of barbecue sauce into the cooked beef before assembling the pizzas for a sweet and smoky flavour.
4. Mushroom and Beef Pizzas
Add finely chopped mushrooms while cooking the onion. Allow their moisture to evaporate before adding the beef.
5. Pepper and Cheddar Pizzas
Mix finely diced bell peppers into the topping for additional colour and sweetness.
6. Turkey Mini Pizzas
Use minced turkey instead of minced beef for a different flavour. Cook turkey thoroughly to 165°F (74°C).
7. Extra-Cheesy Mini Pizzas
Add a modest amount of grated Parmesan or mozzarella alongside the original cheddar topping.
What to Serve with Cheesy Beef Mini Pizzas
These little pizzas are hearty enough to enjoy on their own, but a few simple side dishes can turn them into a complete family meal.
Fresh Green Salad
A crisp salad with lettuce, cucumber and tomatoes provides a refreshing contrast to the rich beef and cheese.
Roasted Vegetables
Roasted courgettes, carrots or peppers bring colour and variety to the plate.
Potato Wedges
Golden oven-baked potato wedges make a filling accompaniment, especially for a relaxed weekend dinner.
Simple Dipping Sauces
Tomato sauce, garlic yoghurt dip or a mild barbecue sauce can be served separately for dipping. These are optional serving additions.
Party Platter
For parties, arrange the mini pizzas on a large serving tray with napkins and small bowls of dipping sauce. Their individual size makes them convenient finger food.
Storage, Freezing and Reheating
Refrigerating Leftovers
Allow leftover pizzas to cool briefly and refrigerate them within two hours of cooking. Store in an airtight container at 4°C (40°F) or below for up to 3–4 days.
Reheating in the Oven
Arrange the pizzas on a baking tray and reheat at approximately 350°F (175°C) until thoroughly hot in the centre. This method helps restore some crispness to the bread. Reheat leftovers to 165°F (74°C).
Reheating in an Air Fryer
An air fryer can also restore a crisp edge. Heat at approximately 350°F (175°C), checking frequently until the pizzas are hot throughout.
Using the Microwave
The microwave is convenient, although it may make the bread softer. Heat in short intervals until steaming hot throughout.
Freezing
For make-ahead convenience, cool the cooked beef filling completely, then assemble the pizzas and freeze them in a single layer before transferring to freezer-safe packaging. Use within 1–2 months for best quality. Bake from frozen until the bases are hot, the cheese has melted and the beef topping reaches 165°F (74°C).
Making the Beef Ahead
The beef mixture can be prepared up to 1–2 days before assembly and refrigerated promptly in a sealed container. Assemble the pizzas with the chilled filling and bake until thoroughly heated.
Frequently Asked Questions
1. Can I use English muffins instead of pita bread?
Yes. The original recipe specifically allows English muffin halves. They produce a slightly thicker and softer pizza base.
2. Can I make these pizzas ahead of time?
Yes. Prepare the beef filling in advance and assemble the pizzas when you are ready to bake.
3. What type of minced beef works best?
Fresh minced beef with moderate fat content offers good flavour. Drain excessive grease after browning.
4. Can I use mozzarella instead of cheddar?
Yes. Mozzarella is a suitable optional substitution, although the cheese flavour will be milder.
5. Do I need pizza sauce?
No. The original recipe relies on seasoned beef and cheddar without pizza sauce.
6. How do I prevent soggy mini pizzas?
Cook off excessive liquid from the beef, drain unwanted grease and avoid overloading the bread.
7. Can I make them spicy?
Yes. Add optional chilli flakes, chilli powder or jalapeños according to your preferred heat level.
8. How long do the pizzas bake?
The original recipe specifies 8–10 minutes at 400°F (200°C), with an optional additional 1–2 minutes under the broiler.
9. Should the beef be cooked before baking?
Absolutely. The minced beef must be thoroughly cooked in the frying pan before being added to the mini pizza bases.
10. Can I use larger pita breads?
Yes, but you will make fewer, larger pizzas, and the amount of filling per pizza will change.
11. Can I freeze the mini pizzas?
Yes. They are suitable for freezing when wrapped and stored properly.
12. How do I make the cheese golden?
Use the optional broiler stage for 1–2 minutes, watching continuously.
13. Can I use leftover cooked beef?
Yes, provided it has been stored safely. Season it appropriately, then make sure it is reheated thoroughly.
14. Are these suitable for children?
The original seasoning is relatively mild. Let the pizzas cool to a comfortable eating temperature before serving.
15. Can I add vegetables?
Yes. Finely chopped mushrooms, peppers or spinach are optional additions. Cook away excess moisture where necessary.
16. What if I do not have Worcestershire sauce?
You can omit it, although the savoury flavour will be slightly different. A small amount of soy sauce is one possible optional substitute.
17. Can I prepare them in disposable foil trays?
Yes. Oven-safe aluminium trays are useful for preparing large batches. Support them with a sturdy baking tray when transferring them in and out of the oven.
18. How many pizzas should I serve per person?
Two or three mini pizzas may be appropriate as a light meal, depending on their size and any accompaniments.
19. Can I use an air fryer instead of an oven?
Yes, as an adaptation. Cook in small batches at a suitable temperature until the cheese melts and the pizzas are heated thoroughly. Times vary by appliance.
20. What makes these pizzas different from regular pizza?
They use convenient ready-made individual bread bases and a fully cooked, seasoned beef topping rather than traditional pizza dough and tomato sauce.
Cheesy Beef Mini Pizzas Recipe Card
Cheesy Beef Mini Pizzas
Easy homemade mini pizzas with crispy pita bases, savoury seasoned minced beef and plenty of melted cheddar cheese. Perfect for casual family meals, appetisers and party platters.
- Category: Main course or snack
- Method: Stovetop and oven
- Prep Time: Approximately 10 minutes
- Cook Time: Approximately 15–18 minutes
- Total Time: Approximately 25–30 minutes
- Yield: 12 mini pizzas
- Servings: Approximately 4–6
- Difficulty: Easy
Ingredients
- 12 mini pita breads or English muffin halves
- 1 lb (450 g) minced beef
- 1½ cups shredded cheddar cheese
- 1 small onion, finely chopped
- 2 cloves garlic, minced
- 1 tablespoon Worcestershire sauce
- 1 teaspoon paprika
- ½ teaspoon salt
- ¼ teaspoon black pepper
- 1 tablespoon olive oil
Instructions
- Preheat the oven to 400°F (200°C) and arrange the mini pita breads on a baking tray.
- Heat the olive oil in a frying pan over medium heat.
- Add the onion and cook for 2–3 minutes until softened.
- Add the minced beef and cook until thoroughly browned, breaking it into small crumbles. Ensure it reaches 160°F (71°C).
- Stir in the minced garlic, Worcestershire sauce, paprika, salt and black pepper.
- Cook for another 1–2 minutes, then remove from the heat.
- Spoon the cooked beef mixture evenly over each mini pita bread.
- Sprinkle the shredded cheddar cheese generously over the beef.
- Bake for 8–10 minutes until the cheese is melted and bubbling.
- Broil for an optional 1–2 minutes if you prefer a golden cheese topping.
- Serve hot with lightly crispy bread edges, juicy seasoned beef and melted cheddar.
Recipe Notes
- Drain excessive fat from the beef to prevent soggy bread.
- Finely crumbled beef makes the topping easier to distribute.
- Freshly grated cheddar often melts particularly well.
- English muffin halves can replace mini pita breads.
- Keep a close eye on the pizzas during the optional broiling stage.
- Preparation and cooking totals are estimates; the original baking time is 8–10 minutes.
Hashtags: #CheesyBeefMiniPizzas #EasyDinnerRecipes #HomemadePizza #GroundBeefRecipes #FamilyFriendlyMeals
Final Thoughts
Cheesy Beef Mini Pizzas are a brilliant example of how straightforward ingredients can become a warm, flavourful and satisfying homemade meal. The combination of crisp mini breads, properly seasoned beef and golden melted cheddar offers familiar comfort-food flavour without the work of traditional pizza dough.
They are easy to share, convenient to prepare in batches and versatile enough for busy evenings or informal gatherings. Keep the beef filling well seasoned, spread the toppings evenly and serve the pizzas while the cheese is still deliciously melted.
If you try this recipe, share how your mini pizzas turned out in the comments. Save the recipe for your next family dinner, share it with someone who loves cheesy comfort food and follow along for more easy homemade recipe ideas.