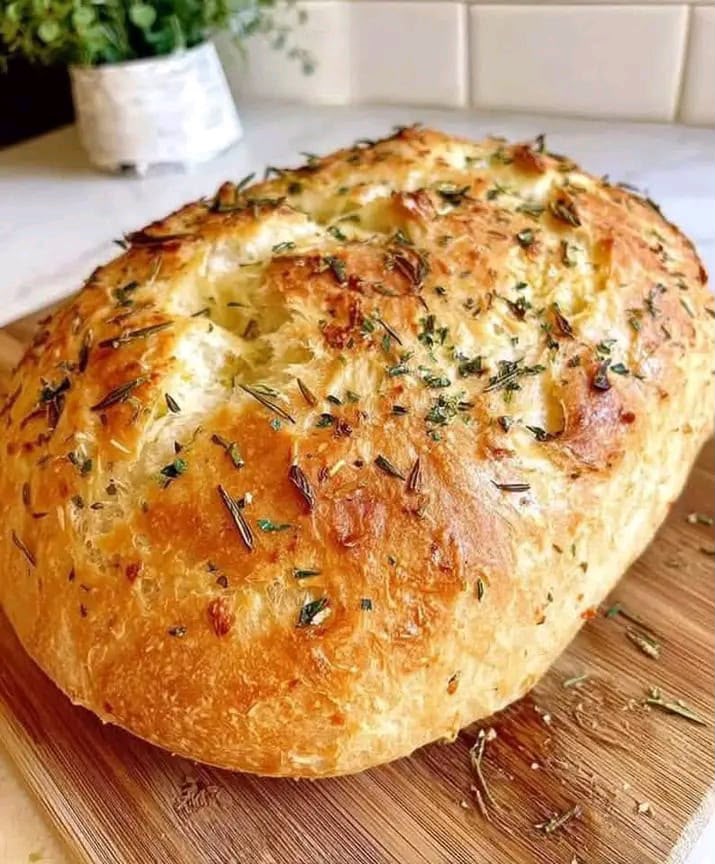
Garlic Herb Cheese Bread
There is something wonderfully comforting about the smell of freshly baked bread filling the kitchen, especially when garlic, melted cheese and fragrant herbs are involved. This homemade garlic herb cheese bread brings together everything people love about rustic bakery-style bread: a beautifully golden crust, a soft interior and delicious savoury flavour in every slice.
Made with mozzarella, Parmesan, garlic, rosemary, thyme and Italian seasoning, this loaf offers a lovely balance of creamy cheese and aromatic herbs. The crust bakes to a deep golden colour while the inside remains tender, making it particularly enjoyable when served slightly warm.
Unlike ordinary garlic bread, which is usually prepared by spreading garlic butter over slices of an already baked loaf, this recipe incorporates the cheese, garlic and herbs directly into homemade yeast dough. That means the flavours are distributed throughout the bread rather than concentrated only on the surface.
The combination of mozzarella and Parmesan is especially appealing. Mozzarella adds pockets of mild, creamy cheese, while Parmesan brings a deeper, savoury richness. Together with olive oil and a buttery topping, they create a loaf that tastes special without requiring complicated ingredients.
This garlic herb cheese bread is ideal for family dinners, weekend baking, casual entertaining or serving alongside a comforting bowl of soup. It also makes a delicious accompaniment to pasta, roasted vegetables and hearty homemade sauces.
Whether you are learning to bake with yeast for the first time or simply looking for a new savoury bread recipe, the instructions below will help you prepare a fragrant homemade loaf with confidence.
Recipe Overview
- Recipe Name: Garlic Herb Cheese Bread
- Category: Bread, Side Dish
- Style: Italian-inspired homemade bread
- Preparation Time: Approximately 20 minutes of active work
- First Rise: Approximately 1 hour
- Second Rise: 30–40 minutes
- Baking Time: 30–35 minutes
- Total Time: Approximately 2 hours 20 minutes to 2 hours 35 minutes, including rising
- Yield: 1 large loaf, approximately 10–12 slices
- Difficulty: Beginner-friendly
- Oven Temperature: 400°F (200°C)
- Cooking Method: Oven baking
- Equipment: Large mixing bowl and parchment-lined baking tray
- Main Ingredients: Flour, yeast, mozzarella, Parmesan, garlic and herbs
The timings are approximate because yeast dough rises at different speeds depending on room temperature and dough conditions.
Why You’ll Love This Recipe
- Beautiful homemade texture: The bread develops a rustic golden crust with a soft, tender centre.
- Wonderful garlic flavour: Fresh minced garlic adds savoury depth without requiring a complicated garlic butter mixture.
- Two delicious cheeses: Mozzarella provides creamy richness while Parmesan adds a more pronounced savoury flavour.
- Fragrant herbs: Rosemary, thyme and Italian seasoning create a delicious aroma during baking.
- Simple pantry ingredients: Most of the ingredients are commonly available in home kitchens.
- Versatile serving options: The loaf works with soups, salads, pasta dishes and family meals.
- Excellent for sharing: A large homemade loaf looks inviting when brought to the dinner table.
- Easy to customise: Optional adjustments allow you to experiment with different cheeses and herbs.
Ingredients
For the Bread Dough
- 3½ cups all-purpose flour (plain flour), approximately 440 g
- 2¼ teaspoons active dry yeast (approximately 7 g)
- 1¼ cups warm water (approximately 300 ml)
- 1 tablespoon sugar
- 1½ teaspoons salt
- 3 tablespoons olive oil
For the Cheese and Herb Filling
- 1 cup shredded mozzarella cheese
- ½ cup grated Parmesan cheese
- 3 cloves garlic, minced
- 1 teaspoon dried rosemary
- 1 teaspoon dried thyme
- 1 teaspoon Italian seasoning
For the Topping
- 2 tablespoons melted butter
The original method also suggests a little extra Parmesan and herbs for sprinkling. These are optional additions, with no extra quantity specified.
Ingredient Notes
Plain Flour
Plain flour forms the structure of the bread. When combined with water and kneaded, its proteins develop gluten, which helps the dough stretch and trap the gas produced by yeast.
For reliable results, measure the flour carefully. Too much flour can create a dry, dense loaf. If possible, use kitchen scales rather than packing flour tightly into measuring cups.
Active Dry Yeast
Active dry yeast allows the bread to rise and develop its light texture. The recipe begins by combining yeast with warm water and sugar, giving it an opportunity to become active before the flour is added.
The yeast mixture should appear foamy after approximately 5–10 minutes. If it shows no activity, check the freshness of the yeast and the temperature of the water.
Warm Water
Warm water hydrates the flour and activates the yeast. Aim for a comfortable temperature of approximately 100–110°F (38–43°C). Very hot water may damage the yeast, while cold water can considerably slow the rise.
Sugar
A tablespoon of sugar supports yeast activity during the initial activation stage. It also contributes a subtle sweetness that balances the salty cheeses and savoury herbs.
Olive Oil
Olive oil enriches the dough and helps create a softer texture. It also complements the Mediterranean-inspired flavours of rosemary, thyme and garlic.
Mozzarella Cheese
Mozzarella provides mild, creamy cheese flavour. Shredded low-moisture mozzarella is a practical choice because it blends into the dough without introducing too much additional moisture.
Parmesan Cheese
Parmesan brings a concentrated savoury taste that makes the bread particularly flavourful. Finely grated Parmesan distributes easily through the dough.
Fresh Garlic
Three minced garlic cloves add a distinctive aroma. Chop the garlic finely so that it disperses throughout the bread rather than forming large, strongly flavoured pieces.
Rosemary and Thyme
Dried rosemary contributes a pine-like, aromatic character, while thyme offers an earthy flavour. Both pair naturally with garlic and Parmesan.
Italian Seasoning
Italian seasoning generally combines several dried herbs. It complements the rosemary and thyme and gives the loaf a well-rounded savoury taste.
Melted Butter
Brushing the risen loaf with melted butter before baking adds richness and helps produce an appetising golden surface.
Equipment You’ll Need
- Large mixing bowl
- Measuring cups and spoons
- Kitchen scales, if available
- Wooden spoon or dough scraper
- Clean work surface for kneading
- Clean kitchen towel or reusable bowl cover
- Baking tray
- Baking parchment
- Pastry brush
- Oven
- Wire cooling rack
- Bread knife
A stand mixer fitted with a dough hook can simplify kneading, but the recipe works perfectly well when made by hand.
Step-by-Step Instructions
Step 1: Activate the Yeast
Pour the warm water into a large mixing bowl. Add the sugar and active dry yeast, then stir gently until combined.
Leave the mixture for 5–10 minutes. A layer of bubbles or foam should begin forming on the surface, indicating that the yeast is active.
Step 2: Add the Oil and Salt
Once the yeast mixture is foamy, add the olive oil and salt. Stir briefly to distribute them through the liquid.
Step 3: Incorporate the Flour
Gradually add the flour, mixing with a wooden spoon or your hands. Continue until the ingredients come together into a soft dough.
The dough should feel slightly tacky but manageable. Avoid adding excessive additional flour, as this can make the finished loaf heavy.
Step 4: Knead the Dough
Transfer the dough to a lightly floured surface. Knead for approximately 8–10 minutes, folding and pushing the dough until it becomes smoother and more elastic.
Proper kneading helps create the structure needed for a light, well-risen loaf.
Step 5: Allow the First Rise
Place the dough in a lightly greased bowl and cover it with a clean kitchen towel or suitable cover.
Leave it in a comfortably warm location for approximately 1 hour, or until it has doubled in size.
The dough should look noticeably expanded and feel airy when gently touched.
Step 6: Add the Cheese, Garlic and Herbs
After the first rise, gently deflate the dough. Add the mozzarella, Parmesan, minced garlic, dried rosemary, thyme and Italian seasoning.
Knead gently just until the ingredients are evenly distributed. Avoid excessive handling at this stage because the dough has already developed its structure.
Step 7: Shape the Loaf
Gather the dough into a rounded loaf, tucking the edges underneath to create a smooth surface.
Place the shaped loaf onto a baking tray lined with baking parchment.
Step 8: Allow the Second Rise
Cover the loaf loosely and allow it to rise for another 30–40 minutes.
During this time, the dough should become visibly puffier. The second rise helps the shaped loaf develop a lighter texture before baking.
Step 9: Preheat the Oven
Preheat your oven to 400°F (200°C). Allow it to reach the correct temperature before placing the bread inside.
Step 10: Add the Butter Topping
Brush the top of the risen loaf carefully with the melted butter.
If desired, sprinkle a little additional dried herb seasoning and Parmesan over the surface for a more decorative finish.
Step 11: Bake Until Golden
Place the loaf in the preheated oven and bake for 30–35 minutes, until the surface is deeply golden and the bread appears fully baked.
Because ovens vary, check the loaf towards the end of baking. A properly baked bread loaf should feel relatively light for its size and sound hollow when tapped on the underside.
For an additional check, the centre of the bread should generally register around 190–200°F (88–93°C) on an instant-read thermometer, although pockets of melted cheese may affect an individual reading.
Step 12: Cool and Serve
Remove the loaf from the oven and transfer it to a wire rack.
Allow it to cool slightly before slicing. This resting period helps the interior settle and prevents the crumb from becoming compressed while it is still very hot.
Serve warm and enjoy the fragrant garlic, tender bread and melted cheese.
How to Make Soft Yeast Dough
A successful garlic herb cheese bread begins with properly prepared yeast dough. The most important elements are water temperature, flour quantity, kneading and adequate rising time.
Start with pleasantly warm water rather than hot water. Yeast is sensitive to extreme temperatures, and water that feels uncomfortably hot may damage it.
When adding the flour, pay attention to the texture rather than relying only on how the dough looks. The dough should become cohesive and elastic while remaining slightly soft to the touch.
Kneading stretches and aligns the gluten proteins. As this structure develops, the dough becomes better able to retain the gas produced during fermentation.
Finally, allow the dough to rise according to its appearance. A cooler kitchen might require additional time, whereas a warm room may encourage faster fermentation. Doubling in size is a more reliable indicator than the clock alone.
Adding Cheese, Garlic and Herbs
One of the distinctive features of this recipe is that the flavouring ingredients are added after the first rise. This creates a relatively simple initial dough that can be kneaded and allowed to develop before the cheese and herbs are incorporated.
When adding the mozzarella and Parmesan, distribute the cheese gradually across the dough. Fold and gently knead until the ingredients are spread reasonably evenly.
Finely minced garlic is preferable to large pieces because it helps avoid concentrated pockets of garlic flavour.
If the dried rosemary contains very long or firm needles, rub or chop them lightly before adding them. This improves their distribution and makes the finished loaf more pleasant to eat.
Try to avoid adding unnecessary moisture during this stage. Excess liquid from wet cheese or other ingredients can make the dough harder to shape and affect the finished crumb.
How to Create a Golden Bread Crust
The attractive crust is one of the best features of this homemade loaf. Several small details contribute to its appearance and texture.
First, shape the dough with gentle surface tension. A neatly shaped loaf holds its form better during the second rise and subsequent baking.
Second, allow the oven to preheat fully. Placing the bread into a properly heated oven encourages the loaf to expand during the early stages of baking.
Third, brush the dough carefully with melted butter. The butter contributes flavour and encourages an appealing finish, while the Parmesan and dried herbs add texture to the surface.
Finally, avoid removing the loaf too early. A deeply golden crust adds flavour, but watch the surface carefully so the herbs do not become excessively dark.
Expert Baking Tips
- Use fresh yeast: Check the expiry date before beginning, especially if the yeast has been stored for a long time.
- Measure the flour accurately: Too much flour produces a firmer, drier loaf.
- Keep the water comfortably warm: Avoid using boiling or very hot water.
- Knead thoroughly: Give the initial dough enough time to develop a smooth, elastic texture.
- Use low-moisture mozzarella: It is easier to incorporate into bread dough.
- Grate Parmesan finely: Smaller pieces distribute more evenly.
- Finely mince the garlic: This helps ensure that the flavour is spread throughout the loaf.
- Watch the first rise: Allow the dough to double rather than strictly following the clock.
- Handle the dough gently after rising: Excessive kneading can unnecessarily deflate the dough.
- Shape firmly but carefully: A smooth, rounded loaf generally bakes more evenly.
- Avoid a cold oven: Preheating properly improves the baking process.
- Check the underside: It should feel firm rather than damp or doughy.
- Cool before slicing: A short cooling period improves the crumb structure.
- Store leftovers properly: Protect the loaf from drying out or absorbing excess moisture.
Common Mistakes to Avoid
1. Using Water That Is Too Hot
Extremely hot water can damage the yeast, resulting in poor rising. Use warm rather than hot water.
2. Adding Too Much Flour
Adding large amounts of extra flour can produce a dense loaf. The dough should remain soft and slightly tacky.
3. Not Kneading Long Enough
Under-kneaded dough may lack the structure needed to rise properly. Knead until smooth and elastic.
4. Rushing the First Rise
The dough needs enough time to expand. If it has not doubled after an hour, allow additional time.
5. Using Very Wet Cheese
Excess moisture from cheese may affect the dough. Choose a suitable shredded mozzarella.
6. Overworking the Dough After Adding Cheese
Mix just until the cheese, garlic and herbs are distributed. Excessive kneading is unnecessary at this point.
7. Skipping the Second Rise
The second rise helps produce a lighter loaf. Baking immediately after shaping may result in a tighter crumb.
8. Baking in an Insufficiently Heated Oven
A cold oven can affect the loaf’s expansion and crust. Preheat to the stated temperature before baking.
9. Cutting the Bread Immediately
Slicing the bread while it is extremely hot can compress the interior. Give it a little time to settle.
Optional Variations
The following ideas are optional adaptations and are not part of the original ingredient list.
Extra Cheesy Garlic Bread
For a richer version, experiment with a little extra shredded mozzarella. Be aware that additional cheese may change the dough texture and baking characteristics.
Cheddar Herb Bread
Replace some or all of the mozzarella with mature cheddar for a sharper cheese flavour.
Roasted Garlic Bread
Use roasted garlic instead of raw minced garlic for a sweeter, mellow garlic flavour.
Spicy Garlic Cheese Bread
Add a small pinch of crushed chilli flakes with the herb mixture for a gentle spicy finish.
Fresh Herb Bread
Try finely chopped fresh rosemary or thyme instead of dried herbs. Fresh herbs contain more moisture, so adjust carefully.
Sun-Dried Tomato Bread
Incorporate a modest amount of finely chopped, well-drained sun-dried tomatoes for a more pronounced Mediterranean-inspired flavour.
Mini Cheese Bread Rolls
Divide the dough into smaller rolls instead of shaping one large loaf. The baking time will be shorter and should be adjusted according to their size.
Serving Suggestions
Garlic herb cheese bread is delicious served warm on its own, but it can also accompany a wide variety of meals.
With Homemade Soup
Serve thick slices alongside tomato soup, vegetable soup or creamy mushroom soup. The bread is especially enjoyable when dipped into a warm bowl of soup.
With Pasta
Pair it with spaghetti, lasagne, baked pasta or creamy Alfredo dishes. The garlic and Parmesan flavours complement many Italian-inspired meals.
With Salads
Serve a slice alongside a fresh green salad, Caesar-style salad or tomato and cucumber salad for a satisfying lunch.
With Roasted Vegetables
The savoury bread works particularly well with roasted peppers, courgettes, aubergines and other oven-roasted vegetables.
As a Sharing Bread
Place the warm loaf on a wooden serving board and cut it into thick slices. Offer a little olive oil or softened butter alongside it, if desired.
With Family Dinners
Serve it with roast chicken, baked fish, casseroles or slow-cooked dishes where the bread can be used to enjoy the accompanying sauce.
Storage and Reheating
How to Store Leftover Bread
Allow the bread to cool before storing. Because this loaf contains cheese, use a food-safe airtight container and refrigerate it promptly once cooled, preferably within two hours. For best quality, enjoy refrigerated leftovers within 3–4 days.
How to Reheat
Wrap a portion loosely in foil and warm in a preheated oven at approximately 350°F (175°C) for 8–10 minutes, depending on thickness, until heated through.
Individual slices can also be reheated briefly in a toaster oven, watching carefully to avoid scorching the herbs or cheese.
Can You Freeze It?
Yes. Once completely cooled, wrap the loaf or individual slices securely and place them into a freezer-safe container or bag.
For best quality, use within approximately 2–3 months. Thaw in the refrigerator before reheating.
Can You Prepare the Dough Ahead?
You can experiment with chilling the dough after the first rise, before adding the cheese and herbs. Cover it securely and refrigerate overnight, then allow it to become workable before continuing.
This is an optional make-ahead adjustment rather than part of the original method. Cold dough may need a longer final rise.
How to Keep the Crust Appealing
Reheating in the oven generally produces a better crust than using a microwave. Avoid prolonged heating, which can dry out the bread.
Frequently Asked Questions
1. Can I make garlic herb cheese bread without a stand mixer?
Yes. This recipe can be mixed and kneaded entirely by hand. Knead the initial dough for approximately 8–10 minutes.
2. Can I use bread flour instead of plain flour?
Yes. Bread flour generally has a higher protein content and may produce a chewier texture. The amount of water needed may vary slightly.
3. Can I use instant yeast?
Yes, but instant yeast is typically mixed directly into the flour. Follow the manufacturer’s guidance, as this changes the original yeast activation step.
4. How do I know whether my yeast is active?
The mixture should develop bubbles or foam during the initial 5–10-minute resting period. Little or no activity may indicate old yeast or an unsuitable water temperature.
5. Why didn’t my bread rise?
Possible causes include inactive yeast, excessively hot water, a cold kitchen or insufficient rising time.
6. Why is my dough so sticky?
Some stickiness is normal. Flour absorbs water gradually, so allow the dough to come together before deciding whether a small additional dusting is necessary.
7. Can I use fresh garlic?
Yes. Fresh minced garlic is already included in the original recipe and gives the bread its characteristic flavour.
8. Can I replace mozzarella with cheddar?
Yes, as an optional variation. Cheddar produces a stronger cheese flavour and may affect the appearance and texture of the melted cheese.
9. Is Parmesan necessary?
Parmesan contributes a distinctive savoury taste. You can experiment with a different hard cheese, but the flavour will change.
10. Can I use fresh herbs instead of dried herbs?
Yes. Finely chopped fresh herbs can work well, although their flavour strength and moisture content differ from dried herbs.
11. Why do I need two rises?
The first rise develops the dough, while the second allows the shaped loaf to expand before baking.
12. Can I make this bread in a loaf tin?
Yes, although the shape and baking behaviour will change. Use a suitably sized tin and check for complete baking rather than relying entirely on the original timing.
13. Can I divide the dough into small rolls?
Yes. Smaller pieces will usually bake faster, so monitor them closely.
14. What makes the crust golden?
The oven heat, dough ingredients and melted butter topping contribute to browning and a fragrant crust.
15. How can I tell when the bread is baked?
Look for a deep golden crust and a firm underside. An instant-read thermometer can offer additional reassurance when inserted into the bread crumb away from melted cheese.
16. Can I add more garlic?
Yes, according to personal preference. However, additional garlic may make the flavour considerably stronger.
17. Can I use garlic powder?
Garlic powder can be used in an adapted version, but the original recipe calls for three fresh minced garlic cloves.
18. Should the loaf cool before cutting?
Yes. Allowing it to cool slightly helps the crumb settle, resulting in neater slices.
19. Is this bread suitable for freezing?
Yes. Wrap the cooled bread well to protect it from drying out and freezer burn.
20. What dishes go best with garlic herb cheese bread?
Tomato soup, pasta, casseroles, roasted vegetables and hearty family dinners are particularly good choices.
21. Can I bake this bread the day before serving?
Yes. Store it safely after cooling and reheat it before serving for a more freshly baked texture.
22. Why is the centre of my bread dense?
Possible reasons include insufficient kneading, too much flour, inadequate rising or underbaking.
23. Can I omit the melted butter topping?
Yes, as an optional change, although the crust will have a slightly different flavour and appearance.
24. Is this bread suitable for beginners?
Yes. It uses a straightforward yeast dough, two rising stages and a conventional oven-baking method.
Complete Recipe Card
Garlic Herb Cheese Bread
Description: A homemade golden bread loaf filled with mozzarella, Parmesan, fresh garlic and aromatic herbs, finished with melted butter and baked until beautifully golden.
- Category: Bread / Side Dish
- Method: Oven Baking
- Prep Time: Approximately 20 minutes
- Rise Time: Approximately 1 hour 30 minutes to 1 hour 40 minutes
- Cook Time: 30–35 minutes
- Total Time: Approximately 2 hours 20 minutes to 2 hours 35 minutes
- Yield: 1 large loaf
- Servings: Approximately 10–12 slices
- Temperature: 400°F (200°C)
Ingredients
- 3½ cups all-purpose flour
- 2¼ teaspoons active dry yeast
- 1¼ cups warm water
- 1 tablespoon sugar
- 1½ teaspoons salt
- 3 tablespoons olive oil
- 1 cup shredded mozzarella cheese
- ½ cup grated Parmesan cheese
- 3 cloves garlic, minced
- 1 teaspoon dried rosemary
- 1 teaspoon dried thyme
- 1 teaspoon Italian seasoning
- 2 tablespoons melted butter
How to Make
- In a large bowl, combine the warm water, sugar and active dry yeast. Allow to stand for 5–10 minutes until foamy.
- Add the olive oil and salt, stirring gently.
- Gradually incorporate the flour until a soft dough forms.
- Knead the dough for 8–10 minutes until smooth and elastic.
- Transfer the dough to a lightly greased bowl, cover and leave to rise for approximately 1 hour or until doubled in size.
- Gently knead in the mozzarella, Parmesan, minced garlic, rosemary, thyme and Italian seasoning until evenly distributed.
- Shape into a rounded loaf and place on a baking tray lined with baking parchment.
- Cover loosely and allow to rise for another 30–40 minutes.
- Preheat the oven to 400°F (200°C).
- Brush the loaf with melted butter and optionally sprinkle with a little extra herbs and Parmesan.
- Bake for 30–35 minutes, until deeply golden and fully cooked in the centre.
- Allow to cool slightly on a wire rack before slicing and serving.
Recipe Notes
- Use warm, not hot, water when activating the yeast.
- Do not add excessive flour during kneading.
- Choose low-moisture mozzarella for easier incorporation.
- Allow both rising stages to take place.
- Watch the crust carefully towards the end of baking.
- Let the bread cool slightly for neater slices.
Hashtags: #GarlicHerbBread #CheeseBread #HomemadeBread #GarlicBreadRecipe #EasyBaking
Share Your Homemade Bread
There is nothing quite like slicing into a freshly baked loaf of garlic herb cheese bread and discovering its soft, fragrant centre. Whether you serve it with soup, pasta or simply enjoy a warm slice on its own, this recipe brings delicious homemade flavour to the table.
Have you tried making this bread? Share your results in the comments and let us know whether you prefer extra garlic, plenty of mozzarella or a generous sprinkle of Parmesan.
Save this recipe for your next baking day, share it with someone who loves homemade bread and follow along for more comforting recipes and easy family favourites.