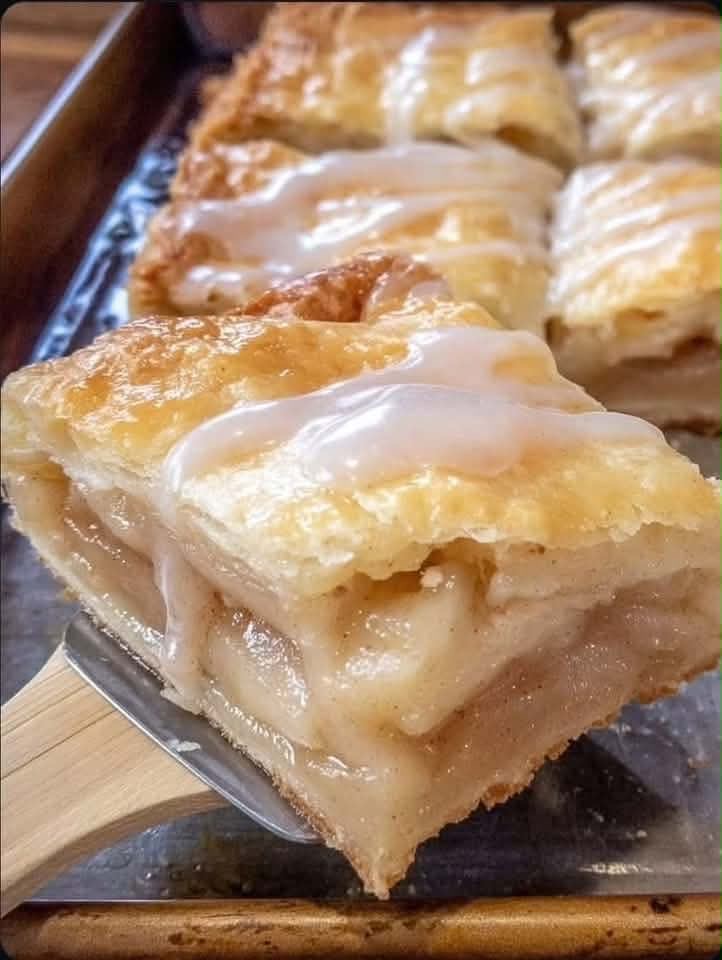
Glazed Apple Pie Bars
Glazed Apple Pie Bars bring together everything wonderful about homemade apple pie in a simple, sliceable dessert. With layers of buttery, golden pastry, tender cinnamon-spiced apples and a generous drizzle of sweet vanilla glaze, these irresistible bars are perfect for sharing with family and friends.
Imagine cutting through a delicate, flaky pastry crust to reveal a thick layer of soft apples coated in a rich, lightly caramelised cinnamon filling. Each bite combines the gentle sweetness of baked fruit with warm spices and the creamy finish of homemade icing.
Unlike a traditional round apple pie, these bars are baked in a rectangular pan and cut into convenient squares. That makes them particularly useful for family gatherings, holiday dessert tables, autumn parties or simply enjoying alongside an afternoon cup of tea.
One of the best things about this recipe is how approachable it is. Using ready-made puff pastry or pie crust removes much of the preparation involved in making pastry from scratch. You can concentrate on creating a delicious apple filling and baking everything until beautifully golden.
The filling is gently cooked before baking, allowing the apples to soften while the brown sugar, cinnamon, nutmeg and butter create a fragrant syrup. A small amount of cornflour helps thicken the juices, giving the finished bars a soft yet cohesive centre.
Finished with a smooth vanilla glaze, these glazed apple pie bars are equally delicious served slightly warm or at room temperature. They offer the familiar comfort of homemade apple pie with the convenience of individual dessert squares.
Recipe Overview
- Recipe Name: Glazed Apple Pie Bars
- Category: Dessert and baking
- Style: American-inspired homemade apple dessert
- Preparation Time: Approximately 20 minutes
- Apple Filling Cooking Time: 6–9 minutes
- Baking Time: 30–35 minutes
- Initial Cooling Time: 15 minutes
- Estimated Total Time: Approximately 1 hour 15 minutes
- Yield: Approximately 12 bars, depending on cutting size
- Difficulty: Easy
- Oven Temperature: 375°F (190°C)
- Baking Pan: 9 x 13 inches (approximately 23 x 33 cm)
- Cooking Method: Stovetop preparation followed by oven baking
- Main Ingredients: Apples, pastry, brown sugar, cinnamon, butter and vanilla glaze
The preparation and total times above are practical estimates based on the supplied method. Actual timing may vary according to the type of pastry, apple variety and individual oven.
Why You’ll Love These Apple Pie Bars
- Classic apple pie flavour: Tender apples, brown sugar and warm cinnamon deliver the comforting taste of traditional apple pie.
- Beautiful flaky pastry: The golden top adds a delicate, buttery contrast to the soft fruit filling.
- Easy preparation: Ready-made pastry reduces preparation time without sacrificing the homemade feel.
- Perfect for sharing: The rectangular baking pan makes it easy to prepare several individual portions at once.
- Delicious vanilla glaze: A simple three-ingredient icing gives the bars an extra layer of sweetness.
- Flexible serving: Enjoy them warm, cooled or accompanied by a scoop of vanilla ice cream.
- Great for special occasions: These bars fit beautifully into autumn celebrations, family dinners and holiday dessert spreads.
- Convenient leftovers: Individual squares can be refrigerated and reheated for another dessert.
Ingredients for Glazed Apple Pie Bars
For the Pastry and Apple Filling
- 2 sheets puff pastry or pie crust
- 4 medium apples, peeled and thinly sliced
- ½ cup brown sugar (approximately 100 g)
- ¼ cup granulated sugar (approximately 50 g)
- 1½ teaspoons ground cinnamon
- ¼ teaspoon ground nutmeg
- 2 tablespoons butter (approximately 28 g)
- 1 tablespoon cornstarch (cornflour)
- 2 tablespoons water (30 ml)
- 1 teaspoon vanilla extract (5 ml)
- 1 egg, beaten, for brushing
For the Vanilla Glaze
- 1 cup powdered sugar (icing sugar, approximately 120 g)
- 2–3 tablespoons milk (30–45 ml)
- ½ teaspoon vanilla extract
All ingredient quantities above are taken from the original recipe. Puff pastry and traditional pie crust are both permitted options, although their finished textures and baking characteristics differ.
Ingredient Notes and Substitutions
Apples
Apples are the main ingredient and provide the characteristic fruity flavour and soft texture. Choose varieties that hold their shape reasonably well when cooked, rather than apples that quickly collapse into a purée.
Thin, fairly even slices cook more consistently and make the finished bars easier to cut. Peeling is recommended in the original recipe because it gives the filling a more tender texture.
Puff Pastry or Pie Crust
Puff pastry creates a light, layered crust that rises during baking and becomes crisp and golden. Traditional pie crust produces a more compact, short and crumbly finish.
Either option can make a delicious dessert. However, if you want bars with a tall, visibly flaky top like those in the photograph, puff pastry is the closest choice.
Brown Sugar
Brown sugar contributes moisture, sweetness and a gentle caramel-like flavour. It pairs especially well with cinnamon and butter, producing a rich apple filling.
Granulated Sugar
White sugar provides additional sweetness without overpowering the natural apple flavour. Combining it with brown sugar gives the filling a balanced sweetness.
Ground Cinnamon
Cinnamon is the signature spice in these bars. It adds warmth and a familiar apple pie aroma that becomes especially noticeable as the filling cooks.
Ground Nutmeg
Nutmeg provides a subtle, aromatic background note. The small quantity in the recipe is enough to complement the cinnamon without dominating the filling.
Butter
Butter helps soften the apples while adding richness to the syrup. It also blends with the sugar and spices to create a smooth, fragrant coating.
Cornstarch
Cornstarch, commonly called cornflour in Britain, thickens the apple juices. This step is particularly important for a dessert that will be cut into individual bars.
Always mix it with the specified water before adding it to the pan. Stirring it into a liquid first helps prevent dry lumps.
Vanilla Extract
Vanilla is used in both the filling and the glaze. In the filling, it softens the intensity of the spices. In the icing, it gives the finished dessert a sweet bakery-style aroma.
Egg Wash
Brushing the upper pastry surface with beaten egg encourages an attractive golden colour. Apply a thin, even coating rather than allowing excess egg to collect around the edges.
Powdered Sugar and Milk
Powdered sugar creates the base of the glaze, while milk controls the consistency. Start with the smaller amount of milk, then gradually increase it until the icing flows smoothly from a spoon.
Equipment You’ll Need
- 9 x 13-inch baking pan
- Large frying pan or skillet
- Sharp knife
- Vegetable peeler
- Chopping board
- Measuring cups and spoons
- Wooden spoon or silicone spatula
- Small bowl for the cornflour mixture
- Small mixing bowl for the glaze
- Fork or whisk
- Pastry brush
- Cooling rack
- Serving spatula
A sharp knife and sturdy serving spatula are especially helpful when portioning the bars. The filling should be sufficiently cooled to hold together before the slices are lifted from the pan.
How to Make Glazed Apple Pie Bars
Step 1: Preheat the Oven
Preheat your oven to 375°F (190°C). Lightly grease a 9 x 13-inch baking pan to help prevent the pastry from sticking.
Place an oven rack near the centre so the pastry can bake evenly. If using refrigerated pastry, keep it chilled until you are ready to assemble the bars.
Step 2: Prepare the Apples
Peel the four medium apples, remove their cores and slice them thinly. Aim for pieces of similar thickness so they soften at approximately the same rate.
Thin slices are preferable to large chunks for this particular recipe because they form even layers inside the pastry.
Step 3: Start the Apple Filling
Place a large skillet over medium heat and melt the two tablespoons of butter.
Add the sliced apples, brown sugar, granulated sugar, cinnamon and nutmeg. Stir gently until the apples are coated in the buttery sugar mixture.
Step 4: Cook Until Slightly Tender
Cook the apples for approximately 5–7 minutes, stirring occasionally.
As the apples warm, they will release some of their natural juices. These combine with the sugar and butter to create a fragrant syrup.
The apples should begin to soften but should not completely break apart. They will continue cooking in the oven.
Step 5: Thicken the Filling
In a small bowl, combine the tablespoon of cornstarch with two tablespoons of water. Stir until completely smooth.
Pour this mixture into the skillet and gently stir it through the apples. Cook for another 1–2 minutes, until the liquid becomes noticeably thicker and glossy.
Remove the skillet from the heat and stir in one teaspoon of vanilla extract.
Step 6: Arrange the Bottom Pastry
Place one sheet of puff pastry or pie crust into the prepared baking pan. Press it gently over the base, bringing it towards the edges as evenly as possible.
Pastry sheets vary in size. If necessary, roll the pastry gently to fit the pan before placing it inside.
Avoid stretching it excessively, as stretched pastry can shrink during baking.
Step 7: Add the Apple Filling
Spoon the warm apple filling over the bottom pastry layer. Spread it evenly using the back of a spoon or silicone spatula.
Distribute the apple slices across the entire surface so each bar contains a generous amount of filling.
Step 8: Add the Top Pastry
Carefully place the second sheet of pastry over the apples.
Gently press and seal the edges to help keep the filling enclosed. Try not to compress the puff pastry too firmly, as it needs room to expand while baking.
Step 9: Brush and Vent
Brush the top with the beaten egg, covering the pastry with a thin, even layer.
Use a sharp knife to make several small slits across the surface. These allow steam to escape as the apples finish cooking.
Step 10: Bake Until Golden
Transfer the pan to the preheated oven and bake for approximately 30–35 minutes.
The upper pastry should become puffed and golden brown, while the apple filling should be bubbling gently around the openings or edges.
Because ovens and pastry brands vary, check the underside where possible. The bottom crust should be properly baked rather than pale or doughy. If it needs additional time, continue baking in short intervals while monitoring the top.
Step 11: Allow the Bars to Cool
Remove the pan from the oven and allow the dessert to cool for approximately 15 minutes, as specified in the original recipe.
During this time, the apple filling begins to settle and the pastry becomes easier to handle. For especially neat squares, allow additional cooling before slicing.
Step 12: Prepare the Vanilla Glaze
Add the powdered sugar to a mixing bowl. Pour in two tablespoons of milk and the half teaspoon of vanilla extract.
Whisk until smooth. If the glaze is too thick, add the remaining milk a little at a time until it reaches a pourable consistency.
Step 13: Glaze and Slice
Drizzle the glaze generously over the top of the baked pastry.
Cut the dessert into squares using a sharp knife. Lift each portion carefully with a serving spatula to preserve its delicate pastry layers.
Serve slightly warm or at room temperature and enjoy the contrast between crisp golden pastry, tender cinnamon apples and smooth vanilla icing.
How to Choose the Best Apples
The type of apple you choose can make a noticeable difference to the finished dessert. Some varieties remain fairly firm during cooking, while others become soft and almost sauce-like.
For bars with visible apple slices, select apples with a good balance of sweetness, acidity and structure.
Granny Smith Apples
Granny Smith apples have a pleasantly sharp flavour and firm texture. Their acidity balances the sweetness of the brown sugar and glaze, making them a reliable choice for sweet baked desserts.
Honeycrisp Apples
Honeycrisp apples provide a naturally sweet flavour and juicy texture. They can make a delicious filling, although their moisture content may vary.
Braeburn Apples
Braeburn apples have a balanced sweet-tart flavour and often hold their shape well when baked. They work nicely with cinnamon and nutmeg.
Using a Mixture of Apples
You can also combine two apple varieties, using one for sweetness and another for tartness. This creates a more layered fruit flavour without changing the basic recipe.
Regardless of variety, slice the apples evenly and avoid using fruit that is excessively soft or bruised.
How to Make the Perfect Apple Filling
The filling is one of the most important elements of glazed apple pie bars. It needs to be tender enough to eat comfortably while retaining enough structure to remain inside the pastry when sliced.
Cook the Apples Gently
Medium heat is sufficient for softening the apples and dissolving the sugar. Very high heat can cause the syrup to catch on the bottom of the pan before the fruit has cooked evenly.
Allow the Apples to Release Their Juices
When heated with sugar, apples naturally release moisture. This liquid forms the basis of the cinnamon syrup and provides the moisture needed for the cornflour to thicken.
Thicken Before Assembly
Adding the cornflour mixture before assembling the bars helps reduce excess free liquid. The filling should look glossy and lightly thickened rather than watery.
If the apple mixture remains very loose after the suggested cooking time, allow it to simmer briefly while stirring. Different apple varieties release different amounts of liquid.
Avoid Overcooking
Remember that the filling receives additional heat in the oven. If the apples are completely broken down in the skillet, they may become overly soft by the time the pastry is baked.
The ideal filling contains tender slices surrounded by a thick, cinnamon-scented sauce.
How to Achieve Golden, Flaky Pastry
A flaky crust is what transforms a simple apple filling into a bakery-style dessert bar. The best results depend on handling the pastry carefully and allowing it to bake thoroughly.
Keep Puff Pastry Cool
Puff pastry contains layers of dough and fat that expand in the oven. If the pastry becomes too warm before baking, the layers may lose definition.
Keep it refrigerated until needed and work efficiently during assembly.
Do Not Stretch the Pastry
Stretching can cause pastry to pull back or shrink while baking. Roll it gently if necessary and allow it to sit naturally inside the pan.
Seal Without Crushing
Pressing the edges together helps contain the filling, but excessively flattening puff pastry can prevent the edges from rising properly.
Use a Light Egg Wash
The beaten egg helps the top develop an appealing glossy, golden surface. Apply it evenly with a pastry brush.
Allow Steam to Escape
The small slits on top are important because the apple filling releases steam during baking. Venting helps reduce trapped moisture beneath the upper pastry layer.
Check the Bottom Crust
Fruit fillings can add moisture to the base of a pastry dessert. A fully baked bottom is essential for bars that can be lifted cleanly.
Use the specified baking time as your starting point, but rely on the colour and texture of the pastry as well. A metal baking pan can help conduct heat to the base.
Expert Tips for the Best Apple Pie Bars
- Choose baking-friendly apples. Firm apple varieties maintain a pleasant texture after stovetop cooking and baking.
- Slice evenly. Uniform slices soften at similar rates and help create consistent layers.
- Use medium heat for the filling. This allows the sugar to dissolve without scorching.
- Stir the cornflour slurry thoroughly. A smooth mixture prevents thickener lumps.
- Watch the filling consistency. It should be glossy and lightly thickened before assembly.
- Keep puff pastry chilled. Cold pastry produces more distinct layers.
- Use an appropriately sized pan. The specified 9 x 13-inch pan helps create an even distribution of filling.
- Spread the apples evenly. Avoid leaving large empty spaces or piling all the filling in the centre.
- Make steam vents. A few small cuts across the top allow moisture to escape.
- Brush lightly with egg. Too much egg wash can pool and affect the finish.
- Look for a properly baked base. The top becoming golden does not always mean the bottom is finished.
- Cool before cutting. Additional resting time gives the filling more opportunity to settle.
- Adjust the glaze gradually. Add milk slowly to avoid making the icing too thin.
- Glaze shortly before serving when possible. This helps preserve the contrast between crisp pastry and smooth icing.
Common Mistakes to Avoid
1. Using Apples That Are Too Soft
Very soft apples can break apart during the stovetop stage and become mushy after baking. Choose firmer varieties if you prefer distinct fruit pieces.
2. Cutting the Apples Too Thickly
Large, uneven slices can remain firm in some areas while becoming overly soft in others. Thin, consistent slices are easier to cook evenly.
3. Skipping the Filling-Thickening Step
Without sufficient thickening, apple juices may soak into the bottom crust and make the bars difficult to portion.
4. Adding Dry Cornflour Directly
Dry cornflour can form lumps when added directly to hot liquid. Always mix it with the specified water first.
5. Letting Puff Pastry Become Too Warm
Warm puff pastry can become sticky and difficult to handle. Chill it briefly if it softens excessively during preparation.
6. Overfilling One Area
Uneven apple distribution may cause some bars to collapse or have very little filling. Spread the mixture across the pan.
7. Forgetting the Steam Vents
Trapped steam can encourage moisture to collect beneath the pastry. Small slits allow steam to escape during baking.
8. Underbaking the Bottom
A golden top can hide a soft base. Check the pastry carefully before removing the pan from the oven.
9. Glazing Too Heavily While Very Hot
Extremely hot pastry can cause the glaze to become thin and run off the surface. Allow the dessert to cool slightly first.
10. Cutting Too Early
Freshly baked apple filling is hot and loose. Allowing the bars to rest helps produce cleaner slices and reduces the risk of burns.
Optional Glazed Apple Pie Bar Variations
The following suggestions are optional adaptations and are not part of the original ingredient list.
1. Salted Caramel Apple Pie Bars
Drizzle a little salted caramel sauce over the finished bars for a richer dessert. You can use a smaller amount of vanilla glaze to prevent excessive sweetness.
2. Apple and Pear Bars
Replace one of the apples with a firm pear for a slightly softer, more floral fruit flavour.
3. Maple Apple Pie Bars
Replace a small portion of the milk in the glaze with maple syrup to introduce a gentle maple flavour.
4. Apple Crumble Pie Bars
Use a suitable pie crust base and finish with a separate buttery crumble topping instead of the upper pastry sheet.
5. Apple and Raisin Bars
Add a small handful of raisins to the apple filling. They will soften and absorb some of the cinnamon-flavoured juices.
6. Nutty Apple Pie Bars
Sprinkle a small quantity of finely chopped pecans or walnuts over the apple filling before adding the top pastry.
7. Extra Cinnamon Glaze
Whisk a small pinch of ground cinnamon into the icing for a more pronounced spiced finish.
8. Lemon Apple Pie Bars
Add a little finely grated lemon zest to the filling for a brighter flavour that balances the sweet apples and vanilla.
How to Serve Glazed Apple Pie Bars
These apple pie bars are delicious on their own, but thoughtful serving choices can turn them into an especially memorable dessert.
With Vanilla Ice Cream
Serve a slightly warm square with a scoop of vanilla ice cream. The cold, creamy ice cream contrasts beautifully with the warm cinnamon apples.
With Whipped Cream
A spoonful of softly whipped cream creates a lighter accompaniment and helps balance the sweetness of the vanilla glaze.
With Caramel Sauce
For a richer dessert, add a light drizzle of caramel sauce just before serving. The caramel flavour complements the brown sugar in the apple filling.
With Coffee or Tea
These bars make a lovely afternoon treat alongside freshly brewed coffee, black tea or a warm spiced drink.
For Holiday Gatherings
Cut the bars into smaller squares and arrange them on a serving platter. They are easy to share at Thanksgiving-inspired meals, autumn gatherings and Christmas dessert tables.
For a Family Dessert
Serve generous squares after dinner, preferably with a little extra vanilla glaze drizzled over the top.
For the neatest presentation, allow the pastry to cool enough for the filling to hold together before transferring each portion to an individual plate.
Storage, Freezing and Reheating
How to Store Leftover Apple Pie Bars
Allow the bars to cool before placing them in an airtight container. Refrigerate within two hours of baking or serving.
Store them in the refrigerator for up to 3–4 days. Place baking parchment between layers if stacking to reduce sticking and protect the glaze.
Can You Freeze Apple Pie Bars?
Yes. Apple pie bars can be frozen, although the pastry may become slightly softer after thawing.
For best results, freeze the unglazed bars individually in freezer-safe containers or wrapping. They are best used within approximately 2–3 months for good quality.
Thaw overnight in the refrigerator before reheating. Add freshly prepared glaze after warming, if desired.
How to Reheat Apple Pie Bars
Place a bar on a baking tray and warm it in an oven preheated to approximately 325°F (160°C) for 8–12 minutes, or until heated through.
These are suggested reheating settings rather than part of the original recipe. Timing depends on the size and temperature of the portion.
Reheating in the oven generally helps restore some of the pastry’s crispness. Glaze may melt during reheating, so add extra icing afterwards if necessary.
Can You Use a Microwave?
Yes, but the pastry will usually become softer. Microwave an individual portion briefly and check that it is heated throughout.
Make-Ahead Preparation
You can prepare the apple filling ahead of time, cool it promptly and refrigerate it in a covered container for up to one day before assembling the bars.
Keep the pastry chilled until assembly. If using cold prepared filling, the finished bake may require closer monitoring to ensure the centre is fully heated and the pastry is cooked.
Frequently Asked Questions
1. What are glazed apple pie bars?
Glazed apple pie bars are rectangular pastry desserts filled with cinnamon-spiced apples and finished with sweet icing. They offer the flavours of traditional apple pie in convenient individual squares.
2. Can I use puff pastry instead of pie crust?
Yes. The supplied recipe allows either puff pastry or pie crust. Puff pastry creates a lighter, more layered texture, while traditional pie crust gives a denser, more crumbly finish.
3. Which pastry is best for a flaky top?
Puff pastry is the best choice when you want a visibly flaky, puffed upper crust similar to the one shown in the accompanying photograph.
4. What apples work best for apple pie bars?
Firm apples such as Granny Smith, Braeburn and Honeycrisp are useful choices. They provide flavour and retain some structure during cooking.
5. Do I need to peel the apples?
The original recipe calls for peeled apples. Removing the skin gives the filling a softer, more uniform texture, particularly when cut into squares.
6. Can I leave the apple skins on?
You can, although the texture will be different. Apple skins may remain noticeable in the finished filling, especially if they are relatively thick.
7. Why is my apple filling watery?
Some apple varieties release more liquid than others. Make sure the cornflour slurry has thickened the juices before assembling the bars.
8. Why did my bottom pastry become soggy?
Excess moisture from the filling or insufficient baking can soften the base. Thicken the apple mixture properly and ensure the bottom pastry is thoroughly baked.
9. Can I use canned apple pie filling?
Yes, as an optional shortcut, although this changes the original recipe. Choose a filling with a suitably thick consistency and adjust the overall sweetness if needed.
10. Can I use frozen apples?
Frozen apples may be used after thawing, but they can release considerable moisture. Drain excess liquid and pay particular attention to thickening the filling.
11. How do I know when the bars are baked?
The top should be golden brown, the filling should be bubbling and the bottom crust should be cooked through. Depending on the pastry and oven, baking may require slightly more time than the suggested range.
12. Why did my puff pastry not rise?
Pastry that becomes too warm, is stretched excessively or is heavily compressed may not rise as expected. Keeping it chilled and handling it gently can help.
13. How do I stop the pastry edges from opening?
Press the edges together gently, avoiding an excessively thick layer of filling along the seal. Steam vents also help release pressure from the baking apples.
14. Can I make these bars without the glaze?
Yes. The unglazed bars will still have a sweet apple filling and golden pastry. However, the vanilla glaze is one of the defining features of the supplied recipe.
15. How can I make the glaze thicker?
Use the smaller amount of milk initially. If the icing is already too thin, whisk in a little additional powdered sugar until it reaches your preferred consistency.
16. Can I make the glaze dairy-free?
As an optional substitution, you can use a suitable unsweetened plant-based milk. The glaze may differ slightly in flavour and thickness.
17. Can I make the bars ahead of time?
Yes. You can prepare them ahead and refrigerate them. For the best appearance and texture, consider adding fresh glaze shortly before serving.
18. Should apple pie bars be served hot or cold?
They can be served slightly warm or at room temperature. Warm bars are especially comforting, while cooled bars generally hold their shape more neatly.
19. How long should I cool the bars before slicing?
The original recipe specifies approximately 15 minutes. Longer cooling is helpful if you want particularly clean, well-defined slices.
20. Can I double the recipe?
Yes. Prepare two separate 9 x 13-inch pans or use appropriately sized bakeware. Monitor baking carefully, as oven loading and pan size can affect the cooking time.
21. Can I freeze the finished bars?
Yes. Freeze the bars in airtight, freezer-safe packaging, ideally before glazing. Thaw them in the refrigerator and reheat gently if preferred.
22. How many bars does this recipe make?
A 9 x 13-inch pan can be cut into approximately 12 generous squares. You can make smaller portions if serving a larger group.
23. What is the best way to cut neat squares?
Allow the filling to settle, then use a sharp knife. Wipe the blade between cuts if the glaze or filling sticks to it.
24. Can I use less sugar?
Reducing the sugar is possible as an optional variation, but it will change the flavour and potentially the consistency of the filling. Choose naturally sweet apples if you want to experiment with a less sweet version.
25. What can I serve alongside apple pie bars?
Vanilla ice cream, whipped cream, coffee and tea all complement the cinnamon-spiced filling and buttery pastry.
Complete Glazed Apple Pie Bars Recipe Card
Glazed Apple Pie Bars
Description: Golden, flaky apple pie bars filled with tender cinnamon-spiced apples and finished with a smooth homemade vanilla glaze.
- Category: Dessert
- Cooking Method: Stovetop and oven
- Preparation Time: Approximately 20 minutes
- Filling Cooking Time: 6–9 minutes
- Baking Time: 30–35 minutes
- Cooling Time: Approximately 15 minutes initially
- Total Time: Approximately 1 hour 15 minutes
- Servings: Approximately 12 bars
- Oven Temperature: 375°F (190°C)
- Pan Size: 9 x 13 inches
Ingredients
Apple Filling and Pastry
- 2 sheets puff pastry or pie crust
- 4 medium apples, peeled and thinly sliced
- ½ cup brown sugar
- ¼ cup granulated sugar
- 1½ teaspoons ground cinnamon
- ¼ teaspoon nutmeg
- 2 tablespoons butter
- 1 tablespoon cornstarch
- 2 tablespoons water
- 1 teaspoon vanilla extract
- 1 egg, beaten, for brushing
Vanilla Glaze
- 1 cup powdered sugar
- 2–3 tablespoons milk
- ½ teaspoon vanilla extract
Instructions
- Preheat the oven to 375°F (190°C) and lightly grease a 9 x 13-inch baking pan.
- Melt the butter in a skillet over medium heat. Add the sliced apples, brown sugar, granulated sugar, cinnamon and nutmeg.
- Cook for about 5–7 minutes, stirring occasionally, until the apples begin to soften.
- Mix the cornstarch with the water until smooth, then stir it into the apples. Cook for another 1–2 minutes until the filling becomes thick and glossy. Stir in the vanilla extract.
- Press one sheet of pastry into the bottom of the prepared baking pan.
- Spread the warm apple filling evenly over the pastry.
- Place the second sheet of pastry over the apples and gently seal the edges.
- Brush the top with beaten egg and make a few small slits to release steam.
- Bake for 30–35 minutes, until the pastry is puffed and golden brown. Check that the bottom crust is fully baked, extending the baking time slightly if necessary.
- Allow the bars to cool for approximately 15 minutes. Cool longer for neater slicing.
- Whisk together the powdered sugar, milk and vanilla extract until smooth. Start with two tablespoons of milk and add more as needed.
- Drizzle the glaze generously over the pastry, cut into squares and serve warm or at room temperature.
Helpful Recipe Notes
- Use firm apples for a filling with more noticeable slices.
- Puff pastry provides the flakiest finish, while pie crust creates a more traditional pastry texture.
- Make sure the apple filling thickens before spreading it over the bottom crust.
- Keep puff pastry cool during assembly.
- For clean squares, allow the bars to cool longer than the initial 15-minute resting period.
- Refrigerate leftovers in an airtight container for up to 3–4 days.
- The preparation time, total time and yield are editorial estimates based on the original method.
Recipe Hashtags
#GlazedApplePieBars #ApplePieBars #AppleDesserts #HomemadeBaking #EasyDessertRecipes