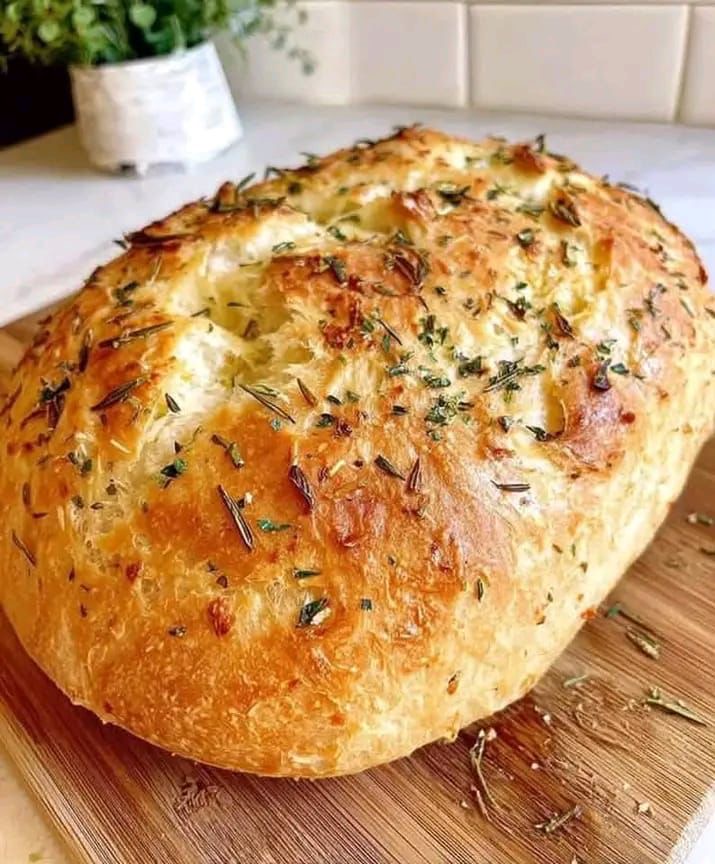
This No-Knead Garlic Herb Bread is a simple homemade loaf with a beautifully golden crust, soft airy center, and plenty of savory garlic and herb flavor. It looks like artisan bakery bread, but the method is surprisingly easy and requires no complicated kneading.
The combination of garlic, rosemary, thyme, and olive oil makes this bread perfect for serving alongside soups, pasta, roasted meats, salads, or simply warm with butter.
Why You’ll Love This Homemade Bread
Homemade bread can sometimes feel intimidating, especially when recipes require long kneading times or special equipment. This version keeps the process simple.
The dough is mixed in one bowl and allowed to rise slowly. During this resting period, the flour absorbs the water and the yeast develops the dough naturally.
Once baked at a high temperature, the outside becomes deeply golden and crisp while the inside remains tender and pleasantly chewy.
The garlic and herbs also make the kitchen smell incredible while the loaf is baking.
Recipe Information
Prep Time: 15 minutes
Rising Time: 2–3 hours
Bake Time: 35–40 minutes
Total Time: About 3½ hours
Servings: 8–10
Difficulty: Easy
Ingredients
- 3 cups all-purpose flour
- 1½ teaspoons salt
- 1 teaspoon granulated sugar or honey
- 2¼ teaspoons active dry yeast or instant yeast
- 1½ cups warm water
- 2 tablespoons olive oil
- 3 cloves garlic, finely minced
- 1 teaspoon dried rosemary
- 1 teaspoon dried thyme
- 1 teaspoon dried parsley
- ½ teaspoon Italian seasoning
- ¼ teaspoon black pepper
- 1 tablespoon melted butter, optional
- Coarse salt for the top, optional
Choosing the Right Flour
Regular all-purpose flour works perfectly for this recipe and produces a tender interior.
If you prefer a slightly chewier artisan-style loaf, bread flour is another excellent option because its higher protein content can help develop a stronger dough structure.
You can also combine equal quantities of bread flour and all-purpose flour.
Make the Garlic Herb Mixture
Heat the olive oil gently in a small skillet.
Add the minced garlic and cook for approximately 30–60 seconds.
You only want the garlic to become fragrant. Don’t allow it to turn dark brown because burnt garlic can taste bitter.
Remove the pan from the heat and stir in the rosemary, thyme, parsley, Italian seasoning, and black pepper.
Allow the mixture to cool slightly.
Prepare the Bread Dough
Place the flour, salt, sugar, and yeast in a large mixing bowl.
Stir the dry ingredients together.
Add the warm water and approximately three-quarters of the garlic-herb oil.
Mix everything with a wooden spoon until no large patches of dry flour remain.
The dough will look sticky and somewhat rough.
That’s exactly what you want.
This isn’t a traditional firm bread dough, so don’t continue adding flour simply because it sticks to the spoon.
Why This Bread Doesn’t Need Kneading
Traditional bread recipes use kneading to develop gluten.
With no-knead bread, time performs much of that work instead.
As the hydrated flour rests, gluten gradually develops and the yeast creates gas bubbles throughout the dough.
This slow process helps create the rustic, airy texture associated with artisan bread.
First Rise
Cover the bowl with plastic wrap or a clean kitchen towel.
Leave it in a warm, draft-free place for approximately 2–3 hours.
The dough should become noticeably larger and bubbly.
Depending on your room temperature, the process may take slightly longer.
A warmer kitchen encourages faster fermentation, while a cooler room slows it down.
Shape the Dough
Generously flour your work surface.
Carefully scrape the risen dough from the bowl.
Sprinkle a little flour over your hands.
Gently fold the outside edges toward the center several times.
Turn the dough over and shape it into a round loaf.
Avoid pressing aggressively because you don’t want to remove all the air developed during rising.
Second Rest
Place the shaped loaf on parchment paper.
Cover loosely with a kitchen towel and allow it to rest for approximately 30–45 minutes.
Meanwhile, preheat the oven to 425°F (220°C).
For an especially crisp crust, preheat a Dutch oven or heavy oven-safe pot while the oven heats.
Add the Garlic Herb Topping
Brush the top of the loaf with the remaining garlic-herb olive oil.
Sprinkle with additional rosemary, thyme, or parsley.
For extra flavor, add a small amount of coarse salt.
You can also make one or two shallow cuts across the surface with a sharp knife.
These cuts help control how the bread expands during baking.
Dutch Oven Baking Method
Carefully remove the hot Dutch oven.
Lower the dough inside using the parchment paper.
Cover with the lid.
Bake for approximately 25 minutes covered.
Remove the lid and continue baking for another 10–15 minutes, or until the crust becomes deeply golden.
The covered portion traps steam around the dough, helping produce a crisp artisan-style crust.
Baking Without a Dutch Oven
You don’t need special cookware to make this bread.
Place the loaf on a parchment-lined baking sheet or inside an oven-safe baking dish.
Bake at 425°F (220°C) for approximately 30–40 minutes.
For additional steam, place a small oven-safe pan containing hot water on a lower oven rack during the beginning of baking.
Be careful when handling hot water and steam.
How to Know When the Bread Is Ready
The crust should be deeply golden.
If you gently tap the bottom of the loaf, it should sound somewhat hollow.
For greater precision, the center of most lean breads is fully baked at around 200–210°F (93–99°C).
Don’t rely only on color because some ovens brown bread more quickly than others.
Let the Bread Cool Before Cutting
Fresh bread smells so good that cutting it immediately is tempting.
However, cooling is an important part of the baking process.
Allow the loaf to rest on a cooling rack for approximately 30–45 minutes.
Cutting it immediately can compress the soft interior and make it appear gummy.
As the loaf cools, the internal structure finishes setting.
Garlic Butter Finish
For an even richer loaf, prepare a quick garlic butter.
Mix:
- 2 tablespoons melted butter
- 1 small garlic clove, finely grated
- ½ teaspoon parsley
- Pinch of salt
Brush the mixture lightly over the warm loaf after it leaves the oven.
This produces a softer, intensely flavorful surface.
Rosemary Parmesan Variation
Add approximately ½ cup finely grated Parmesan cheese to the dough.
Use rosemary as the main herb.
Before baking, sprinkle a little additional Parmesan over the surface.
The cheese develops crispy golden areas that pair beautifully with the garlic and rosemary.
Cheesy Garlic Bread Variation
Once the loaf is baked and slightly cooled, slice it horizontally or make deep cuts across the top.
Mix softened butter with garlic and parsley.
Spread it inside the bread and add shredded mozzarella.
Return it to the oven briefly until the cheese melts.
This variation works particularly well as a party appetizer.
Olive and Herb Variation
For Mediterranean flavor, fold approximately ½ cup chopped olives into the dough.
Green olives, Kalamata olives, or a combination can work.
Because olives are naturally salty, slightly reduce the added salt if necessary.
What to Serve With Garlic Herb Bread
This bread works beautifully with creamy tomato soup, vegetable soup, chicken soup, beef stew, or chili.
It is also excellent alongside spaghetti, lasagna, baked pasta, chicken Parmesan, roasted chicken, or grilled vegetables.
For something very simple, serve warm slices with olive oil and herbs for dipping.
Turn Leftovers Into Garlic Toast
Day-old bread is perfect for garlic toast.
Slice the bread.
Spread with butter mixed with garlic and parsley.
Bake or toast until the edges become crisp and golden.
Add Parmesan or mozzarella if desired.
Homemade Croutons
Cut leftover bread into cubes.
Toss them lightly with olive oil, garlic powder, Italian seasoning, salt, and pepper.
Bake until crisp.
The resulting homemade croutons are excellent for Caesar salad, soups, and casseroles.
How to Store Homemade Bread
Allow the loaf to cool completely before storing it.
Keep it inside a bread bag, paper bag, or loosely covered container at room temperature.
For the best texture, enjoy it within approximately 2–3 days.
Avoid refrigerating bread unless necessary because refrigeration can accelerate staling.
Can You Freeze Garlic Herb Bread?
Yes.
Allow the loaf to cool completely.
You can freeze the entire loaf or slice it first.
Slicing before freezing makes it easy to remove only the portions you need.
Wrap tightly and place inside a freezer-safe bag.
For best quality, use within approximately 2 months.
How to Reheat the Bread
To refresh the crust, place the bread in an oven heated to approximately 350°F (175°C) for several minutes.
Individual slices can also be toasted.
If reheating a whole loaf, lightly misting the outside with water before warming can help restore some crispness.
Common Mistakes to Avoid
Using water that’s too hot: Very hot water can damage the yeast.
Adding excessive flour: No-knead dough should remain relatively sticky.
Skipping the rise: Fermentation is essential for both texture and flavor.
Deflating the dough aggressively: Shape it gently to preserve internal air bubbles.
Underbaking: A pale loaf may have a gummy interior.
Cutting immediately: Give the bread time to cool and set before slicing.
Frequently Asked Questions
Can I use instant yeast?
Yes. Instant yeast works very well and can be mixed directly with the flour.
Can I use fresh herbs?
Absolutely. Fresh rosemary, thyme, parsley, and chives can all be used. Because fresh herbs are less concentrated than dried herbs, you can use a little more.
Can I prepare the dough overnight?
Yes. For deeper flavor, prepare the dough and allow it to rise slowly in the refrigerator overnight. Bring it closer to room temperature before shaping and baking.
Why is my dough so sticky?
That’s normal. Higher hydration helps create the moist, open interior associated with rustic bread.
Do I need a Dutch oven?
No. A Dutch oven helps create a particularly crisp crust, but a baking sheet or oven-safe dish works too.
Can I add cheese?
Yes. Parmesan, cheddar, mozzarella, or Asiago can all complement the garlic and herbs.
Final Thoughts
This Easy No-Knead Garlic Herb Bread is an excellent recipe when you want the flavor and appearance of rustic bakery bread without complicated techniques.
The golden crust, fluffy interior, fragrant garlic, rosemary, and herbs make it delicious enough to serve on its own with butter, yet versatile enough for soups, pasta dinners, sandwiches, and family meals.
Once you’ve mastered the basic dough, you can easily transform it with Parmesan, olives, cheese, roasted garlic, or your favorite herbs for a different homemade loaf every time. 🥖🌿🧄