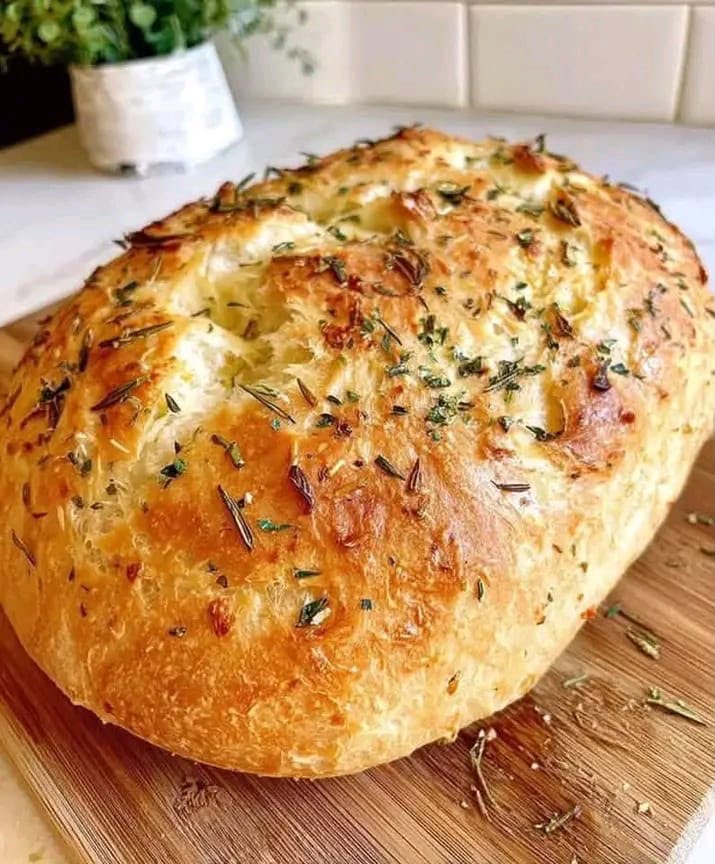
A Golden Homemade Loaf with Garlic and Herbs
Easy No-Knead Garlic Herb Bread is a warm, rustic homemade loaf with a crisp golden crust, soft airy center, and a fragrant blend of garlic and herbs. It looks like artisan bakery bread, but it is made with simple ingredients and does not require complicated kneading or special bread-making skills.
This loaf is perfect for serving with soup, pasta, roasted chicken, salads, cheese boards, or a comforting family dinner. The outside becomes beautifully golden and lightly crisp, while the inside stays soft and tender. Every slice carries a delicious buttery garlic aroma with small pieces of herbs baked into the dough.
No-knead bread is ideal for beginners because time does much of the work. After mixing the dough, you allow it to rise slowly. This resting time develops flavor and creates the light texture that makes homemade bread so satisfying. With a little patience, you can make a gorgeous loaf that looks and tastes special.
Why You’ll Love This Recipe
This garlic herb bread is easy to make with pantry ingredients. You do not need a stand mixer, bread machine, or long kneading process. A bowl, wooden spoon, baking sheet, and oven are enough.
The recipe is also very flexible. You can use rosemary, thyme, parsley, Italian seasoning, or a blend of your favorite dried herbs. Add Parmesan cheese for a cheesy crust, red pepper flakes for gentle heat, or extra garlic for a stronger savory flavor.
The loaf is beautiful enough to serve to guests, but it is comforting enough for an ordinary weeknight meal. The crispy crust and soft center make it delicious on its own with butter, olive oil, or a bowl of warm soup.
It is also a great recipe for meal planning. Bake one loaf for dinner, then use leftovers for sandwiches, garlic toast, croutons, or toasted breakfast slices the next day.
Recipe Information
Prep Time: 15 minutes
First Rise: 1 to 2 hours
Second Rise: 30 to 40 minutes
Bake Time: 30 to 35 minutes
Total Time: About 3 hours
Servings: 10 to 12 slices
Difficulty Level: Easy
Equipment Needed: Large mixing bowl, measuring cups, wooden spoon, baking sheet or Dutch oven, parchment paper, and sharp knife
Main Ingredients Explained
All-purpose flour is the foundation of this bread. It creates a soft interior and a lightly chewy crust. Bread flour can also be used if you want a slightly chewier texture and a taller loaf, but regular all-purpose flour works very well.
Yeast helps the dough rise and creates the airy texture inside the loaf. Active dry yeast or instant yeast can both be used. Instant yeast may rise a little faster, but either kind will work when mixed properly with warm water.
Warm water activates the yeast and brings the dough together. The water should feel warm but not hot. Water that is too hot can damage the yeast, while cool water can slow down the rise.
Olive oil adds flavor, softness, and a beautiful golden crust. It also helps the garlic and herbs coat the dough evenly.
Garlic gives this bread its savory, comforting flavor. Fresh minced garlic creates the strongest taste, while garlic powder can be used for a milder flavor that distributes very evenly through the dough.
Herbs such as rosemary, thyme, parsley, oregano, or Italian seasoning make the loaf fragrant and flavorful. Rosemary is especially delicious because it has a bold aroma that pairs beautifully with garlic.
Simple Recipe Overview
Start by mixing flour, yeast, salt, herbs, and warm water in a large bowl. Stir just until the ingredients come together into a soft, sticky dough.
Cover the bowl and allow the dough to rise until it becomes puffy and nearly doubles in size. Shape it gently into a round loaf, then let it rest again while the oven heats.
Brush the top with olive oil or melted butter, then sprinkle it with garlic, herbs, and optional Parmesan cheese. Bake the bread until it is golden brown and sounds hollow when tapped on the bottom.
Let the loaf cool slightly before slicing. This gives the inside time to set and keeps the bread from becoming gummy.
Ingredients
3 cups all-purpose flour
2 1/4 teaspoons active dry yeast, one packet
1 1/2 teaspoons salt
1 tablespoon sugar or honey
1 1/4 cups warm water
2 tablespoons olive oil
2 cloves garlic, finely minced
1 teaspoon garlic powder
1 tablespoon dried rosemary or Italian seasoning
1 tablespoon dried parsley
1/2 teaspoon dried thyme, optional
1 tablespoon melted butter or olive oil for brushing
2 tablespoons grated Parmesan cheese, optional
Flaky salt for topping, optional
Fresh chopped parsley or rosemary for garnish, optional
How to Choose the Best Ingredients
Choose fresh flour that has been stored in a sealed container in a dry place. Old flour can give bread a flat taste and may not produce the best texture.
Check the date on the yeast package before using it. Expired yeast may not activate properly, which can leave you with a dense, heavy loaf. If you are unsure whether your yeast is active, mix it with warm water and a pinch of sugar. It should become foamy after about 5 to 10 minutes.
Use good olive oil if possible. Since olive oil adds flavor to both the dough and the crust, a quality oil makes the bread taste richer.
Fresh garlic gives the strongest flavor, but be careful not to use too much raw garlic inside the dough because it can become sharp. Two finely minced cloves are usually enough for a balanced garlic herb loaf.
For herbs, dried rosemary and dried parsley are convenient and work very well. If using fresh rosemary, chop it finely so the pieces are small and easy to eat.
Preparing the Main Ingredient
The main ingredient is the bread dough. Start by adding the warm water, sugar or honey, and yeast to a large bowl. Stir gently and let it sit for 5 minutes if you are using active dry yeast. The mixture should become slightly foamy.
Add the flour, salt, olive oil, minced garlic, garlic powder, rosemary, parsley, and thyme. Stir with a wooden spoon until a soft dough forms. The dough will look slightly sticky and rough, which is normal for no-knead bread.
Do not add too much extra flour. A wetter dough creates steam as it bakes, helping the bread become light inside and crisp outside. If the dough is extremely wet and impossible to handle, add only one tablespoon of flour at a time.
Cover the bowl with plastic wrap, a lid, or a clean kitchen towel. Place it in a warm, draft-free place and let it rise until it doubles in size.
Preparing the Remaining Ingredients
Line a baking sheet with parchment paper. If you are using a Dutch oven, place parchment paper inside the pot or prepare a separate sheet of parchment for lifting the dough.
Prepare the topping by mixing melted butter or olive oil with a small amount of minced garlic, dried herbs, and optional Parmesan cheese. This mixture gives the top of the loaf extra flavor and helps it brown beautifully.
If you want a rustic bakery-style appearance, keep a little dried rosemary and flaky salt for the top. You can also add a few small pieces of fresh rosemary, but use them lightly because fresh herbs can darken quickly in a hot oven.
Preheat the oven to 425°F (220°C) during the final part of the second rise. A hot oven is important because it gives the bread a strong rise and crisp crust.
Step-by-Step Instructions
Once the dough has doubled in size, gently scrape it onto a lightly floured surface. Use your hands to fold the edges toward the center a few times, creating a loose round shape.
Do not knead the dough heavily. The goal is simply to shape it without pressing out all of the air bubbles created during the first rise.
Place the shaped dough seam-side down on the prepared parchment-lined baking sheet. Cover it loosely with a clean towel and let it rest for 30 to 40 minutes. It should become slightly puffy again.
Use a sharp knife to make two or three shallow cuts across the top of the loaf. These cuts allow the bread to expand in the oven and create a beautiful rustic pattern.
Brush the top gently with the garlic herb butter or olive oil mixture. Sprinkle with Parmesan cheese, flaky salt, and extra herbs if desired.
Bake for 30 to 35 minutes, until the loaf is deeply golden brown. The bread should sound hollow when tapped on the bottom. If you have an instant-read thermometer, the center should reach about 200°F (93°C).
Remove the loaf from the oven and place it on a cooling rack. Let it cool for at least 20 minutes before slicing. This helps the inside finish setting and makes the slices cleaner.
Tips for the Best Result
Use warm water, not hot water. The ideal temperature is around 105°F to 110°F. If the water feels comfortably warm on your wrist, it is usually safe for yeast.
Keep the dough slightly sticky. No-knead dough should not feel dry or firm. A softer dough creates a lighter interior with better air pockets.
Allow enough time for the rise. The dough should visibly double in size before shaping. If your kitchen is cool, it may take longer than the recipe suggests.
For an extra-crisp crust, place an oven-safe pan of hot water on the lower oven rack while the bread bakes. The steam helps create a bakery-style crust.
Do not cut the bread while it is very hot. Fresh bread smells wonderful, but slicing too soon can make the center look doughy. Give it at least 20 minutes to cool.
Common Mistakes to Avoid
Avoid using expired yeast. If the yeast does not foam after being mixed with warm water and sugar, it may not be active enough to make the dough rise.
Do not add too much flour while mixing. Extra flour can make the bread dense and dry. The dough should be soft and somewhat sticky before the first rise.
Avoid placing the dough in a very hot area to rise. Too much heat can make the yeast work too fast and create an unpleasant flavor. A warm countertop or an oven with only the light on is usually enough.
Do not skip the second rise. This short rest allows the shaped loaf to become lighter and gives it a better texture after baking.
Avoid baking at a low temperature. A hot oven helps the bread rise quickly and creates the golden crust shown in the finished loaf.
Ideas and Variations
For cheesy garlic bread, mix 1/2 cup shredded mozzarella or cheddar into the dough and sprinkle more cheese over the top during the final 10 minutes of baking.
For rosemary Parmesan bread, use extra rosemary and add 1/3 cup grated Parmesan cheese directly into the dough. This creates a richer, more savory flavor.
For spicy garlic herb bread, add 1/4 teaspoon red pepper flakes or a pinch of cayenne pepper to the dough. The heat adds a gentle kick without covering the garlic and herb flavor.
For an Italian-style loaf, use Italian seasoning, oregano, basil, and a little grated Parmesan. Serve it beside pasta, tomato soup, or a cheese board.
For olive bread, fold in 1/2 cup chopped olives after the first rise. Black olives, green olives, or sun-dried tomatoes can add a delicious Mediterranean flavor.
For a sweeter herb loaf, leave out the garlic, add a little extra honey, and use thyme with a small amount of cinnamon. This version is lovely with butter or soft cheese.
How to Serve
Serve garlic herb bread warm with softened butter, olive oil, balsamic vinegar, or cream cheese. It is perfect for tearing into pieces and sharing at the table.
This bread pairs especially well with soups such as tomato soup, chicken soup, creamy vegetable soup, or beef stew. The crisp crust is wonderful for dipping into warm broth.
Serve it beside spaghetti, lasagna, baked pasta, roasted chicken, grilled steak, or a large salad. The garlic and herbs make it a flavorful replacement for regular dinner rolls.
Use leftover slices for sandwiches. Turkey, chicken, roast beef, cheese, egg salad, and grilled vegetables all taste delicious between slices of garlic herb bread.
You can also toast leftover bread and top it with butter, cheese, avocado, eggs, or tomatoes for an easy breakfast or lunch.
Meal Prep and Storage
This bread tastes best on the day it is baked, especially while the crust is crisp and the inside is soft. However, it can be stored at room temperature for up to 2 days.
Let the loaf cool completely before storing. Wrap it loosely in parchment paper, foil, or a clean kitchen towel. Avoid sealing warm bread in plastic immediately because trapped steam can soften the crust.
For longer storage, place the cooled bread in an airtight container or resealable bag. If the crust becomes soft, reheat the loaf in the oven for a few minutes to restore some crispness.
You can prepare the dough ahead of time. After mixing, cover the bowl and refrigerate it overnight. Let it sit at room temperature for about 30 minutes before shaping and baking the next day.
How to Freeze
Garlic herb bread freezes very well. Let the loaf cool completely, then wrap it tightly in plastic wrap or foil. Place the wrapped loaf in a freezer-safe bag.
Freeze the whole loaf for up to 2 months. You can also slice the bread before freezing so you can remove only the pieces you need.
To thaw, leave the bread at room temperature for a few hours or overnight. For a warm fresh-baked feel, place the thawed loaf in a 350°F (175°C) oven for 8 to 10 minutes.
Do not freeze the dough after it has already completed both rises unless you are experienced with bread dough. Freezing the baked loaf gives the most reliable texture.
How to Reheat
To reheat a whole loaf, wrap it loosely in foil and place it in a 350°F (175°C) oven for 8 to 12 minutes. Remove the foil for the final few minutes if you want a crispier crust.
For individual slices, toast them in a toaster, skillet, air fryer, or oven. Spread a little butter or garlic butter on the warm slices for extra flavor.
If the bread is dry after storage, brush the outside lightly with water before reheating in the oven. This creates a little steam and helps soften the inside while refreshing the crust.
Avoid microwaving the whole loaf for a long time. The microwave can make bread rubbery. It is better for warming only one slice briefly when needed.
Frequently Asked Questions
Can I use bread flour instead of all-purpose flour?
Yes. Bread flour creates a slightly chewier loaf and may give the bread a little more height. Use the same amount as all-purpose flour.
Can I make this bread without fresh garlic?
Yes. Use 1 to 1 1/2 teaspoons of garlic powder instead. Garlic powder gives a milder but evenly distributed garlic flavor.
Why did my bread not rise?
The yeast may have been expired, the water may have been too hot, or the dough may have been left in a very cold place. Check the yeast date and use warm water for the best result.
Can I use fresh herbs?
Yes. Use about three times the amount of fresh herbs because dried herbs are more concentrated. Chop fresh rosemary or parsley very finely before adding it.
How do I know when the bread is fully baked?
The crust should be golden brown, and the loaf should sound hollow when tapped underneath. An internal temperature of about 200°F means the bread is baked through.
Final Thoughts
Easy No-Knead Garlic Herb Bread is a simple homemade recipe that brings warm bakery-style flavor to your kitchen. With a crisp golden crust, soft center, fragrant herbs, and savory garlic, it is the perfect loaf for family meals, special dinners, or everyday comfort food.
The no-knead method makes bread baking less stressful and more enjoyable. Mix the dough, let it rise, bake it until golden, and enjoy the wonderful smell of fresh garlic herb bread coming from the oven.