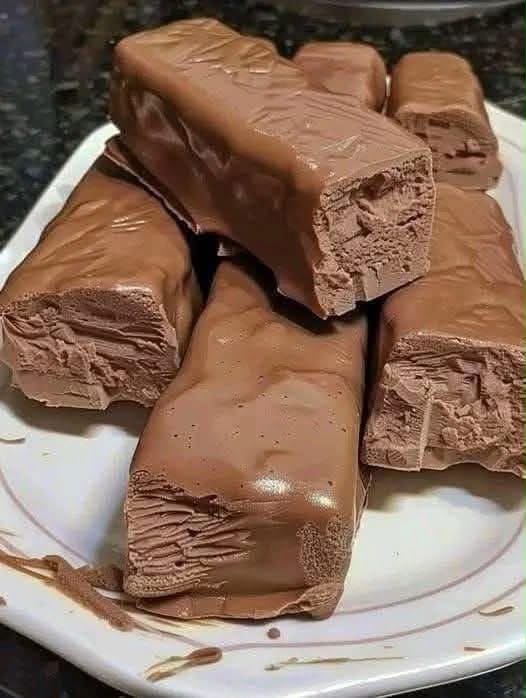
Chocolate Fudge Ice Cream Bars
Chocolate Fudge Ice Cream Bars are the perfect homemade treat for anyone who loves rich chocolate, creamy frozen desserts and a delicate chocolate shell. These indulgent bars combine a smooth cocoa ice cream centre with a thin layer of milk chocolate that firms up beautifully in the freezer.
Every bite brings together two wonderful textures. The outside provides a satisfying chocolate snap, while the inside remains creamy, soft and full of deep cocoa flavour. They look like something from a traditional ice cream shop, yet they are surprisingly simple to prepare at home.
One of the best things about this recipe is that you do not need an ice cream maker. The filling is prepared using whipped cream, sweetened condensed milk, cocoa powder and vanilla extract. Once frozen, it becomes a rich, no-churn chocolate dessert that can be sliced into generous bars.
The chocolate coating is equally straightforward. Melted milk chocolate is combined with a little coconut oil or vegetable oil to produce a smooth coating that spreads easily over the frozen filling. After a short return to the freezer, the bars are ready to enjoy.
These homemade chocolate ice cream bars are wonderful for summer afternoons, family celebrations, weekend desserts or whenever a chocolate craving strikes. They can also be prepared ahead of time, making them convenient for parties and gatherings.
If you enjoy frozen chocolate treats with a creamy, fudgy texture, this recipe offers a delicious combination of simplicity and homemade comfort.
Recipe Overview
- Recipe Name: Chocolate Fudge Ice Cream Bars
- Category: Dessert
- Style: Homemade frozen chocolate treat
- Preparation Time: Approximately 20–30 minutes
- Cooking Time: No baking required
- Initial Freezing Time: At least 6 hours
- Final Setting Time: 10–15 minutes
- Total Time: Approximately 6 hours 30 minutes to 6 hours 45 minutes, excluding any additional chilling
- Yield: Approximately 8–10 bars, depending on size
- Difficulty: Easy
- Cooking Method: No-churn freezing and chocolate dipping
- Main Ingredients: Double cream, condensed milk, cocoa powder and milk chocolate
The longest part of this recipe is the freezing time. The actual hands-on preparation is relatively quick, especially if the ingredients and equipment are organised before starting.
Why You’ll Love This Recipe
- Only six ingredients: The recipe uses familiar ingredients without complicated additions.
- No ice cream machine: Whipped cream creates a light texture without churning.
- Rich chocolate flavour: Cocoa powder and milk chocolate provide two layers of chocolate goodness.
- Wonderful texture: A firm outer shell contrasts with the creamy frozen filling.
- Easy to prepare ahead: Make a batch and keep it frozen for future treats.
- Customisable portions: Cut small bars for children or larger bars for a generous dessert.
- Great for entertaining: They make a lovely addition to summer parties and family gatherings.
- Homemade satisfaction: You can enjoy a classic frozen chocolate treat prepared in your own kitchen.
Ingredients
For the Chocolate Ice Cream Filling
- 2 cups heavy whipping cream (approximately 480 ml double or whipping cream)
- 1 can sweetened condensed milk (approximately 397 g, if using a standard can)
- ½ cup unsweetened cocoa powder
- 1 teaspoon vanilla extract
For the Chocolate Coating
- 1 cup melted milk chocolate (approximately 170 g, depending on the chocolate)
- 2 tablespoons coconut oil or vegetable oil
The recipe contains just six ingredients. The creamy filling and chocolate shell are prepared separately before being combined into finished frozen bars.
Ingredient Notes
Heavy Whipping Cream
Heavy whipping cream provides the fluffy structure that makes no-churn ice cream possible. For best results, use cream that contains enough fat to whip into stiff peaks. Double cream is a suitable British alternative, although it can thicken quickly, so avoid overwhipping.
Sweetened Condensed Milk
Condensed milk adds sweetness, creaminess and body. Its concentrated sugar content helps the filling remain more scoopable and less icy than a simple frozen milk mixture. Use sweetened condensed milk rather than evaporated milk.
Unsweetened Cocoa Powder
Cocoa powder creates the deep chocolate flavour and rich brown colour of the centre. Choose an unsweetened variety so that the sweetness stays balanced. Sifting cocoa powder can prevent dry lumps from appearing in the filling.
Vanilla Extract
Vanilla adds warmth and rounds out the chocolate flavour. Although only a small amount is needed, it helps the filling taste smoother and more complete.
Milk Chocolate
Milk chocolate creates a sweet, creamy coating that complements the cocoa filling. Use chocolate that melts smoothly. Chopped chocolate bars or suitable melting chocolate both work well.
Coconut Oil or Vegetable Oil
A small quantity of oil thins the melted chocolate, making it easier to coat the frozen bars evenly. Refined coconut oil offers a relatively neutral flavour, while ordinary neutral vegetable oil is another option. Coconut oil generally creates a firmer shell when cold.
Equipment You’ll Need
- Large mixing bowl
- Electric hand mixer or stand mixer
- Second mixing bowl
- Rubber spatula
- Loaf tin or rectangular freezer-safe container
- Baking parchment
- Sharp kitchen knife
- Microwave-safe bowl or heatproof bowl
- Forks or dipping tools
- Freezer-safe tray
- Airtight freezer container
A rectangular container with straight sides makes cutting the frozen mixture easier. Line it with enough parchment to create overhanging edges for lifting the ice cream out.
Step-by-Step Instructions
Step 1: Whip the Cream
Pour the heavy whipping cream into a large, preferably chilled mixing bowl. Beat using an electric mixer until stiff peaks form. The cream should hold its shape when the beaters are lifted.
Stop once the peaks are firm. Overwhipping can cause the cream to become grainy and may eventually turn it into butter.
Step 2: Mix the Chocolate Base
In a separate bowl, combine the sweetened condensed milk, unsweetened cocoa powder and vanilla extract. Stir thoroughly until smooth and evenly chocolate-coloured.
For an especially smooth mixture, sift the cocoa powder before adding it. This helps prevent powdery lumps.
Step 3: Fold the Mixtures Together
Add a portion of the whipped cream to the chocolate condensed milk mixture. Fold gently with a spatula to loosen the chocolate base.
Add the remaining whipped cream and continue folding until everything is combined. Use slow, sweeping movements rather than vigorous stirring to preserve as much air as possible.
Step 4: Fill the Container
Line a loaf tin or rectangular freezer-safe container with baking parchment. Spoon in the chocolate ice cream mixture and spread it evenly.
Smooth the top with a spatula and gently tap the container against the worktop to remove any large trapped air pockets.
Step 5: Freeze Until Firm
Cover the container and place it in the freezer for at least 6 hours, or until completely solid.
For easier handling, overnight freezing is especially helpful. The mixture needs to be firm enough to maintain its rectangular shape when sliced and dipped.
Step 6: Cut into Bars
Remove the frozen chocolate mixture from the freezer and lift it from the container using the parchment edges.
Place it on a chilled cutting board and slice into thick rectangular bars using a sharp knife. Work quickly so the ice cream does not soften excessively.
Step 7: Prepare the Chocolate Coating
Melt the milk chocolate gently in a microwave or over a pan of barely simmering water. If using a microwave, heat in short intervals, stirring between each one.
Stir in the coconut oil or vegetable oil until the chocolate is smooth and glossy. Allow the mixture to cool until it is fluid but no longer hot.
Step 8: Dip the Frozen Bars
Dip each frozen ice cream bar into the melted chocolate, covering it completely. Use two forks or dipping tools to turn the bars and allow excess chocolate to drip away.
If the ice cream starts to soften, return the undipped bars to the freezer briefly before continuing.
Step 9: Set the Chocolate Shell
Place the coated bars on a parchment-lined tray. Return them to the freezer for 10–15 minutes, or until the chocolate coating has become firm.
Step 10: Serve
Remove the chocolate fudge ice cream bars from the freezer just before serving. Enjoy them frozen, with their creamy chocolate centres and smooth chocolate shells.
How to Make the Filling Creamy
The secret to smooth homemade chocolate ice cream bars is the balance between whipped cream and sweetened condensed milk.
Whipping the cream introduces air into the mixture. Those tiny air bubbles help give the ice cream a lighter texture even though no ice cream machine is involved.
Condensed milk contributes sweetness and dissolved sugar, which reduces the tendency of the mixture to freeze into a completely hard block.
When combining these ingredients, gentle folding is important. Mixing too aggressively releases the air trapped in the whipped cream and may produce a denser result.
For the best texture, chill the cream before whipping, mix the cocoa thoroughly into the condensed milk and freeze the finished filling in a well-covered container.
How to Cut Perfect Ice Cream Bars
Neat rectangular pieces make these chocolate-covered ice cream bars easier to dip and serve.
Start by freezing the mixture completely. A partially frozen centre may bend, crumble or melt while being handled.
Lift the frozen block onto a chilled cutting surface. Use a large, sharp knife to make straight cuts through the chocolate filling.
Warming the knife very briefly under hot water, then drying it thoroughly, can help with especially firm ice cream. Wipe the blade between cuts for cleaner edges.
Cut the block into approximately eight to ten pieces, depending on the size of your container and the portion size you prefer.
After slicing, place the bars back into the freezer while preparing the chocolate coating. This helps them stay firm during dipping.
How to Make a Smooth Chocolate Shell
A smooth chocolate coating gives homemade fudge bars their attractive finish and delicious contrast in texture.
Begin with gently melted chocolate. Excessive heat can cause chocolate to become thick, scorched or grainy.
The coconut oil or vegetable oil makes the melted chocolate more fluid, helping it spread over the cold ice cream without forming an excessively thick layer.
Before dipping, allow the coating to cool slightly. It should still pour easily, but it must not be so hot that it rapidly melts the ice cream filling.
Dip one bar at a time and work efficiently. The frozen surface causes the chocolate to begin setting almost immediately.
For best results, keep the remaining bars in the freezer and remove only a few at a time. This makes the dipping process more manageable, particularly in a warm kitchen.
Expert Tips for Perfect Chocolate Fudge Bars
- Use cold cream. Chilled cream whips more reliably and holds its shape better.
- Choose full-fat cream. The extra fat contributes to a smoother, richer frozen filling.
- Sift the cocoa powder. This helps avoid dry chocolate lumps.
- Whip to stiff peaks. Properly whipped cream provides structure without an ice cream machine.
- Fold gently. Preserve the air in the whipped cream for a lighter result.
- Line the container carefully. Parchment makes it easier to remove the frozen mixture.
- Freeze thoroughly. Fully frozen bars are much easier to coat.
- Use a sharp knife. Clean cuts give the bars a more attractive appearance.
- Melt chocolate slowly. Gentle heat protects its smooth texture.
- Cool the coating slightly. Warm rather than hot chocolate is less likely to melt the filling immediately.
- Dip in small batches. Keep unused bars frozen while working.
- Allow excess chocolate to drip away. Thin, even coatings are generally easier to bite through.
- Store in airtight packaging. This helps limit freezer odours and ice crystals.
- Serve directly from the freezer. The bars are at their best while the chocolate shell is firm.
Common Mistakes to Avoid
1. Using Cream That Will Not Whip
Low-fat pouring cream may not form stable peaks. Choose whipping cream or double cream suitable for whipping.
2. Overwhipping the Cream
Whipping for too long can make cream grainy. Stop as soon as stiff peaks form.
3. Adding Cocoa Without Mixing Properly
Unsifted cocoa can create bitter dry pockets. Mix the cocoa thoroughly with the condensed milk before folding in the cream.
4. Stirring Too Aggressively
Vigorous stirring removes air from the whipped cream. Use gentle folding movements instead.
5. Cutting Before Fully Frozen
Soft ice cream may lose its shape during slicing. Freeze for at least six hours and longer if necessary.
6. Using Hot Chocolate Coating
Very hot melted chocolate can soften the frozen filling. Let it cool until comfortably warm and fluid.
7. Leaving Bars at Room Temperature
The creamy filling softens quickly. Return the bars to the freezer whenever they are not being handled.
8. Applying an Excessively Thick Shell
A thick chocolate coating can be difficult to bite through. Let excess chocolate drip off before placing the bars on parchment.
9. Poor Freezer Storage
Uncovered ice cream can absorb unwanted odours and develop ice crystals. Use airtight freezer-safe packaging.
Optional Variations
The following ideas are optional changes to the original six-ingredient recipe.
1. Dark Chocolate Fudge Bars
Replace the milk chocolate coating with dark chocolate for a more intense cocoa flavour and a less sweet outer shell.
2. Chocolate Peanut Butter Bars
Swirl a little smooth peanut butter into the prepared chocolate filling before freezing.
3. Mint Chocolate Ice Cream Bars
Replace a small portion of the vanilla extract with peppermint extract for a refreshing chocolate-mint version.
4. Crunchy Chocolate Bars
Sprinkle finely chopped toasted nuts onto the coating before it completely sets.
5. White Chocolate Coating
Use melted white chocolate instead of milk chocolate for a sweeter contrast with the cocoa filling. The amount of added oil may need adjusting.
6. Coffee Chocolate Bars
Add a little dissolved instant coffee to the condensed milk mixture for a mocha-style dessert. Cool the coffee before combining it with the other ingredients.
7. Chocolate Cookie Bars
Fold small pieces of chocolate biscuits into the filling before freezing for extra texture.
Serving Suggestions
Chocolate fudge ice cream bars are delicious served on their own, but they can also be included in larger dessert presentations.
For a summer gathering, arrange the bars on a chilled platter just before serving. Keep the platter out of direct sunlight to slow melting.
For a more elegant dessert, serve a bar with a few fresh raspberries or strawberries. Their natural tartness balances the sweetness of the milk chocolate coating.
A cup of freshly brewed coffee pairs particularly well with the rich cocoa filling. The contrast between hot coffee and cold chocolate ice cream makes a lovely after-dinner combination.
For children’s celebrations, prepare smaller portions that are easier to hold and eat. You can also place individual bars in small paper dessert wrappers for convenient serving.
Another enjoyable option is to serve the bars alongside a small scoop of vanilla ice cream for a double-chocolate frozen dessert.
Storage and Freezing
How to Store Homemade Ice Cream Bars
Once the chocolate coating has fully set, transfer the bars to an airtight freezer-safe container. Separate layers with pieces of baking parchment to prevent sticking.
Keep the bars frozen at approximately -18°C (0°F) or colder.
How Long Do They Last?
For the best homemade flavour and texture, enjoy the bars within approximately two to four weeks. They may remain safe for longer when continuously frozen and properly handled, but their quality can gradually decline.
Can You Make Them Ahead?
Yes. The filling can be prepared and frozen a day before coating. You can also finish the bars completely and store them until needed.
Should They Be Refrigerated?
No. These bars need freezer storage. Refrigeration alone will not keep the ice cream centre solid.
Can Melted Bars Be Refrozen?
It is best to avoid repeatedly melting and refreezing the bars. This can damage their texture and create unnecessary food-safety risks, particularly if they have been left warm for an extended period.
Do They Need Reheating?
No. Chocolate fudge ice cream bars are designed to be enjoyed frozen and should never be reheated.
Frequently Asked Questions
1. Can I make chocolate fudge ice cream bars without an ice cream maker?
Yes. The whipped cream and condensed milk mixture creates a no-churn ice cream filling that freezes without specialised equipment.
2. Can I use double cream instead of heavy whipping cream?
Yes. Double cream is an excellent alternative, provided it is whipped carefully to avoid overmixing.
3. Can I use evaporated milk instead of condensed milk?
No, not as a direct replacement. Evaporated milk is unsweetened and behaves differently in frozen desserts.
4. Why is my ice cream filling too hard?
The filling may contain too little incorporated air, or your freezer may be particularly cold. Make sure the cream is properly whipped and folded gently.
5. Why is my ice cream icy?
Ice crystals may form if the mixture is poorly covered, partially melted and refrozen, or not blended evenly.
6. Can I use dark chocolate for the coating?
Yes. Dark chocolate makes a delicious alternative if you prefer a stronger chocolate flavour.
7. Is coconut oil necessary?
The recipe allows either coconut oil or vegetable oil. Both help thin the melted chocolate, although coconut oil generally produces a firmer cold coating.
8. Can I leave out the oil entirely?
You can try, but the chocolate may form a thicker coating that is harder to dip and bite through.
9. How long should the filling freeze?
At least six hours, or until completely firm. Overnight freezing often gives more reliable results.
10. How do I stop the bars melting while dipping?
Freeze them thoroughly, work in small batches and return unused portions to the freezer.
11. Why does my chocolate coating crack?
Chocolate naturally becomes firm and brittle when cold. A very thick layer can crack more noticeably, so allow excess coating to drip away.
12. Can I make smaller bars?
Absolutely. Simply cut the frozen block into smaller rectangular pieces before dipping.
13. Can I use silicone moulds?
Yes. Silicone bar moulds can create evenly shaped portions and may make removal easier.
14. Can I use chocolate chips?
Yes, provided they melt smoothly. Some chocolate chips contain stabilisers and may need more careful melting.
15. Why is the chocolate coating too thick?
The chocolate may have cooled too much or may need more gentle warming. Stir thoroughly and maintain a fluid consistency.
16. Can I add nuts?
Yes. Chopped nuts can be added as an optional variation to the coating or filling.
17. Can I prepare the filling the night before?
Yes. Overnight freezing is ideal for preparing the mixture before cutting and coating the next day.
18. How should I transport these ice cream bars?
Use a well-insulated cooler with sufficient frozen ice packs and keep the bars thoroughly frozen until serving.
19. Can I make them dairy-free?
A dairy-free version would require suitable whipping cream, condensed milk and chocolate alternatives. The texture may differ, so those changes would need testing.
20. Are these bars suitable for parties?
Yes. They are convenient make-ahead desserts, especially when kept in the freezer until guests are ready to enjoy them.
21. Can children help make this recipe?
Children can help with mixing and folding under supervision. Adults should handle melting chocolate and slicing frozen bars with sharp knives.
22. What makes these bars fudgy?
The combination of cocoa powder, condensed milk and rich cream creates a dense chocolate flavour and creamy frozen texture reminiscent of fudge.
Complete Recipe Card
Chocolate Fudge Ice Cream Bars
Description: Creamy homemade chocolate fudge ice cream bars dipped in a smooth milk chocolate coating. An easy no-churn frozen dessert made with six ingredients.
- Category: Dessert
- Method: No-churn freezing
- Prep Time: Approximately 20–30 minutes
- Freeze Time: At least 6 hours
- Coating Set Time: 10–15 minutes
- Total Time: Approximately 6 hours 30–45 minutes
- Yield: Approximately 8–10 bars
Ingredients
- 2 cups heavy whipping cream
- 1 can sweetened condensed milk
- ½ cup unsweetened cocoa powder
- 1 teaspoon vanilla extract
- 1 cup melted milk chocolate
- 2 tablespoons coconut oil or vegetable oil
Instructions
- In a large bowl, whip the heavy cream until stiff peaks form.
- In another bowl, combine the sweetened condensed milk, cocoa powder and vanilla extract until smooth.
- Gently fold the whipped cream into the chocolate mixture until completely combined.
- Pour the mixture into a parchment-lined loaf tin or rectangular freezer-safe container.
- Smooth the top and freeze for at least 6 hours, or until completely firm.
- Remove the frozen mixture from the container and cut into thick rectangular bars.
- Mix the melted milk chocolate with the coconut oil or vegetable oil until smooth and glossy. Let the coating cool slightly if necessary.
- Dip each frozen bar into the chocolate mixture, covering it completely.
- Place the coated bars onto baking parchment and return them to the freezer for 10–15 minutes, until the chocolate shell is firm.
- Serve frozen for a creamy chocolate centre and a crisp chocolate coating.
Recipe Notes
- Use well-chilled whipping cream for the best volume.
- Fold the cream gently to preserve its airy texture.
- Freeze the chocolate filling completely before slicing.
- Allow the melted chocolate to cool slightly before dipping.
- Keep the remaining bars frozen while coating each batch.
- Store finished bars in an airtight freezer-safe container.
Hashtags: #ChocolateFudgeBars #HomemadeIceCream #ChocolateDessert #FrozenTreats #EasyDessertRecipes
Share Your Homemade Chocolate Bars
There is something especially satisfying about making your own chocolate-covered ice cream bars. From the creamy cocoa filling to the delicate chocolate shell, every step creates a dessert worth sharing.
If you try these Chocolate Fudge Ice Cream Bars, share how they turned out in the comments. Did you keep the classic milk chocolate coating or try a different chocolate variation?
Save this recipe for your next family gathering, share it with a fellow chocolate lover and follow along for more easy homemade desserts and frozen treats.