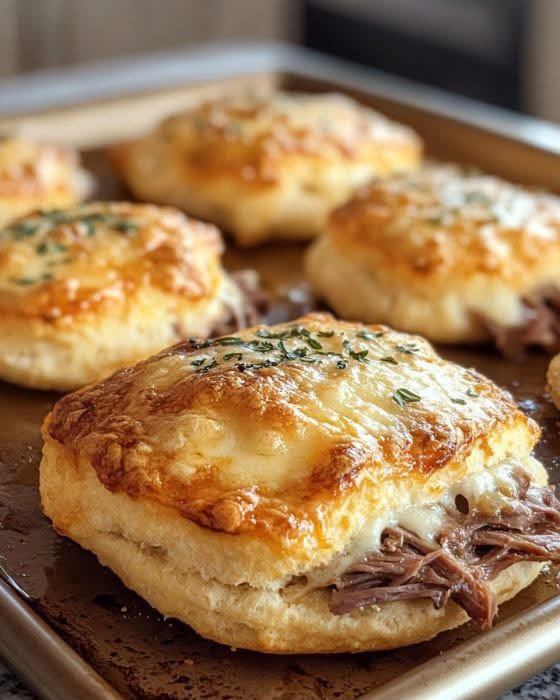
Cheesy Beef Biscuit Melts
Golden, buttery biscuits filled with juicy shredded beef and topped with bubbling melted cheese are the kind of comfort food that brings everyone to the kitchen. These cheesy beef biscuit melts combine soft, fluffy biscuit centres, savoury meat and rich, stretchy cheese in one wonderfully satisfying bite.
There is something irresistible about warm biscuits fresh from the oven, especially when they are loaded with tender beef. The outside becomes beautifully golden while the inside stays soft enough to absorb the delicious juices from the filling.
The combination of mozzarella and provolone or cheddar creates an especially tempting cheese topping. Mozzarella provides that lovely melted texture, while the second cheese adds extra savoury flavour and richness.
One of the best things about this recipe is its simplicity. Refrigerated biscuit dough takes care of the baking, and cooked shredded beef makes the filling incredibly convenient. If you have leftover pot roast in the fridge, this is a delicious way to turn it into another meal.
These biscuit melts work beautifully for a quick family dinner, weekend lunch, game-day snack or casual gathering. Serve them straight from the oven while the cheese is warm and the biscuits are at their best.
With a handful of everyday ingredients and a straightforward method, cheesy beef biscuit melts offer all the appeal of a hearty homemade sandwich without requiring you to prepare bread dough from scratch.
Recipe Overview
- Recipe: Cheesy Beef Biscuit Melts
- Category: Main course, snack or appetiser
- Style: American-inspired comfort food
- Preparation Time: Approximately 10 minutes
- Cooking Time: Approximately 14–18 minutes, plus optional grilling
- Total Time: Approximately 24–30 minutes
- Servings: Approximately 8 biscuit melts, depending on the dough package
- Oven Temperature: 375°F (190°C)
- Cooking Method: Oven baking
- Main Ingredients: Biscuit dough, shredded beef, mozzarella, provolone or cheddar
- Difficulty: Easy
The timings assume that the beef has already been cooked and is ready to use. Cooking a pot roast from raw will require additional time.
Why You’ll Love This Recipe
- Easy preparation: Refrigerated biscuit dough eliminates the need for homemade bread dough.
- Excellent use of leftovers: Cooked pot roast transforms into a completely different and satisfying dish.
- Rich cheese flavour: Two cheeses create a wonderfully gooey filling and golden topping.
- Family-friendly: The familiar beef, biscuit and cheese combination appeals to many different tastes.
- Flexible serving options: Enjoy them as dinner, lunch, party food or a filling snack.
- Minimal equipment: A baking tray, knife, brush and oven are all you need.
- Easy to customise: You can experiment with different cheeses, seasonings and fillings.
- Comforting texture: Soft biscuit centres contrast beautifully with crisp, golden cheese and tender beef.
Ingredients
These ingredients follow the original recipe and make approximately eight biscuit melts when using a standard eight-biscuit package.
Biscuits and Beef Filling
- 1 can refrigerated biscuit dough
- 2 cups cooked shredded beef or pot roast
- 1½ cups shredded mozzarella cheese
- ½ cup shredded provolone or cheddar cheese
Butter and Seasonings
- 2 tablespoons melted butter
- 1 teaspoon garlic powder
- ½ teaspoon onion powder
- ½ teaspoon black pepper
- ½ teaspoon Italian seasoning
- 1 tablespoon chopped parsley
No extra salt is included in the original ingredients. Cooked beef and cheese may already contain enough seasoning, so taste the filling before making any adjustments.
Ingredient Notes
Refrigerated Biscuit Dough
Refrigerated biscuit dough provides a quick, convenient base with a soft, fluffy interior and golden exterior. Larger biscuits are particularly useful because they offer enough space for a generous portion of shredded beef. Check the packet’s baking instructions, as individual brands may require slightly different cooking times.
Cooked Shredded Beef
Tender pot roast or slow-cooked shredded beef works especially well. The meat should be moist enough to remain juicy during baking but not so wet that it soaks through the biscuits. Remove large pieces of fat and break up any oversized chunks before assembling.
Mozzarella Cheese
Mozzarella melts smoothly and creates the stretchy texture that makes these biscuits so appealing. Low-moisture shredded mozzarella is particularly convenient and helps avoid an excessively wet filling.
Provolone or Cheddar
Provolone produces a mild, creamy melt, while cheddar offers a more pronounced savoury flavour. Both choices work well with beef. Use whichever best suits your taste.
Melted Butter
Butter helps create a rich, golden surface and carries the seasoning across the biscuit tops. Brush lightly rather than soaking the dough.
Garlic and Onion Powder
These seasonings add savoury depth without introducing additional moisture. Distributing them evenly gives each biscuit a balanced flavour.
Italian Seasoning and Parsley
Italian seasoning gives the melted cheese a gentle herbal flavour. Fresh chopped parsley finishes the biscuits with a little colour and freshness.
Equipment You’ll Need
- Large baking tray
- Parchment paper
- Sharp serrated knife
- Pastry brush
- Measuring cups and spoons
- Small bowl for melted butter
- Oven gloves
- Spatula for transferring the biscuits
A serrated knife is especially helpful for opening partly baked biscuits without compressing their fluffy centres.
How to Make Cheesy Beef Biscuit Melts
Step 1: Preheat the Oven
Preheat your oven to 375°F (190°C). Line a large baking tray with parchment paper to reduce sticking and make cleaning easier.
Step 2: Prepare the Biscuit Dough
Open the refrigerated biscuit dough and separate the individual biscuits. Gently flatten each biscuit into a thick, even round, taking care not to press out all the air.
Step 3: Partially Bake the Biscuits
Arrange the biscuits on the prepared tray with space between them. Bake for approximately 6–8 minutes, until they begin to rise and develop structure but are not fully cooked.
Step 4: Split the Biscuits
Carefully remove the tray from the oven. Allow the biscuits to cool just enough to handle safely, then gently split each one horizontally with a serrated knife.
Step 5: Add the Shredded Beef
Place a generous portion of cooked shredded beef onto the bottom half of each biscuit. Spread the beef evenly so the sandwiches are easy to close and the meat warms consistently.
Step 6: Add the Cheese Filling
Sprinkle the mozzarella and provolone or cheddar over the shredded beef, distributing the cheese among all the biscuits. Reserve a little cheese for the tops.
Step 7: Assemble the Melts
Carefully place the biscuit tops back over the filling. Sprinkle the remaining cheese over the upper surfaces to create the golden, bubbly finish.
Step 8: Brush and Season
Lightly brush the tops with melted butter. Sprinkle evenly with garlic powder, onion powder, black pepper and Italian seasoning.
Step 9: Bake Until Golden
Return the assembled biscuits to the oven and bake for another 8–10 minutes, until the cheese has melted and the biscuits are deeply golden. Check that the dough is fully cooked through, particularly around the centre and filling.
Step 10: Optional Final Browning
For a more deeply browned cheese topping, switch to the grill or broiler for 1–2 minutes. Watch continuously because cheese can brown or burn very quickly.
Step 11: Garnish and Serve
Remove the biscuits from the oven and sprinkle with chopped parsley. Let them stand briefly, then serve while the cheese is soft and melted.
How to Prepare the Beef Filling
The quality of the beef filling has a major effect on the finished biscuits. Slow-cooked pot roast is particularly suitable because its tender fibres are easy to pull apart and distribute evenly.
If your cooked beef has been refrigerated, loosen the strands with a fork and warm it gently before assembly. This helps the filling heat through during the short final baking period. Add a little reserved pot roast cooking liquid only if the beef is unusually dry, and avoid leaving excess liquid in the mixture.
For best results, use small, tender shreds rather than large chunks. Smaller pieces settle into the biscuit naturally, making the sandwiches easier to eat and helping the cheese coat the meat.
If using leftover cooked beef, refrigerate it promptly after its original preparation and reheat it thoroughly. Leftovers being reheated should reach 74°C (165°F) throughout.
How to Create a Golden Cheese Topping
The distinctive golden cheese topping is one of the highlights of cheesy beef biscuit melts. To achieve it, spread the cheese across the biscuit surface rather than piling all of it in the centre.
Mozzarella provides the smooth, stretchy layer, while provolone or cheddar gives the topping extra flavour. As the biscuits bake, the cheese should melt into a bubbly coating with lightly caramelised edges.
For even browning, position the tray around the middle of the oven during the main baking stage. Only use the upper grill briefly at the end if the cheese needs additional colour.
Remember that melted cheese continues to firm up as it cools. Serving the biscuits warm delivers the softest, most appealing texture.
How to Keep the Biscuits Fluffy
The key to fluffy biscuits is handling the dough gently and allowing it to develop some structure before adding the filling.
Flatten the dough only enough to create a suitable base. Pressing too firmly can produce a dense result rather than the soft, layered texture associated with biscuits.
Partially baking the dough makes splitting and filling easier, but refrigerated biscuit products differ. Check that each biscuit has risen enough to open safely, and adjust the remaining baking time if necessary to ensure the centre is cooked through.
Finally, keep excess beef juices away from the cut surface. A moist filling is delicious, but a watery filling can make the biscuits heavy or soggy.
Expert Cooking Tips
- Choose thick refrigerated biscuits that can accommodate the filling without tearing.
- Use thoroughly cooked, tender shredded beef rather than raw meat.
- Remove excess liquid from pot roast before placing it inside the biscuits.
- Warm chilled beef before assembling to encourage even heating.
- Shred the beef into small strands for easier portioning.
- Use low-moisture mozzarella for a pleasantly gooey filling.
- Reserve enough cheese to cover the tops evenly.
- Keep the butter coating light so the biscuit surface does not become greasy.
- Distribute seasonings evenly rather than concentrating them on one biscuit.
- Leave enough space between biscuits for proper oven circulation.
- Follow the biscuit manufacturer’s guidance if the dough requires extra baking.
- Watch closely during the optional grilling stage.
- Allow the melts to rest briefly so the filling settles before serving.
- Serve fresh whenever possible for the best contrast between fluffy dough and melted cheese.
Common Mistakes to Avoid
1. Using Beef That Is Too Wet
Excess cooking liquid can soak into the biscuit and prevent it from baking properly. Drain the beef lightly before assembling.
2. Overflattening the Dough
Pressing the biscuit dough too thin can cause it to become dense or tear during assembly. Maintain a thick, rounded shape.
3. Filling the Biscuits Too Early
Adding heavy fillings before the dough has developed enough structure may make the biscuit difficult to bake evenly. Follow the partial-baking step.
4. Using Large Pieces of Beef
Oversized beef chunks can make the biscuit tops unstable. Shred the meat thoroughly before filling.
5. Adding Too Much Cheese in One Spot
Unevenly distributed cheese can spill from the sandwiches. Spread it across the filling and topping.
6. Overloading with Butter
Excessive melted butter may create a greasy surface. A light brushing is enough.
7. Underbaking the Biscuit Centres
A golden outside does not always guarantee cooked dough inside. Check the biscuit centres and allow additional baking time when required.
8. Walking Away While Grilling
Cheese can burn within seconds under intense grill heat. Stay near the oven and remove the tray as soon as the topping reaches the desired colour.
9. Serving Before the Beef Is Properly Heated
If the filling was refrigerated, ensure it is thoroughly heated. Warming the beef before assembly makes this easier.
Optional Recipe Variations
The following ideas are optional adaptations and are not part of the original ingredient list.
1. Cheesy BBQ Beef Biscuits
Mix a small amount of your favourite barbecue sauce into the cooked shredded beef before filling the biscuits. The sauce adds a sweet, smoky flavour.
2. Philly-Style Beef Melts
Add cooked onions and thinly sliced sautéed peppers to the beef filling. Use provolone for a classic steak-and-cheese-inspired combination.
3. Spicy Beef Biscuit Melts
Include chopped pickled jalapeños or a little crushed chilli for extra heat. Pepper Jack cheese is another delicious option.
4. Mushroom and Beef Biscuits
Stir cooked, well-drained mushrooms into the beef to add a deeper savoury flavour.
5. Garlic Parmesan Topping
Add a small sprinkling of grated Parmesan to the biscuit tops for a sharper, slightly salty cheese crust.
6. Caramelised Onion Melts
Layer a spoonful of caramelised onions over the shredded beef before adding the cheese.
7. Mini Party Biscuit Melts
Use smaller biscuits and reduce the filling accordingly to create bite-sized party snacks. Adjust baking time based on the dough package and check for doneness.
What to Serve with Cheesy Beef Biscuit Melts
These hearty biscuits can easily form the centre of a casual meal. Because they contain beef, bread and cheese, lighter side dishes provide a pleasant balance.
Fresh Green Salad
A crisp green salad with a simple vinaigrette adds freshness and cuts through the richness of the melted cheese.
Coleslaw
Crunchy homemade coleslaw creates a refreshing contrast against the warm, tender beef filling.
Roasted Vegetables
Roasted broccoli, carrots or green beans make an easy accompaniment for a more complete dinner.
Tomato Soup
Serve the biscuit melts alongside warm tomato soup for a particularly comforting lunch.
Pickles and Dipping Sauces
Tangy pickles, barbecue sauce or a simple mustard dip complement the savoury beef and cheese.
For parties, arrange the biscuits on a large serving platter and offer sauces separately so the golden tops remain crisp.
Storage and Reheating
Refrigerating Leftovers
Allow leftover biscuit melts to cool slightly, then refrigerate promptly in an airtight container. Do not leave them at room temperature for more than two hours. Consume refrigerated leftovers within 3–4 days, taking the original age of the cooked beef into account.
Reheating in the Oven
Preheat the oven to approximately 350°F (175°C). Place the biscuits on a lined baking tray and heat until thoroughly hot, generally around 10–15 minutes depending on their size and starting temperature. The centre should reach 74°C (165°F).
Reheating in an Air Fryer
Place the biscuits in a single layer and warm at approximately 160°C (320°F), checking after 4–6 minutes. Continue if necessary until the filling is piping hot throughout.
Microwave Reheating
A microwave is convenient but may soften the biscuits. Heat in short intervals until thoroughly hot and allow a brief standing time before eating.
Freezing
Fully cooked biscuit melts may be wrapped individually and frozen for approximately 2–3 months for best quality. Reheat from thawed when possible, ensuring the beef filling is heated thoroughly.
Preparing Ahead
You can shred the cooked beef and grate the cheese in advance. Keep both refrigerated separately, then assemble and bake the biscuits shortly before serving.
Frequently Asked Questions
1. What are cheesy beef biscuit melts?
They are baked biscuits filled with tender cooked shredded beef and melted cheese, then finished with a seasoned, golden cheese topping.
2. Can I use leftover pot roast?
Yes. Leftover pot roast is an excellent choice because it is usually tender and easy to shred.
3. Do I need to cook the beef first?
Yes. This recipe requires fully cooked beef. The short baking time is designed to heat the filling and finish the biscuits, not cook raw meat.
4. Which biscuits work best?
Large refrigerated biscuits are convenient and provide enough space for the filling. Choose a variety that can be split after partial baking.
5. Can I make homemade biscuit dough?
Yes, although the method and baking times may require adjustment depending on the recipe used.
6. Can I substitute cheddar for provolone?
Absolutely. Cheddar creates a stronger, sharper cheese flavour, while provolone provides a milder melt.
7. Is mozzarella necessary?
Mozzarella creates the signature stretchy texture, but another good melting cheese can be used if preferred.
8. How do I prevent soggy biscuits?
Drain excess beef liquid, avoid overfilling and bake the biscuits until their centres are fully cooked.
9. Can I make these biscuits spicy?
Yes. Add chilli flakes, chopped jalapeños or a spicy cheese as an optional variation.
10. Can I use shredded chicken instead?
Yes. Fully cooked shredded chicken can replace beef, although it will create a different recipe and flavour.
11. Can I use sliced roast beef?
Thinly sliced cooked roast beef may be used, but shredded beef usually distributes more evenly inside the biscuits.
12. How do I know when the biscuits are done?
The exterior should be golden and the dough inside should be properly baked, without raw or sticky patches. The filling should also be thoroughly hot.
13. Can I skip the grilling step?
Yes. Grilling is optional and is only intended to produce a more deeply browned cheese topping.
14. Can I prepare the filling the day before?
Yes. Store the cooked beef and shredded cheese in the refrigerator until you are ready to assemble the biscuits.
15. What if my beef is dry?
Gently warm the meat with a little reserved cooking liquid before filling the biscuits. Avoid adding so much liquid that the dough becomes soggy.
16. Can children help make this recipe?
Children can help portion cooled ingredients and sprinkle cheese under supervision. An adult should handle the hot oven, baking tray and knife.
17. Are these suitable for parties?
Yes. They are easy to portion, simple to serve and especially enjoyable while warm.
18. Can I freeze the finished biscuits?
Yes. Wrap them individually once cooled and freeze for approximately 2–3 months for best quality.
19. Can I make these in an air fryer?
Potentially, although cooking temperature and timing will vary. The oven method is recommended for the original recipe, particularly when making a full batch.
20. What goes well with beef biscuit melts?
Fresh salad, coleslaw, roasted vegetables, soup or pickles complement the rich filling.
Cheesy Beef Biscuit Melts Recipe Card
Description: Buttery golden biscuits stuffed with tender shredded beef, mozzarella and provolone or cheddar, finished with a seasoned, bubbling cheese topping.
- Category: Main Course
- Method: Oven Baked
- Prep Time: Approximately 10 minutes
- Cook Time: Approximately 14–18 minutes
- Total Time: Approximately 24–30 minutes, plus optional grilling
- Yield: Approximately 8 melts
- Temperature: 375°F (190°C)
Ingredients
- 1 can refrigerated biscuit dough
- 2 cups cooked shredded beef or pot roast
- 1½ cups shredded mozzarella cheese
- ½ cup shredded provolone or cheddar cheese
- 2 tablespoons melted butter
- 1 teaspoon garlic powder
- ½ teaspoon onion powder
- ½ teaspoon black pepper
- ½ teaspoon Italian seasoning
- 1 tablespoon chopped parsley
Instructions
- Preheat the oven to 375°F (190°C). Line a baking tray with parchment paper.
- Separate the biscuit dough and gently flatten each biscuit into a thick round.
- Bake the biscuits for 6–8 minutes until they begin to puff.
- Carefully remove from the oven and split each biscuit horizontally.
- Fill the bottom halves with cooked shredded beef.
- Sprinkle with mozzarella and provolone or cheddar, reserving some cheese for the topping.
- Replace the biscuit tops and add the remaining cheese.
- Brush lightly with melted butter and sprinkle with garlic powder, onion powder, black pepper and Italian seasoning.
- Return to the oven for another 8–10 minutes, or until the biscuits are fully baked and the cheese has melted.
- Optionally grill for 1–2 minutes for a more golden topping, watching carefully.
- Sprinkle with chopped parsley and serve hot.
Recipe Notes
- Use cooked shredded beef that is tender but not overly wet.
- Warm refrigerated beef before assembly and ensure it is thoroughly reheated.
- The amount of biscuit dough per can varies by brand, so the number of servings is an estimate.
- Adjust baking time when necessary to cook the dough completely.
- Serve immediately for the best melted-cheese texture.
Hashtags: #CheesyBeefBiscuits #BeefBiscuitMelts #EasyDinnerRecipes #ComfortFoodRecipes #HomemadeBiscuits
Final Thoughts
Cheesy beef biscuit melts are an easy, comforting way to turn a few everyday ingredients into something delicious. Tender shredded beef, buttery golden biscuits and melted cheese come together in a recipe that works just as well for family dinners as it does for casual gatherings.
Try these warm, savoury biscuits the next time you have leftover pot roast, and experiment with your favourite cheese combinations. If you enjoy the recipe, save it for later, share your results in the comments and follow our pages for more easy homemade meals.