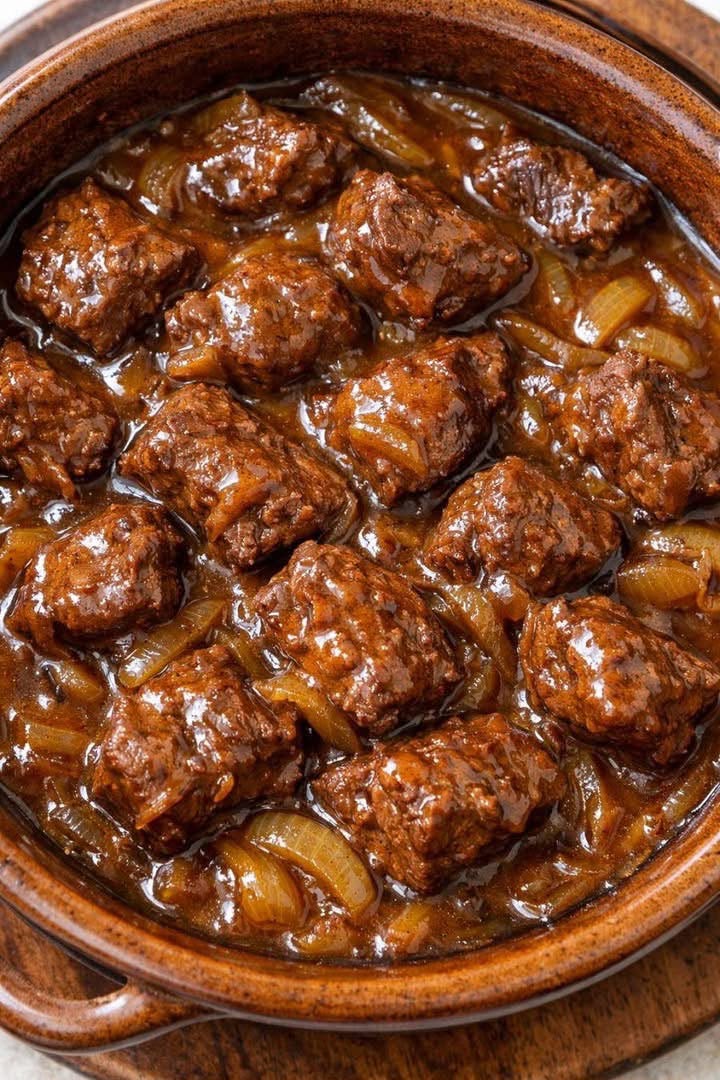
Braised Beef Tips in Onion Gravy (Seared, Braised, Falling-Apart Tender)
Cubed beef chuck seared until deeply crusted, then braised low and slow in a dark onion gravy until a fork goes through without resistance. No stand mixer, no oven required if you have a heavy pot, and the gravy is built entirely from what the meat leaves behind.
The technique that decides everything is searing in batches rather than all at once. A crowded pan drops in temperature the moment the meat hits it, and the beef steams in its own juice instead of browning. Small batches keep the pan hot enough to actually crust the meat, and that crust is where most of the final flavour comes from.
Twenty minutes of prep, two and a half hours mostly unattended, and the beef falls apart at the touch of a fork.
Why You Will Love This Recipe
The gravy needs no separate roux. Flour on the meat before searing does the thickening work as the braise reduces.
Low heat does the tenderising. Two and a half hours turns a tough, inexpensive cut into something that shreds with a spoon.
It is mostly hands-off. Twenty minutes of active work, then the pot needs almost nothing until it is done.
One pot for the whole dish. Sear, deglaze, braise, and serve from the same vessel.
It reheats better than the day it is made. The gravy thickens further and the flavour deepens overnight.
Recipe Overview
Prep time: 20 minutes
Cook time: 2 hours 30 minutes
Total time: 2 hours 50 minutes
Yield: 6 servings
Difficulty: Easy
Best for: Sunday dinners, meal prep, cold-weather cooking
Ingredients
For the beef
• 2½ pounds beef chuck, cut into 1½-inch cubes
• ⅓ cup all-purpose flour
• 1½ teaspoons salt
• 1 teaspoon black pepper
• ½ teaspoon smoked paprika
• 3 tablespoons vegetable oil
For the braise
• 2 large yellow onions, sliced
• 4 cloves garlic, minced
• 2 tablespoons tomato paste
• 2 cups beef broth
• ½ cup dry red wine, or additional broth
• 2 tablespoons Worcestershire sauce
• 2 bay leaves
• 1 teaspoon dried thyme
• 1 tablespoon butter, to finish
Choosing the Right Cut of Beef
The cut determines whether this braises into tenderness or stays tough no matter how long it cooks.
Chuck roast, cubed at home. The best choice by a clear margin. Well marbled with connective tissue that breaks down into gelatin over the long braise, which is what makes the sauce silky and the meat fall apart.
Pre-cut stew meat. Convenient, but it is often trimmed from several different cuts and cooks unevenly. Fine in a pinch, less reliable than cutting your own chuck.
Brisket. Works well and gives a slightly different, more fibrous shred. Trim excess fat before cubing.
Short rib meat, off the bone. Very rich and tender, and a good upgrade if you want something more special.
Lean cuts like sirloin or round. Avoid for this method. They lack the connective tissue that melts during a long braise and turn dry and stringy instead of tender.
Look for cubes with visible marbling and small streaks of white connective tissue running through them. Those are exactly what disappear into the gravy over two hours.
Why Batches, the Flour Dredge, and Low Heat All Matter
Searing browns meat through the Maillard reaction, which needs a hot, dry surface to happen. A crowded pan releases enough moisture from the meat all at once that the temperature drops below the point where browning occurs, and the beef ends up grey and boiled-tasting rather than crusted. Cooking in three or four small batches keeps the pan hot the whole way through, and that crust becomes the base of the gravy’s flavour once it is scraped up.
The flour dredge does two things. It helps the sear happen faster, since a thin coat browns quickly, and it means the flour clinging to each piece dissolves into the braising liquid and thickens the gravy gradually as it simmers, with no separate roux needed.
The long, low braise is what governs the texture. Chuck is full of collagen, a tough protein that makes the raw meat chewy. Held at a bare simmer for two hours or more, that same collagen slowly converts to gelatin, which is soft and gives the sauce its silky body. Boil it hard and fast instead, and the muscle fibres seize and toughen before the collagen has time to break down, leaving you with meat that is somehow both overcooked and tough at once. Low and slow is not a suggestion here; it is the only way this cut becomes tender.
How to Make Braised Beef Tips in Onion Gravy
Step 1: Dredge the beef
Toss the cubed beef with the flour, salt, pepper, and smoked paprika until evenly coated.
Step 2: Sear in batches
Heat the oil in a heavy pot or Dutch oven over medium-high heat. Sear the beef in three or four batches, 2 to 3 minutes per side, until deeply browned. Transfer each batch to a plate.
Do not crowd the pot. Give each piece space to actually touch the hot metal.
Step 3: Soften the onions
Lower the heat to medium and add the onions to the same pot, scraping up the browned bits as they release moisture. Cook 8 to 10 minutes until soft and golden.
Step 4: Add the garlic and tomato paste
Stir in the garlic and cook 30 seconds, then add the tomato paste and cook 1 minute until it darkens slightly.
Cooking the tomato paste briefly deepens its flavour before any liquid goes in.
Step 5: Deglaze the pot
Pour in the red wine, if using, and scrape the bottom of the pot thoroughly. Let it bubble for 1 minute.
Step 6: Build the braising liquid
Add the beef broth, Worcestershire sauce, bay leaves, and thyme, and stir to combine.
Step 7: Return the beef
Nestle the seared beef and any accumulated juices back into the pot. The liquid should come about two thirds of the way up the meat.
Step 8: Braise low and slow
Bring to a bare simmer, then cover and cook on low heat for 2 to 2½ hours, checking occasionally, until the beef is fork-tender.
A bare simmer means the occasional lazy bubble, not a rolling boil. Adjust the heat down if it looks vigorous.
Step 9: Finish the gravy
Remove the bay leaves, stir in the butter, and simmer uncovered for 5 to 10 minutes if the gravy needs thickening further.
Tips for the Best Braised Beef
Pat the beef dry before dredging. Wet meat steams instead of searing, no matter how hot the pan.
Do not skip the batches. This single habit is the difference between a deeply flavoured gravy and a flat one.
Keep the braise at a bare simmer. A hard boil toughens the meat even over a long cook time.
Check at the two-hour mark. Ovens and stovetops vary, and the meat is done when it shreds easily, not at a fixed time.
Let it rest for ten minutes before serving. The sauce thickens slightly as it cools and the flavour settles.
Easy Variations
• Add sliced mushrooms with the onions for an earthier gravy
• Stir in 2 tablespoons of Dijon mustard at the end for sharpness
• Add carrots and potatoes in the last 45 minutes for a full stew
• Use beer in place of the wine for a maltier depth
• Finish with a splash of balsamic vinegar for brightness
• Add a sprig of rosemary alongside the thyme for a more herbal profile
What to Serve With It
Mashed potatoes are the natural partner, since the gravy is built to be spooned over something. Buttered egg noodles or creamy polenta work equally well.
For a vegetable, roasted carrots, sautéed green beans, or a simple salad with a sharp vinaigrette all cut through the richness. Crusty bread for the gravy is close to mandatory.
Make-Ahead and Storage
Make ahead. This dish is better the next day, once the flavours have settled. Make it up to 2 days in advance and reheat gently.
Fridge. Store in an airtight container for up to 4 days.
Freezer. Freeze in a sealed container for up to 3 months. Thaw overnight in the fridge before reheating.
Reheating. Warm gently in a covered pot over low heat, adding a splash of broth if the gravy has thickened too much. The microwave works for individual portions but the stovetop keeps the meat more tender.
Frequently Asked Questions
Can I make this in a slow cooker?
Yes. Sear the beef and build the gravy on the stove first, then transfer everything to a slow cooker and cook on low for 6 to 7 hours.Cubed beef chuck seared until deeply crusted, then braised low and slow in a dark onion gravy until a fork goes through without resistance. No stand mixer, no oven required if you have a heavy pot, and the gravy is built entirely from what the meat leaves behind.
The technique that decides everything is searing in batches rather than all at once. A crowded pan drops in temperature the moment the meat hits it, and the beef steams in its own juice instead of browning. Small batches keep the pan hot enough to actually crust the meat, and that crust is where most of the final flavour comes from.
Twenty minutes of prep, two and a half hours mostly unattended, and the beef falls apart at the touch of a fork.
Why You Will Love This Recipe
The gravy needs no separate roux. Flour on the meat before searing does the thickening work as the braise reduces.
Low heat does the tenderising. Two and a half hours turns a tough, inexpensive cut into something that shreds with a spoon.
It is mostly hands-off. Twenty minutes of active work, then the pot needs almost nothing until it is done.
One pot for the whole dish. Sear, deglaze, braise, and serve from the same vessel.
It reheats better than the day it is made. The gravy thickens further and the flavour deepens overnight.
Recipe Overview
Prep time: 20 minutes
Cook time: 2 hours 30 minutes
Total time: 2 hours 50 minutes
Yield: 6 servings
Difficulty: Easy
Best for: Sunday dinners, meal prep, cold-weather cooking
Ingredients
For the beef
• 2½ pounds beef chuck, cut into 1½-inch cubes
• ⅓ cup all-purpose flour
• 1½ teaspoons salt
• 1 teaspoon black pepper
• ½ teaspoon smoked paprika
• 3 tablespoons vegetable oil
For the braise
• 2 large yellow onions, sliced
• 4 cloves garlic, minced
• 2 tablespoons tomato paste
• 2 cups beef broth
• ½ cup dry red wine, or additional broth
• 2 tablespoons Worcestershire sauce
• 2 bay leaves
• 1 teaspoon dried thyme
• 1 tablespoon butter, to finish
Choosing the Right Cut of Beef
The cut determines whether this braises into tenderness or stays tough no matter how long it cooks.
Chuck roast, cubed at home. The best choice by a clear margin. Well marbled with connective tissue that breaks down into gelatin over the long braise, which is what makes the sauce silky and the meat fall apart.
Pre-cut stew meat. Convenient, but it is often trimmed from several different cuts and cooks unevenly. Fine in a pinch, less reliable than cutting your own chuck.
Brisket. Works well and gives a slightly different, more fibrous shred. Trim excess fat before cubing.
Short rib meat, off the bone. Very rich and tender, and a good upgrade if you want something more special.
Lean cuts like sirloin or round. Avoid for this method. They lack the connective tissue that melts during a long braise and turn dry and stringy instead of tender.
Look for cubes with visible marbling and small streaks of white connective tissue running through them. Those are exactly what disappear into the gravy over two hours.
Why Batches, the Flour Dredge, and Low Heat All Matter
Searing browns meat through the Maillard reaction, which needs a hot, dry surface to happen. A crowded pan releases enough moisture from the meat all at once that the temperature drops below the point where browning occurs, and the beef ends up grey and boiled-tasting rather than crusted. Cooking in three or four small batches keeps the pan hot the whole way through, and that crust becomes the base of the gravy’s flavour once it is scraped up.
The flour dredge does two things. It helps the sear happen faster, since a thin coat browns quickly, and it means the flour clinging to each piece dissolves into the braising liquid and thickens the gravy gradually as it simmers, with no separate roux needed.
The long, low braise is what governs the texture. Chuck is full of collagen, a tough protein that makes the raw meat chewy. Held at a bare simmer for two hours or more, that same collagen slowly converts to gelatin, which is soft and gives the sauce its silky body. Boil it hard and fast instead, and the muscle fibres seize and toughen before the collagen has time to break down, leaving you with meat that is somehow both overcooked and tough at once. Low and slow is not a suggestion here; it is the only way this cut becomes tender.
How to Make Braised Beef Tips in Onion Gravy
Step 1: Dredge the beef
Toss the cubed beef with the flour, salt, pepper, and smoked paprika until evenly coated.
Step 2: Sear in batches
Heat the oil in a heavy pot or Dutch oven over medium-high heat. Sear the beef in three or four batches, 2 to 3 minutes per side, until deeply browned. Transfer each batch to a plate.
Do not crowd the pot. Give each piece space to actually touch the hot metal.
Step 3: Soften the onions
Lower the heat to medium and add the onions to the same pot, scraping up the browned bits as they release moisture. Cook 8 to 10 minutes until soft and golden.
Step 4: Add the garlic and tomato paste
Stir in the garlic and cook 30 seconds, then add the tomato paste and cook 1 minute until it darkens slightly.
Cooking the tomato paste briefly deepens its flavour before any liquid goes in.
Step 5: Deglaze the pot
Pour in the red wine, if using, and scrape the bottom of the pot thoroughly. Let it bubble for 1 minute.
Step 6: Build the braising liquid
Add the beef broth, Worcestershire sauce, bay leaves, and thyme, and stir to combine.
Step 7: Return the beef
Nestle the seared beef and any accumulated juices back into the pot. The liquid should come about two thirds of the way up the meat.
Step 8: Braise low and slow
Bring to a bare simmer, then cover and cook on low heat for 2 to 2½ hours, checking occasionally, until the beef is fork-tender.
A bare simmer means the occasional lazy bubble, not a rolling boil. Adjust the heat down if it looks vigorous.
Step 9: Finish the gravy
Remove the bay leaves, stir in the butter, and simmer uncovered for 5 to 10 minutes if the gravy needs thickening further.
Tips for the Best Braised Beef
Pat the beef dry before dredging. Wet meat steams instead of searing, no matter how hot the pan.
Do not skip the batches. This single habit is the difference between a deeply flavoured gravy and a flat one.
Keep the braise at a bare simmer. A hard boil toughens the meat even over a long cook time.
Check at the two-hour mark. Ovens and stovetops vary, and the meat is done when it shreds easily, not at a fixed time.
Let it rest for ten minutes before serving. The sauce thickens slightly as it cools and the flavour settles.
Easy Variations
• Add sliced mushrooms with the onions for an earthier gravy
• Stir in 2 tablespoons of Dijon mustard at the end for sharpness
• Add carrots and potatoes in the last 45 minutes for a full stew
• Use beer in place of the wine for a maltier depth
• Finish with a splash of balsamic vinegar for brightness
• Add a sprig of rosemary alongside the thyme for a more herbal profile
What to Serve With It
Mashed potatoes are the natural partner, since the gravy is built to be spooned over something. Buttered egg noodles or creamy polenta work equally well.
For a vegetable, roasted carrots, sautéed green beans, or a simple salad with a sharp vinaigrette all cut through the richness. Crusty bread for the gravy is close to mandatory.
Make-Ahead and Storage
Make ahead. This dish is better the next day, once the flavours have settled. Make it up to 2 days in advance and reheat gently.
Fridge. Store in an airtight container for up to 4 days.
Freezer. Freeze in a sealed container for up to 3 months. Thaw overnight in the fridge before reheating.
Reheating. Warm gently in a covered pot over low heat, adding a splash of broth if the gravy has thickened too much. The microwave works for individual portions but the stovetop keeps the meat more tender.
Frequently Asked Questions
Can I make this in a slow cooker?
Yes. Sear the beef and build the gravy on the stove first, then transfer everything to a slow cooker and cook on low for 6 to 7 hours.