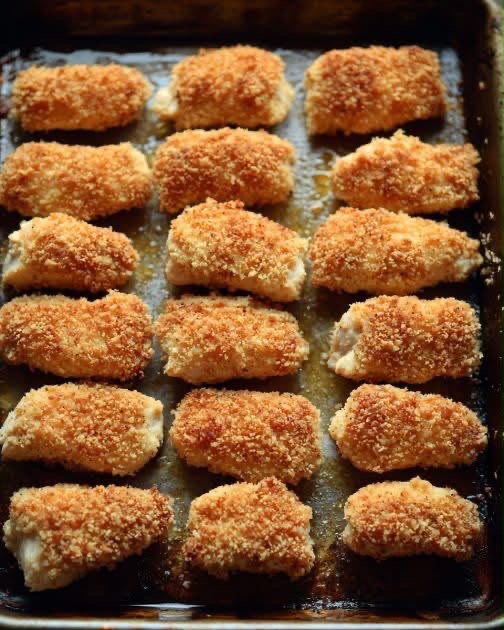
There is a specific kind of disappointment that comes from baked chicken tenders. You do everything right, the smell is incredible, and then you bite into a coating that is pale, soft, and vaguely damp. The chicken is fine. The crust is a letdown.
This recipe fixes that with one small step most people skip: toasting the breadcrumbs before they ever touch the chicken. That single move turns oven-baked tenders into something that actually shatters when you bite it, with a deep golden color and a savory Parmesan edge running through every piece.
They come out of the oven looking like the photo on a sheet pan — evenly bronzed, crisp on all sides, juicy in the middle. No deep fryer, no pot of hot oil, no splattered stovetop. Just one pan, about forty minutes, and a plate of tenders that disappear faster than you can set them down.
Table of Contents
• Why You Will Love This Recipe
• Recipe Overview
• Ingredients You Will Need
• The Science Behind a Crunchy Baked Coating
• Choosing and Prepping the Chicken
• How to Make Crispy Baked Parmesan Chicken Tenders
• Tips for the Best Results
• Variations
• What to Serve With Chicken Tenders
• Make-Ahead and Storage
• Frequently Asked Questions
• Nutrition Information
• Final Thoughts
[AD SLOT 1]
Why You Will Love This Recipe
It is genuinely crispy without frying. The pre-toasted breadcrumb method gives you the crunch of a fried tender with a fraction of the oil and none of the mess or lingering smell in your kitchen.
Everything happens on one sheet pan. You bread the chicken, lay it out, and bake. There is no batch-by-batch frying, no draining rack, and no oil to dispose of afterward.
It works for a weeknight and for a crowd. The recipe doubles cleanly, the tenders hold their crunch on a serving platter, and kids and adults reach for them equally.
The ingredient list is short and familiar. Chicken, breadcrumbs, Parmesan, eggs, flour, and pantry spices — nothing you need a special trip for.
Recipe Overview
Course: Main Dish, Appetizer
Cuisine: American
Prep Time: 20 minutes
Cook Time: 20 minutes
Total Time: 40 minutes
Servings: 4 (about 18 tenders)
Difficulty: Easy
Method: Oven-baked
Equipment: Large rimmed baking sheet, three shallow bowls, skillet, meat mallet or rolling pin
Ingredients You Will Need
For the chicken
• 2 pounds boneless, skinless chicken breasts (about 3 large breasts), cut into strips
• 1 teaspoon kosher salt
• ½ teaspoon black pepper
• ½ teaspoon garlic powder
For the breading
• 2 cups panko breadcrumbs
• 3 tablespoons olive oil or melted butter
• ¾ cup finely grated Parmesan cheese
• 1 teaspoon paprika
• ½ teaspoon onion powder
• ½ teaspoon dried oregano
• ¼ teaspoon cayenne pepper (optional)
• ½ cup all-purpose flour
• 2 large eggs
• 1 tablespoon water or milk
For the pan
• 2 tablespoons olive oil or nonstick cooking spray
Panko is the ingredient worth being strict about. Standard fine breadcrumbs absorb moisture and go soft in the oven, while panko’s larger, airier flakes stay open and brittle, which is what gives you that jagged, craggy surface.
Grate the Parmesan yourself if you can. Pre-shredded cheese is coated with anti-caking starch that keeps it from melting into the crust the way freshly grated cheese does.
[AD SLOT 2]
The Science Behind a Crunchy Baked Coating
Frying works because hot oil surrounds the coating on every side at once, driving out moisture and browning it in minutes. An oven cannot do that — dry heat browns the top surface efficiently but leaves the underside sitting against a pan, steaming in the moisture the chicken releases.
Toasting the breadcrumbs in a skillet first solves the problem by front-loading the browning. The crumbs go into the oven already golden and already dehydrated, so the oven only has to cook the chicken through rather than perform two jobs at once.
The oil you toss with the crumbs matters as much as the toasting. Fat coats each flake and conducts heat into it, which is why dry untoasted panko bakes into something chalky while oiled panko bakes into something that crackles.
Parmesan adds a second layer of insurance. As it heats, its proteins and fats brown and then set into a brittle, salty shell that reinforces the crumb structure and deepens the color.
Choosing and Prepping the Chicken
Boneless skinless breasts give you the classic tender shape, but they are uneven — thick at one end, thin at the other. Slicing them into strips and pounding those strips to a uniform thickness is what keeps the thin ends from drying out while the thick ends finish.
Aim for strips about 1 inch wide and ¾ inch thick. Anything thinner overcooks before the crust colors; anything much thicker leaves you baking long enough to dry the surface.
Chicken tenderloins are an excellent shortcut if your store sells them. They are already the right size and only need the white tendon pulled out before breading.
Pat the chicken completely dry before it touches the flour. Surface moisture dissolves the flour into paste, and paste is exactly what makes breading slide off in sheets.
[AD SLOT 3]
How to Make Crispy Baked Parmesan Chicken Tenders
1. Heat the oven and prepare the pan
Preheat the oven to 425°F (220°C) and set a rack in the upper third. Brush a large rimmed baking sheet with 2 tablespoons of olive oil, coating it right to the corners.
Oiling the pan directly, rather than using parchment, lets the underside of each tender crisp against hot metal. This is the difference between tenders that are crunchy on top and tenders that are crunchy all the way around.
2. Season the chicken
Cut the chicken into strips and pound them to an even thickness between two sheets of plastic wrap. Season all over with the salt, pepper, and garlic powder, then set aside while you prepare the coating.
3. Toast the breadcrumbs
Heat the 3 tablespoons of oil or butter in a large skillet over medium heat. Add the panko and stir constantly for 4 to 5 minutes, until the crumbs turn an even light golden brown.
Pour them onto a plate immediately to stop the cooking. Panko goes from golden to burnt in under a minute, so do not walk away from the pan.
4. Build the breading station
Set out three shallow bowls. Put the flour in the first, whisk the eggs with water in the second, and combine the cooled toasted panko with the Parmesan, paprika, onion powder, oregano, and cayenne in the third.
Keep one hand for dry ingredients and one for wet. Mixing the two turns your fingers into breaded clubs within about three tenders.
5. Bread the tenders
Coat each strip in flour and shake off the excess, then dip it in egg and let the extra drip away. Press it firmly into the crumb mixture, pushing crumbs onto every surface with your palm.
Pressing is not optional. A gentle roll leaves bare patches, while firm pressure embeds the crumbs so they stay put through baking.
6. Arrange and bake
Lay the tenders on the oiled sheet pan with at least an inch of space between them. Crowding traps steam, and steam is the enemy of everything you just built.
Bake for 18 to 22 minutes, until the coating is deep golden and the chicken registers 165°F (74°C) at the thickest point. There is no need to flip them.
7. Rest and serve
Let the tenders sit on the pan for 3 to 4 minutes before moving them. This lets the juices redistribute and the crust firm up so it does not tear when you lift them.
[AD SLOT 4]
Tips for the Best Results
Do not skip the toasting step. It is five minutes of active work and it is the single largest factor in whether your tenders come out crisp or pale.
Let the toasted crumbs cool before adding the Parmesan. Hot crumbs melt the cheese into clumps that will not coat evenly.
Use a wire rack only if your oven runs hot. A rack improves airflow but sacrifices the browned underside you get from direct pan contact, so choose based on your oven.
Check the temperature rather than the clock. Strip thickness varies enough that two minutes can be the difference between juicy and dry.
Season the chicken itself, not just the coating. Under-seasoned meat under a well-seasoned crust always tastes flat.
Variations
Spicy Nashville-style: Double the cayenne and brush the hot tenders with a mixture of melted butter, cayenne, and brown sugar.
Italian herb: Add 1 teaspoon dried basil and swap half the Parmesan for grated Pecorino Romano.
Ranch: Whisk a packet of dry ranch seasoning into the crumb mixture and cut the salt in the chicken by half.
Gluten-free: Use gluten-free panko and substitute cornstarch for the all-purpose flour. The coating turns out slightly lighter but just as crisp.
Air fryer: Cook at 400°F for 10 to 12 minutes in a single layer, flipping halfway through.
[AD SLOT 5]
What to Serve With Chicken Tenders
Honey mustard, garlic aioli, barbecue sauce, and ranch are the obvious dipping choices, and setting out two or three keeps everyone happy. A squeeze of lemon over the tenders themselves cuts the richness nicely.
For a full plate, roasted potato wedges, a crisp Caesar salad, or buttered corn all work. If you want something lighter, a shaved cabbage slaw with vinegar dressing balances the crust well.
They also make excellent sandwich filling. Tuck two tenders into a soft roll with pickles and slaw and you have a chicken sandwich that rivals anything from a drive-through.
Make-Ahead and Storage
Make ahead: Bread the tenders up to 8 hours in advance, arrange them on the pan, cover loosely, and refrigerate. Bake straight from the fridge, adding 2 to 3 minutes.
Refrigerator: Store cooled tenders in an airtight container for up to 4 days.
Freezer: Freeze breaded raw tenders on a tray until solid, then transfer to a bag for up to 3 months. Bake from frozen at 425°F for 25 to 28 minutes.
Reheating: Use a 375°F oven or air fryer for 6 to 8 minutes. A microwave will make the coating soft within seconds, so avoid it entirely.
Frequently Asked Questions
Why did my coating fall off?
Usually because the chicken was wet before flouring, or because the crumbs were not pressed on firmly. Both leave gaps where the breading has nothing to grip.
Can I use chicken thighs?
Yes. Boneless thighs stay juicier and need about 3 extra minutes in the oven.
Can I skip the flour?
You can, but the coating will be noticeably thinner and more likely to slip. Flour gives the egg something to cling to.
Do I need to flip them halfway?
No, provided you oiled the pan well. The hot metal browns the underside on its own.
Can I make these dairy-free?
Yes. Leave out the Parmesan and add ½ teaspoon extra salt plus a tablespoon of nutritional yeast for savoriness.