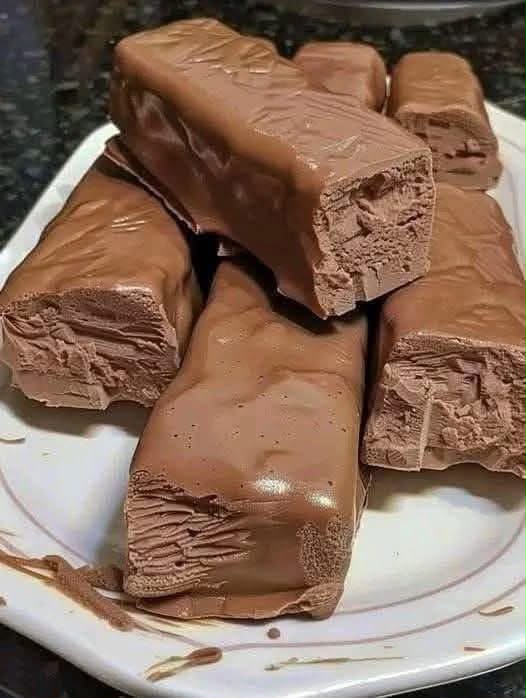
Easy homemade chocolate ice cream bars are a rich frozen dessert with a smooth chocolate center and a crisp chocolate coating. They are creamy, cold, and satisfying, with a simple homemade flavor that feels special without needing complicated baking steps.
These chocolate ice cream bars are perfect for warm days, birthday parties, weekend desserts, or preparing a sweet treat ahead of time. The recipe uses a creamy chocolate filling that freezes into neat bars, then gets dipped or coated in melted chocolate for a classic ice cream shop finish.
Why You’ll Love This Recipe
This homemade frozen dessert is easy to customize. You can make the center with chocolate ice cream, chocolate pudding, whipped cream, or a simple homemade chocolate mixture. The chocolate coating can be milk chocolate, semi-sweet chocolate, or dark chocolate depending on your taste.
The bars are also great for make-ahead desserts because they stay in the freezer until you are ready to serve them. You can make a full batch in advance for a party, family gathering, or hot-weather snack, then take out only the number you need.
Recipe Information
Preparation time for homemade chocolate ice cream bars is about 25 minutes. Freezing time is approximately four to six hours, depending on the size of the bars and your freezer temperature. The total time is around five hours. This recipe makes eight medium ice cream bars. The difficulty level is easy to moderate because the bars need enough freezing time before coating.
Main Ingredients Explained
Chocolate ice cream is the easiest base for these bars. Use a good-quality chocolate ice cream that you enjoy eating on its own, because it provides most of the flavor. Let it soften slightly before pressing it into the mold, but do not allow it to melt completely.
Whipped topping or whipped cream can be added to make the center lighter and creamier. It gives the bars a mousse-like texture that is easy to bite after freezing. A small amount of cocoa powder can intensify the chocolate flavor.
Chocolate chips create the outer shell. Adding a little coconut oil or butter helps the chocolate melt smoothly and become easier to dip. Once the coating touches the frozen bar, it hardens quickly into a crisp chocolate layer.
Simple Recipe Overview
Begin by lining a loaf pan or small square pan with parchment paper. Press softened chocolate ice cream into the pan, smooth the top, and freeze until firm. Cut the frozen block into bars or use a popsicle mold to form individual portions.
Melt chocolate chips with coconut oil, then dip or spoon the chocolate over the frozen bars. Return the bars to the freezer until the coating is firm. The final dessert has a smooth chocolate center and a crisp shell that cracks lightly when bitten.
Ingredients
For these easy homemade chocolate ice cream bars, you will need 1½ quarts chocolate ice cream, 1 cup whipped topping or softly whipped cream if desired, 2 tablespoons cocoa powder, 2 cups semi-sweet or milk chocolate chips, 2 tablespoons coconut oil or unsalted butter, ½ teaspoon vanilla extract, and optional mini chocolate chips, crushed cookies, chopped nuts, or shredded coconut for topping.
How to Choose the Best Ingredients
Choose a chocolate ice cream with a smooth, creamy texture. A high-quality ice cream usually freezes into bars with fewer icy crystals. Avoid ice cream that has already melted and refrozen, as it may have a grainy texture.
Use chocolate chips that melt well. Semi-sweet chips give a balanced flavor, while milk chocolate chips make the coating sweeter and creamier. Dark chocolate makes a richer outer shell and is a good choice if the center is already sweet.
Coconut oil helps create a thin coating that hardens quickly. Refined coconut oil has little or no coconut flavor. If you do not have coconut oil, butter can be used, though the coating may be slightly softer.
Preparing the Ice Cream Base
Remove the chocolate ice cream from the freezer and let it sit at room temperature for about five to 10 minutes. It should become soft enough to scoop and stir, but it should not become liquid. Softened ice cream is easier to spread into the pan and gives the bars a smoother surface.
Place the softened ice cream in a large bowl. Add whipped topping or whipped cream if using, along with cocoa powder and vanilla extract. Fold the mixture gently until it is smooth and evenly chocolate-colored. Do not stir too aggressively, or the ice cream may melt too much.
Line an 8-by-8-inch pan or a loaf pan with parchment paper, leaving extra paper over the sides. This extra parchment acts as handles and makes the frozen block easier to remove later.
Preparing the Frozen Bars
Spread the chocolate ice cream mixture into the prepared pan. Use a spoon or spatula to press it firmly into the corners and smooth the top. Aim for an even thickness so the bars freeze and slice evenly.
Cover the pan with plastic wrap or foil and place it in the freezer for at least four hours. For the cleanest slices, freeze overnight. The ice cream base should be very firm before you try to cut it.
When ready, lift the frozen block from the pan using the parchment paper. Place it on a cold cutting board. Use a large sharp knife warmed under hot water and dried completely to slice the block into eight bars. Work quickly so the ice cream does not soften.
Place the cut bars on a parchment-lined tray and return them to the freezer for 30 minutes. This extra freezing step makes them easier to coat in chocolate.
Preparing the Chocolate Coating
Place the chocolate chips and coconut oil in a microwave-safe bowl. Heat in 20-second intervals, stirring after each interval, until the chocolate is nearly melted. Continue stirring until it becomes completely smooth and glossy.
You can also melt the chocolate using a heat-safe bowl set over gently simmering water. Stir often and keep water away from the chocolate, as even a small amount of water can make melted chocolate thick and grainy.
Let the melted chocolate cool for a few minutes before coating the bars. It should be smooth and fluid, but not very hot. Hot chocolate can melt the ice cream surface too quickly.
Step-by-Step Instructions
Remove two frozen bars from the freezer at a time. Dip one bar into the melted chocolate, using a fork or spoon to coat all sides. Let excess chocolate drip back into the bowl.
Place the coated bar on a parchment-lined tray. If desired, immediately sprinkle mini chocolate chips, crushed cookies, chopped nuts, or coconut on top before the chocolate hardens. The coating begins to set quickly because the bar is frozen.
Repeat with the remaining bars, keeping the uncoated bars in the freezer until you are ready to work with them. This prevents them from becoming soft during the coating process.
Return the fully coated bars to the freezer for at least 30 minutes, until the chocolate shell is firm. Once set, wrap each bar individually or store them in a freezer-safe container with parchment paper between layers.
Tips for the Best Result
Freeze the ice cream base until it is very firm before slicing. Soft ice cream can make uneven, messy bars that are difficult to coat. Overnight freezing gives the cleanest shape and easiest handling.
Work with only one or two bars at a time. Keep the rest in the freezer while you melt and apply the chocolate. This helps the bars stay solid and allows the coating to set quickly.
Use parchment paper for every freezing step. It prevents sticking and makes the bars easier to move. A parchment-lined tray is especially helpful after coating because the chocolate shell can stick to a plain baking sheet.
Common Mistakes to Avoid
Avoid letting the ice cream melt too much while mixing the base. If it becomes liquid, it can freeze with icy crystals instead of a creamy texture. Soften it only enough to stir smoothly.
Do not dip the bars in very hot melted chocolate. Hot chocolate can melt the outer layer of ice cream and make the coating thick or uneven. Let the chocolate cool slightly before dipping.
Avoid taking all the bars out of the freezer at once. The coating process takes a little time, and bars that sit out too long can become soft. Keep them frozen until each one is ready to coat.
Flavor Variations
For peanut butter chocolate ice cream bars, swirl ½ cup creamy peanut butter into the softened chocolate ice cream before freezing. You can also sprinkle chopped peanuts over the chocolate coating before it sets.
For cookies and cream chocolate bars, fold crushed chocolate sandwich cookies into the ice cream base. Use white chocolate or milk chocolate for the coating and add extra cookie crumbs on top.
For mint chocolate bars, add a few drops of peppermint extract to the ice cream mixture and use dark chocolate for the coating. A small amount of green food coloring can be added if you want a classic mint chocolate appearance.
For a caramel chocolate version, drizzle a small amount of thick caramel sauce over the ice cream layer before freezing. Use a thin layer so the bars stay easy to slice and coat.
How to Serve Homemade Chocolate Ice Cream Bars
Serve the bars directly from the freezer, but allow them to rest for two to three minutes before eating if they are very firm. This creates a softer, creamier bite while keeping the chocolate shell crisp.
For a dessert plate, serve a chocolate ice cream bar with fresh strawberries, raspberries, sliced banana, or a small spoonful of whipped cream. The fruit adds a fresh contrast to the rich chocolate flavor.
These bars are also perfect for a birthday dessert table, summer barbecue, movie night, or casual family gathering. Keep them in a chilled container or freezer until serving time so the chocolate shell stays neat.
Meal Prep and Storage
Homemade chocolate ice cream bars are made for freezer storage. Once the chocolate coating is fully set, wrap each bar in parchment paper, wax paper, or freezer-safe wrap. This prevents the bars from sticking together and protects them from freezer odors.
Store the wrapped bars in an airtight freezer-safe container or bag. They keep well for up to two weeks for the best texture and flavor. After that, they are still safe to eat but may develop ice crystals.
Freezing Instructions
The bars need to stay frozen until ready to serve. Keep them at the back of the freezer, where the temperature is most stable. Avoid storing them near the freezer door because repeated temperature changes can soften and refreeze the ice cream.
If you make several flavors, label each container so you know what is inside. You can prepare the bars days before a gathering, which makes them a convenient make-ahead dessert.
Reheating Instructions
These chocolate ice cream bars should not be reheated. If they are too firm straight from the freezer, simply let them stand at room temperature for two to three minutes before serving.
If a bar becomes soft during serving, return it to the freezer as soon as possible. Avoid allowing the bars to melt completely and refreeze, as this can create a less creamy texture.
Frequently Asked Questions
Can I use vanilla ice cream instead of chocolate? Yes. Vanilla ice cream works very well and creates a classic chocolate-covered vanilla ice cream bar. You can add chocolate chips, cookie crumbs, or cocoa powder to the base if you still want a chocolate flavor inside.
Can I make these without coconut oil? Yes. Use butter instead, or melt the chocolate chips on their own. Coconut oil helps create a thinner, crisp shell, but the bars will still be delicious without it.
Why is my chocolate coating too thick? The chocolate may have cooled too much, or it may need a little more coconut oil. Warm it gently for a few seconds and stir in an extra teaspoon of coconut oil if needed.
Why are my bars icy? The ice cream may have melted too much before refreezing, or the bars may have been exposed to changing freezer temperatures. Keep the mixture cold and store the finished bars in a tightly sealed container.
Can I use popsicle molds? Yes. Popsicle molds make individual bars very easy. Fill the molds with the ice cream mixture, freeze until firm, remove them, and dip each bar in melted chocolate.
Final Thoughts
Easy homemade chocolate ice cream bars are a simple frozen dessert with a creamy chocolate center and a satisfying crisp chocolate shell. They are perfect for warm days, celebrations, or any time you want a make-ahead treat from the freezer.
Use your favorite chocolate, add toppings, and experiment with different ice cream flavors to make the recipe your own. With a little chilling time and simple ingredients, you can create delicious homemade ice cream bars that are ready whenever a chocolate craving appears.