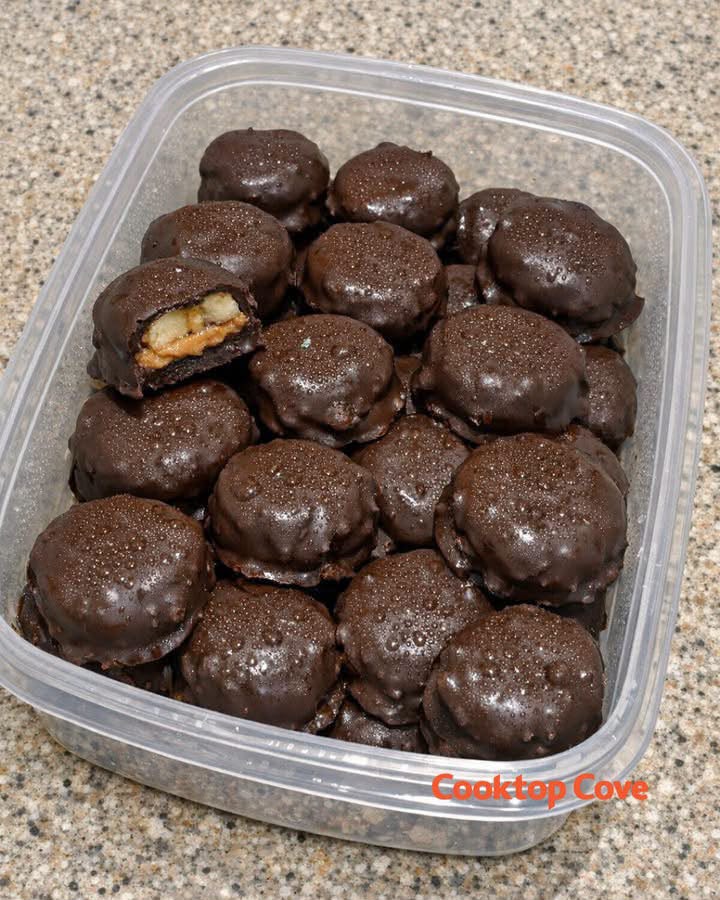
Chocolate Peanut Butter Bites
These homemade chocolate peanut butter bites combine a smooth, creamy peanut butter filling with a rich chocolate coating. They are wonderfully simple to make, require just six ingredients and need no baking at all.
Every bite offers a delicious contrast between the firm chocolate shell and the soft, sweet peanut butter centre. The combination is familiar, comforting and especially satisfying for anyone who loves chocolate and peanut butter together.
One of the best things about this recipe is how straightforward it is. There is no complicated candy-making equipment, no oven to preheat and no special baking technique to master. A mixing bowl, a spoon and a little refrigerator space are all you really need.
These chocolate peanut butter bites are perfect for preparing ahead of time. Once chilled, they can be stored in an airtight container and enjoyed whenever you fancy something sweet.
They also make a lovely addition to dessert platters, holiday treat boxes, birthday gatherings and casual family celebrations. Their small size makes them easy to serve, share and pack.
Whether you are making a batch for a special occasion or simply stocking your refrigerator with homemade treats, this easy no-bake recipe is a delicious place to start.
Recipe Overview
- Recipe: Chocolate Peanut Butter Bites
- Category: Dessert / Homemade Sweets
- Style: No-bake American-inspired treat
- Preparation Time: Approximately 15–20 minutes
- Cooking Time: No baking required
- First Chilling Time: 20–30 minutes
- Second Chilling Time: 20 minutes
- Total Time: Approximately 55–70 minutes
- Estimated Yield: 18–24 small bites, depending on size
- Difficulty: Easy
- Method: Mixing, shaping, chilling and chocolate dipping
- Main Ingredients: Peanut butter, powdered sugar, butter, vanilla and chocolate
The active preparation time and yield are estimates because the original recipe does not specify the exact number or size of the finished bites.
Why You’ll Love This Recipe
- Only six ingredients: The recipe uses a short list of familiar ingredients that are easy to work with.
- No oven required: Everything is prepared through mixing, chilling and dipping.
- Rich peanut butter flavour: Creamy peanut butter gives each bite a satisfying nutty centre.
- Delicious chocolate coating: Semi-sweet chocolate balances the sweetness of the filling.
- Easy to make ahead: The finished sweets keep well in the refrigerator.
- Ideal for sharing: Their small size makes them convenient for parties and dessert trays.
- Beginner-friendly: The instructions are simple enough for inexperienced home cooks.
- Easy to customise: You can experiment with different chocolate coatings and optional toppings.
Ingredients
For the peanut butter filling:
- 1 cup creamy peanut butter
- ½ cup powdered sugar (icing sugar)
- 2 tablespoons softened butter
- 1 teaspoon vanilla extract
For the chocolate coating:
- 1½ cups semi-sweet chocolate chips
- 1 tablespoon coconut oil or vegetable oil
These are the original ingredients and quantities. No additional ingredients are required to prepare the recipe.
Ingredient Notes
Creamy Peanut Butter
Creamy peanut butter forms the main filling and provides its rich, nutty flavour. A smooth, well-mixed variety works particularly well because it produces a filling that is easy to shape.
If using natural peanut butter, stir it thoroughly before measuring. Varieties with significant oil separation may produce a softer filling and can be more difficult to roll.
Powdered Sugar
Powdered sugar, known as icing sugar in the UK, sweetens the peanut butter and helps give the mixture a thicker consistency. Its fine texture also allows it to blend smoothly without leaving noticeable sugar crystals.
Softened Butter
Two tablespoons of softened butter add richness and help the peanut butter filling come together. The butter should be soft enough to mix easily but not melted or oily.
Vanilla Extract
Vanilla brings a gentle sweetness and rounds out the flavour of the peanut butter and chocolate. A small amount is enough to make the filling taste more balanced.
Semi-Sweet Chocolate Chips
Semi-sweet chocolate provides the rich outer shell. Its slight bitterness contrasts beautifully with the sweet peanut butter centre.
Choose chocolate chips that melt smoothly and have a flavour you enjoy, as the coating is a major part of the finished treat.
Coconut Oil or Vegetable Oil
A tablespoon of oil helps loosen the melted chocolate, making the coating easier to work with. It allows the chocolate to flow around the peanut butter centres and helps excess chocolate drip away.
Use refined coconut oil if you prefer a more neutral flavour. Vegetable oil is another suitable option already included in the original recipe.
Equipment You’ll Need
- Medium mixing bowl
- Mixing spoon or spatula
- Measuring cups and spoons
- Baking tray or flat plate
- Baking parchment
- Microwave-safe bowl or small saucepan
- Fork or chocolate dipping tool
- Refrigerator
- Airtight storage container
A small cookie scoop can be useful for portioning the filling evenly, although an ordinary teaspoon works perfectly well.
Step-by-Step Instructions
Step 1: Prepare the Peanut Butter Filling
Place 1 cup of creamy peanut butter into a medium mixing bowl. Add ½ cup powdered sugar, 2 tablespoons softened butter and 1 teaspoon vanilla extract.
Mix thoroughly with a spoon or spatula until the ingredients form a smooth, thick mixture.
The filling should be soft enough to shape but firm enough to hold together. Scrape down the sides of the bowl to incorporate any remaining sugar or butter.
Step 2: Shape the Bites
Using a teaspoon or small cookie scoop, take small portions of the peanut butter mixture.
Roll each portion gently between your palms to create a bite-sized ball. Alternatively, flatten the balls slightly to make small rounds, as shown in the supplied photograph.
Try to keep the pieces reasonably similar in size so they chill evenly and are easier to coat.
Step 3: Arrange on a Lined Tray
Line a baking tray or large flat plate with baking parchment.
Arrange the shaped peanut butter pieces on the parchment, leaving a little space between them.
Make sure the tray fits comfortably in your refrigerator before arranging all the bites.
Step 4: Chill the Peanut Butter Centres
Place the tray in the refrigerator for 20–30 minutes, until the pieces become firm.
This chilling stage is important because it makes the centres easier to handle during dipping.
If the filling still feels too soft after chilling, allow it a little longer in the refrigerator before continuing.
Step 5: Melt the Chocolate
Place 1½ cups semi-sweet chocolate chips and 1 tablespoon coconut oil or vegetable oil into a microwave-safe bowl.
Heat in short intervals, stirring between each one, until the chocolate is completely melted and smooth.
Alternatively, melt the chocolate gently over a pan of barely simmering water, keeping the bottom of the bowl away from the water.
Avoid overheating the chocolate, as excessive heat can make it thick, grainy or difficult to coat with.
Step 6: Dip Each Peanut Butter Bite
Remove the chilled peanut butter centres from the refrigerator.
Lower one piece at a time into the melted chocolate, turning it gently until completely covered.
Use a fork to lift the coated piece from the chocolate.
Step 7: Allow Excess Chocolate to Drip Away
Hold each coated bite briefly over the bowl so the excess chocolate can drip away.
Lightly tap the fork against the side of the bowl if necessary. This helps create a more even coating and prevents large pools of chocolate forming underneath.
Return the coated bites to the parchment-lined tray.
Step 8: Chill Until Set
Once every bite has been coated, return the tray to the refrigerator for another 20 minutes, or until the chocolate shells have firmed up.
The coating should feel set when touched gently.
Step 9: Serve and Enjoy
Transfer the chocolate peanut butter bites to a serving plate or airtight container.
Enjoy them chilled for a firm chocolate shell surrounding a rich, creamy peanut butter centre.
Making the Perfect Peanut Butter Filling
The filling is the heart of this recipe, so achieving the right texture makes a noticeable difference.
Start by using peanut butter that is smooth and thoroughly mixed. If the peanut butter contains separated oil, stir until the consistency is even before adding the remaining ingredients.
Softened butter should blend easily into the peanut butter. Very cold butter can leave small lumps, while completely melted butter may make the filling unnecessarily loose.
Add the powdered sugar and vanilla, then mix until the ingredients become cohesive. The powdered sugar helps the mixture hold its shape while retaining a creamy texture.
If the mixture is slightly sticky, chilling it briefly before shaping can make handling easier. This is an optional handling technique rather than a change to the original recipe.
When rolling the pieces, use gentle pressure. Overworking the filling is unnecessary and can make the mixture warmer and softer.
For a traditional round chocolate, form small balls. For a flatter sweet resembling the photograph, press each ball lightly into a thick disc.
How to Melt Chocolate Smoothly
Chocolate melts best when heated gently and evenly. Although melting chocolate is straightforward, rushing this stage can cause problems.
If using a microwave, begin with a short heating interval of approximately 20 seconds. Remove the bowl and stir before heating again.
Continue in shorter intervals of around 10–15 seconds, stirring well each time. Stop heating when only a few small pieces remain, then stir until completely smooth.
The residual heat usually finishes melting the remaining pieces without overheating the mixture.
For the hob method, place the chocolate and oil in a heatproof bowl over a saucepan containing a small amount of gently simmering water.
Make sure the bowl does not touch the water. Stir until the chocolate becomes smooth, then remove the bowl from the heat.
Keep water and steam away from the chocolate. Even a small amount of moisture can cause melted chocolate to seize and become difficult to work with.
The tablespoon of oil in the recipe helps create a coating that flows more easily around the chilled centres. Because this recipe uses added oil rather than tempered chocolate, the finished sweets are best stored chilled.
How to Coat the Bites Neatly
Chocolate dipping is often the most enjoyable part of making these sweets. The key is to work with firm centres and chocolate that is fluid but not excessively hot.
Place a chilled peanut butter piece into the chocolate and turn it carefully with a fork. Make sure the sides and bottom are completely coated.
Lift it gently and allow the chocolate to fall back into the bowl for a few seconds.
For a smooth finish, slide the coated piece from the fork onto the parchment using another small utensil if needed.
If you prefer the rustic homemade look shown in the photograph, do not worry about making every piece perfectly round. Slightly uneven chocolate coatings give homemade sweets their own character.
If the chocolate thickens while you work, warm it very gently again. Avoid repeated overheating.
Once the coating has set, the centres should remain creamy while the outer layer feels firmer. The added oil can make this coating softer at warm room temperatures, which is another reason refrigeration is recommended.
Expert Tips for the Best Results
- Measure the peanut butter accurately. Too much can make the filling softer than intended.
- Use well-mixed peanut butter. Excess separated oil can affect the texture.
- Soften the butter properly. It should blend smoothly without being melted.
- Use powdered sugar rather than granulated sugar. The fine texture creates a smoother centre.
- Shape the pieces evenly. Similar-sized bites are easier to handle and serve.
- Chill before dipping. Firm centres are less likely to break apart in warm chocolate.
- Use dry utensils. Keep moisture away from the melting chocolate.
- Melt the chocolate slowly. Gentle heating helps preserve a smooth texture.
- Stir thoroughly. Even melting produces a more consistent coating.
- Work in small batches if needed. Keep unused centres refrigerated while dipping the others.
- Allow excess chocolate to drip away. This helps prevent overly thick shells.
- Use baking parchment. It makes the set bites easier to remove.
- Allow the coating to firm completely. Avoid stacking the pieces before chilling.
- Store in a cool place. Refrigeration helps maintain their shape and texture.
Common Mistakes to Avoid
1. Using Peanut Butter That Is Too Oily
A particularly runny peanut butter can make the filling difficult to shape. Stir separated peanut butter thoroughly and use a smooth, stable consistency whenever possible.
2. Adding Melted Butter Instead of Softened Butter
Melted butter can loosen the mixture. Use softened butter as specified in the original recipe.
3. Skipping the First Chilling Stage
Warm, soft centres may lose their shape during dipping. Refrigerating them for 20–30 minutes gives them time to firm up.
4. Overheating the Chocolate
Chocolate exposed to too much heat may become thick or grainy. Melt gradually and stir frequently.
5. Introducing Water into the Chocolate
Water can cause melted chocolate to seize. Dry all bowls, forks and spoons before beginning.
6. Making the Pieces Too Large
Oversized pieces can be difficult to dip neatly. Smaller portions are easier to coat and make better bite-sized sweets.
7. Leaving Too Much Chocolate on Each Piece
Excess coating can collect beneath the bites. Allow the chocolate to drip off before returning them to the tray.
8. Stacking Before the Coating Has Set
Soft chocolate surfaces can stick together. Wait until the shells are firm before transferring them to a container.
9. Storing in a Warm Kitchen
The coating may soften because it contains added oil. Refrigerate the finished bites to maintain their appearance and texture.
Optional Recipe Variations
The following ideas are optional adaptations and are not part of the original six-ingredient recipe.
Dark Chocolate Peanut Butter Bites
Replace the semi-sweet chocolate chips with dark chocolate for a stronger cocoa flavour and a less sweet coating.
Milk Chocolate Version
Use milk chocolate instead of semi-sweet chocolate for a sweeter, creamier shell.
Crunchy Peanut Butter Bites
Replace the creamy peanut butter with crunchy peanut butter if you enjoy small peanut pieces inside the filling.
Sea Salt Chocolate Bites
Sprinkle a tiny pinch of flaky sea salt over the chocolate coating before it sets. The salt provides a pleasant contrast to the sweetness.
White Chocolate Coating
Dip the centres in melted white chocolate for a sweeter variation. Melt white chocolate especially gently because it can scorch easily.
Chocolate Drizzle Decoration
Once the original coating has set, drizzle a small amount of contrasting melted chocolate over the top for a decorative finish.
Mini Dessert Bites
Shape the mixture into smaller portions to create miniature sweets suitable for dessert platters or party trays.
Serving Suggestions
Chocolate peanut butter bites are delicious served directly from the refrigerator, when the chocolate coating is firm and the filling remains creamy.
For parties, arrange the bites on a dessert platter alongside fresh strawberries, grapes or other homemade sweets. The fresh fruit provides a refreshing contrast to the rich chocolate.
They also pair nicely with a cup of coffee, black tea or cold milk.
If serving them as an after-dinner treat, place two or three pieces on small dessert plates. Their rich flavour means a small serving can feel particularly satisfying.
For gift boxes, place each bite in a miniature paper sweet case before arranging the pieces in a food-safe container. Keep the gifts refrigerated until they are ready to be given.
During warmer weather, avoid leaving these sweets on a serving table for extended periods because the chocolate coating can soften.
Storage and Freezing
Refrigerator Storage
Place the finished bites in an airtight container and refrigerate them promptly. As a practical quality guideline, enjoy them within approximately one week when prepared hygienically and kept consistently chilled.
Separate layers with baking parchment to prevent the chocolate shells from sticking together.
Freezer Storage
For longer storage, arrange the fully set bites in a freezer-safe airtight container with parchment between layers.
They can be frozen for approximately 2–3 months for best quality.
Allow frozen bites to soften slightly in the refrigerator before serving if you prefer a creamier centre.
Make-Ahead Preparation
The peanut butter centres can be shaped and refrigerated ahead of dipping. Keep them covered and chilled until you are ready to prepare the chocolate coating.
You can also prepare the entire batch the day before serving. This gives the chocolate plenty of time to set and makes party preparation easier.
Do These Bites Need Reheating?
No. These are chilled, no-bake sweets and should not be reheated. Excess heat will melt or soften the chocolate coating.
Food Safety
Use clean utensils, store the finished sweets promptly in the refrigerator and avoid prolonged exposure to warm temperatures.
These treats contain peanuts and dairy ingredients. Check the labels of chocolate chips and other packaged ingredients when preparing them for someone with food allergies.
Frequently Asked Questions
1. Are chocolate peanut butter bites no-bake?
Yes. This recipe requires no oven baking. The filling is mixed and shaped, then coated in melted chocolate and chilled until firm.
2. How many ingredients do I need?
You need six ingredients: creamy peanut butter, powdered sugar, softened butter, vanilla extract, semi-sweet chocolate chips and coconut oil or vegetable oil.
3. Can I use crunchy peanut butter?
Yes, as an optional variation. Crunchy peanut butter creates a textured filling rather than the smooth centre produced by the original recipe.
4. Can I use natural peanut butter?
Yes, although the texture may differ. Stir natural peanut butter thoroughly before using it, and be aware that runnier varieties may require additional chilling.
5. Why is my peanut butter filling sticky?
The mixture may be too warm or the peanut butter may contain more oil than expected. Refrigerating the filling briefly can make it easier to shape.
6. Can I make the filling without butter?
Butter is part of the original recipe. Omitting it would change the richness and consistency, so a butter-free version would need separate testing.
7. What does powdered sugar do?
Powdered sugar sweetens the filling and helps create a thicker, smoother texture that can be rolled into small pieces.
8. Can I use milk chocolate instead?
Yes. Milk chocolate is a suitable optional variation if you prefer a sweeter chocolate coating.
9. Can I use dark chocolate?
Absolutely. Dark chocolate gives the bites a more intense cocoa flavour and can balance the sweet filling particularly well.
10. How long should I chill the peanut butter centres?
The original recipe recommends refrigerating them for 20–30 minutes before dipping.
11. Why do the bites need chilling before dipping?
Chilling firms up the filling, helping the pieces retain their shape when placed into melted chocolate.
12. Can I melt the chocolate in the microwave?
Yes. Heat the chocolate in short intervals and stir frequently to avoid overheating.
13. Can I melt the chocolate on the hob?
Yes. Use a heatproof bowl over gently simmering water, taking care to keep water and steam away from the chocolate.
14. What is the purpose of the coconut oil?
The coconut oil helps thin the melted chocolate so it coats the peanut butter centres more easily.
15. Can I use vegetable oil instead?
Yes. The original recipe specifically allows either coconut oil or vegetable oil.
16. Why is my chocolate coating too thick?
The chocolate may have cooled too much or been overheated. Gently warming it again may help if it has simply cooled. Chocolate that has seized may not return to a suitable dipping consistency.
17. Can I flatten the bites instead of rolling them into balls?
Yes. The original instructions allow slightly flattened rounds. This shape also resembles the pieces in the accompanying photograph.
18. How long does the final coating take to set?
The original recipe recommends approximately 20 minutes in the refrigerator after dipping.
19. How many bites does this recipe make?
An estimated 18–24 small pieces, depending on how generously you portion the mixture.
20. Can I freeze chocolate peanut butter bites?
Yes. Store the set bites in an airtight freezer-safe container, separating layers with parchment, and enjoy within approximately 2–3 months for best quality.
21. How should I serve frozen bites?
Transfer them to the refrigerator for a short time before eating if you prefer a softer peanut butter filling.
22. Are these suitable for dessert gift boxes?
Yes. Place them in small paper cases and pack them in a food-safe container. Keep them chilled during storage and transport.
23. Can children help make this recipe?
Children can help mix and shape the filling with adult supervision. An adult should handle melting and dipping with hot chocolate.
24. Why does the chocolate soften at room temperature?
The coating contains added oil and is not tempered, so it may soften in a warm environment. Keeping the bites refrigerated gives the best results.
25. Can I prepare these bites a day ahead?
Yes. They are excellent make-ahead treats. Prepare the entire batch, chill until set and store in a covered container in the refrigerator until serving.
Complete Recipe Card
Chocolate Peanut Butter Bites
Description: Easy homemade no-bake peanut butter bites with soft, creamy centres and rich semi-sweet chocolate coatings.
- Category: Dessert
- Method: No-bake, chilling and dipping
- Prep Time: Approximately 15–20 minutes
- Chilling Time: 40–50 minutes
- Total Time: Approximately 55–70 minutes
- Estimated Yield: 18–24 small bites
- Difficulty: Easy
Ingredients
- 1 cup creamy peanut butter
- ½ cup powdered sugar
- 2 tablespoons softened butter
- 1 teaspoon vanilla extract
- 1½ cups semi-sweet chocolate chips
- 1 tablespoon coconut oil or vegetable oil
Instructions
- In a medium mixing bowl, combine the creamy peanut butter, powdered sugar, softened butter and vanilla extract.
- Mix until the ingredients form a smooth, thick filling.
- Scoop small portions and roll them into bite-sized balls, or flatten them slightly into rounds.
- Arrange the pieces on a parchment-lined tray.
- Refrigerate for 20–30 minutes, until firm.
- Melt the semi-sweet chocolate chips with the coconut oil or vegetable oil, stirring until smooth.
- Dip each chilled peanut butter bite completely into the melted chocolate.
- Lift each piece with a fork and allow the excess chocolate to drip away.
- Return the coated bites to the parchment-lined tray.
- Refrigerate for another 20 minutes, until the chocolate coating is firm.
- Transfer to an airtight container and store chilled until ready to serve.
Recipe Notes
- Use creamy, well-mixed peanut butter for the smoothest filling.
- Do not skip the first chilling stage because it helps the pieces hold their shape.
- Melt the chocolate carefully to prevent scorching.
- Keep moisture away from the melted chocolate.
- Allow excess chocolate to drip away before placing each piece on parchment.
- Store finished bites in the refrigerator for the best texture.
- Preparation time and yield are estimates based on small, bite-sized portions.
Hashtags: #ChocolatePeanutButter #NoBakeDesserts #PeanutButterBites #HomemadeSweets #EasyDessertRecipes