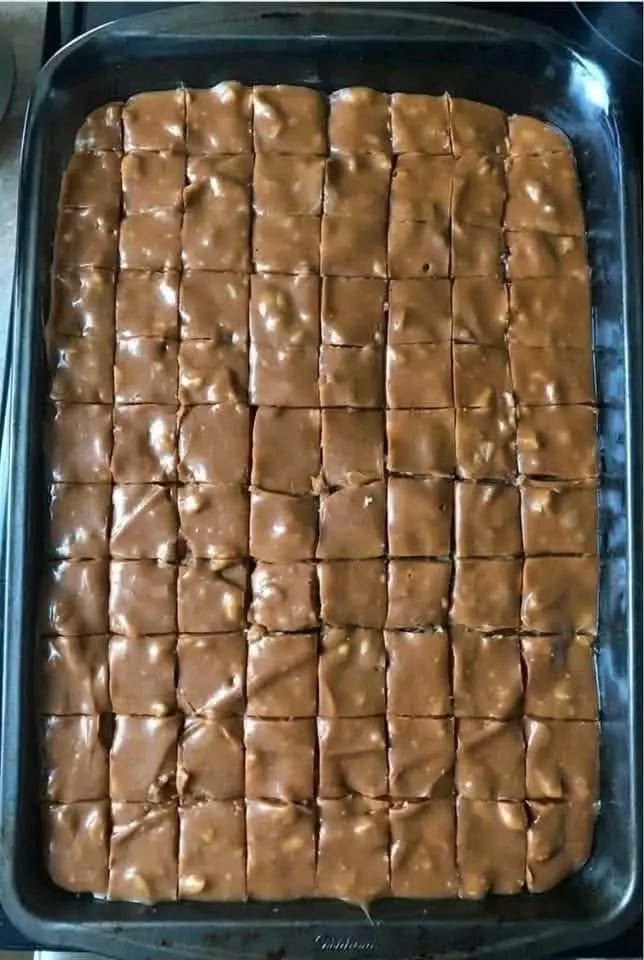
Chocolate Peanut Butter Crunch Bars
Rich, creamy, crunchy and wonderfully chocolatey, these homemade chocolate peanut butter crunch bars combine smooth melted chocolate, creamy peanut butter, crispy rice cereal and chopped peanuts in one easy no-bake dessert.
Introduction
Chocolate and peanut butter are a classic combination, and these chocolate peanut butter crunch bars show exactly why they work so well together. Every little square combines the sweetness of milk chocolate, the richer taste of semi-sweet chocolate and the distinctive nutty flavour of peanut butter.
What makes these bars particularly appealing is the contrast between their creamy chocolate base and their crunchy additions. Crispy rice cereal provides a light, delicate crunch, while chopped peanuts add a satisfying bite and extra roasted flavour.
Unlike traditional chocolate brownies or baked dessert bars, this recipe requires no oven. The chocolate mixture is gently melted on the hob, combined with the crunchy ingredients, pressed into a baking pan and refrigerated until firm enough to cut.
Sweetened condensed milk gives the mixture a rich, sweet consistency that helps hold the ingredients together. A little butter adds smoothness, while vanilla and a pinch of salt help balance the overall flavour.
These homemade chocolate peanut butter bars are ideal for family gatherings, holiday dessert trays, parties, bake sales and afternoon treats. Their small square shape makes them particularly convenient when you want a dessert that can be prepared ahead of time.
With familiar ingredients and straightforward preparation, this is a practical recipe for beginners as well as experienced home cooks looking for a simple chocolate treat.
Recipe Overview
- Recipe Name: Chocolate Peanut Butter Crunch Bars
- Category: Dessert and sweet snacks
- Style: American-inspired homemade no-bake bars
- Preparation Time: Approximately 15–20 minutes
- Cooking Time: Approximately 5–10 minutes for gentle melting
- Refrigeration Time: 2–3 hours
- Total Time: Approximately 2 hours 20 minutes to 3 hours 30 minutes
- Yield: Approximately 40–48 small squares, depending on cutting size
- Difficulty: Easy
- Cooking Method: Low-heat hob melting and refrigeration
- Pan Size: 9×13 inches (approximately 23×33 cm)
- Main Ingredients: Chocolate chips, peanut butter, condensed milk, crispy rice cereal and peanuts
The preparation time and yield are practical estimates. The original recipe specifies 2–3 hours of refrigeration, which is the most important timing for achieving a firm texture.
Why You’ll Love This Recipe
- No oven required: A saucepan and refrigerator handle almost all the work.
- Delicious texture: Creamy chocolate surrounds crispy cereal and chopped peanuts.
- Easy ingredients: The recipe uses familiar supermarket staples.
- Great for sharing: One large pan makes plenty of small dessert squares.
- Make-ahead friendly: Prepare the bars before a party and keep them chilled.
- Customisable: You can experiment with different chocolates or optional toppings.
- Simple preparation: No complicated baking techniques or specialist equipment are necessary.
- Rich flavour: The combination of chocolate, peanut butter and vanilla creates a satisfying sweet treat.
Ingredients
Gather all the ingredients before beginning. The chocolate mixture comes together relatively quickly once warmed, so having everything measured makes preparation easier.
Chocolate Peanut Butter Base
- 2 cups milk chocolate chips
- 1 cup semi-sweet chocolate chips
- 1 cup creamy peanut butter
- 2 tablespoons unsalted butter
- 1 can sweetened condensed milk
- 1 teaspoon vanilla extract
- Pinch of salt
Crunchy Additions
- 2 cups crispy rice cereal
- 1 cup chopped peanuts
Ingredient note: Use sweetened condensed milk, not evaporated milk. Condensed milk is thick and sweet, while evaporated milk has a different consistency and will not give the same result.
Ingredient Notes
Milk Chocolate Chips
Milk chocolate chips provide sweetness and a mellow cocoa flavour. Their creamy taste complements peanut butter beautifully. Good-quality chocolate chips that melt smoothly will help produce the best texture.
Semi-Sweet Chocolate Chips
Semi-sweet chocolate brings a deeper chocolate flavour and balances the sweetness of the milk chocolate and condensed milk. Using both types creates a richer result than relying on milk chocolate alone.
Creamy Peanut Butter
Creamy peanut butter adds the signature nutty flavour and a soft, rich mouthfeel. A conventional, well-emulsified creamy peanut butter is a convenient choice because its consistency tends to be predictable.
Unsalted Butter
Butter helps create a smooth chocolate mixture and contributes a subtle richness. Unsalted butter also gives you better control over the finished flavour.
Sweetened Condensed Milk
This ingredient contributes sweetness and thickness. Standard cans vary in size between countries, so follow the can size normally used for the original recipe; a common American can contains 14 ounces, approximately 397 grams.
Crispy Rice Cereal
Crispy rice cereal adds a light crunch without making the bars overly dense. Choose cereal that is fresh and crisp rather than stale or soft.
Chopped Peanuts
Peanuts deliver a firmer crunch and a savoury roasted note. Chop them into small pieces so they distribute evenly and do not make the bars difficult to slice.
Vanilla Extract and Salt
Vanilla rounds out the chocolate flavour, while a small pinch of salt helps prevent the dessert from tasting excessively sweet.
Equipment You’ll Need
- 9×13-inch baking pan
- Parchment paper or a little grease for the pan
- Medium or large heavy-bottomed saucepan
- Heat-resistant spatula
- Measuring cups and spoons
- Mixing spoon
- Sharp knife
- Refrigerator
- Airtight container for storing the finished bars
A heavy-bottomed saucepan is particularly useful because it distributes heat more evenly, reducing the chance of scorching the chocolate mixture.
Step-by-Step Instructions
Step 1: Prepare the Baking Pan
Line a 9×13-inch baking pan with parchment paper or lightly grease it. If using parchment, leave a little hanging over two sides so you can lift the finished slab out easily.
Step 2: Combine the Chocolate Ingredients
Place the milk chocolate chips, semi-sweet chocolate chips, creamy peanut butter, unsalted butter and sweetened condensed milk into a saucepan.
Use a saucepan large enough to hold the mixture comfortably while stirring.
Step 3: Melt Over Low Heat
Set the saucepan over low heat. Stir continuously and gently until the chocolate has melted and the mixture becomes smooth.
Avoid boiling or overheating. If the chocolate begins to catch on the bottom, remove the saucepan from the heat immediately and continue stirring.
Step 4: Add Vanilla and Salt
Remove the saucepan from the heat. Stir in the vanilla extract and a pinch of salt until evenly combined.
Step 5: Fold in the Crunchy Ingredients
Add the crispy rice cereal and chopped peanuts to the warm chocolate mixture.
Fold everything together gently with a spatula until the cereal and peanuts are evenly coated. Avoid excessive stirring, which can crush the cereal.
Step 6: Transfer to the Pan
Spoon the mixture into the prepared baking pan. Spread it evenly, making sure to reach the corners.
Step 7: Smooth the Surface
Use a spatula to smooth the top into an even layer. Press lightly to remove large air pockets, but do not compact the mixture too firmly.
Step 8: Refrigerate Until Firm
Place the baking pan in the refrigerator for 2–3 hours, or until the mixture has firmed sufficiently to cut into squares.
The bars should feel set and hold their shape when gently pressed.
Step 9: Cut into Squares
Remove the chilled mixture from the pan. If you used parchment paper, lift it out by holding the overhanging edges.
Place the slab on a cutting board and use a sharp knife to cut it into small, even squares.
Step 10: Serve or Store
Serve the bars chilled for a firm, creamy chocolate-peanut butter texture with a light crunch. Transfer any leftovers to an airtight container and return them to the refrigerator.
How to Melt Chocolate Smoothly
The melting stage is one of the most important parts of this recipe. Chocolate is sensitive to excessive heat, and a mixture containing condensed milk can become thick or scorched if heated too aggressively.
Keep the hob on its lowest practical setting and stir regularly across the base and sides of the saucepan. The goal is to melt the ingredients gradually rather than cook them.
As the chocolate chips soften, the peanut butter and condensed milk will combine into a thick mixture. Continue stirring until no obvious solid chocolate pieces remain.
If your saucepan retains heat strongly, remove it from the hob shortly before all the chocolate has melted. Residual warmth can finish the melting process while you continue stirring.
If the mixture seems unusually thick, do not automatically add water. Extra liquid can change how the bars set. Gentle heating and thorough stirring are generally the better first steps.
How to Keep the Bars Crunchy
The distinctive crunch comes from two ingredients: crispy rice cereal and chopped peanuts. Each provides a different texture, making the finished bars more interesting to eat.
For the best results, add the cereal only after removing the melted chocolate mixture from the heat. This reduces unnecessary exposure to heat and helps preserve its delicate texture.
Fold rather than beat the ingredients together. The cereal should be thoroughly coated, but not broken into tiny crumbs.
Use dry, fresh peanuts, and avoid adding excess moisture. Moisture can soften the cereal over time, particularly during storage.
Remember that the chocolate and condensed milk mixture is naturally rich and moist. These bars should have a light crunch within a creamy base, rather than the brittle texture of a hard chocolate wafer.
How to Cut Perfect Chocolate Squares
Neatly cut squares make these bars attractive for dessert platters, holiday boxes and homemade gifts.
Begin by allowing the mixture to set fully. Cutting too early can cause the edges to smear or the pieces to lose their shape.
For particularly neat squares, use a long, sharp knife and wipe the blade clean between cuts. A slightly warmed, thoroughly dried knife may help with a very firm chocolate slab.
Cut the mixture into long strips first, then slice across the strips to create squares of your preferred size.
Smaller portions are ideal because the bars are rich. A 9×13-inch pan can be divided into approximately 40–48 small pieces, depending on how generously you cut them.
Expert Tips for the Best Results
- Measure before melting: Have the cereal and peanuts ready so the chocolate does not sit unnecessarily on the heat.
- Use low heat: High temperatures can scorch the chocolate and condensed milk.
- Choose creamy peanut butter: A smooth variety distributes more evenly through the base.
- Keep utensils dry: Avoid introducing unnecessary moisture into the chocolate.
- Use fresh cereal: Stale rice cereal produces a disappointing texture.
- Chop peanuts evenly: Small pieces help the bars slice cleanly.
- Stir the saucepan thoroughly: Scrape the corners and bottom to prevent localised overheating.
- Add vanilla off the heat: This preserves its aroma.
- Fold gently: Preserve the cereal’s structure while coating every piece.
- Level the mixture: An even surface makes chilling and cutting easier.
- Chill completely: Refrigeration is essential for a firm finished bar.
- Use parchment paper: It makes removing the chocolate slab significantly easier.
- Cut small portions: These rich bars are best enjoyed in modest squares.
- Store chilled: Refrigeration helps maintain their shape and texture.
Common Mistakes to Avoid
1. Overheating the Chocolate
Excessive heat can cause scorching, graininess or separation. Melt the ingredients gently and remove the saucepan from the heat as soon as the mixture is smooth.
2. Using Evaporated Milk
Evaporated milk is not a direct substitute for sweetened condensed milk. Its different sugar and moisture content can affect both sweetness and firmness.
3. Adding Stale Cereal
Cereal that has absorbed moisture will not provide the expected crunch. Check that it is fresh before mixing.
4. Mixing Too Aggressively
Vigorous stirring can crush the cereal and make the finished bars denser. Fold the ingredients gently.
5. Skipping the Pan Lining
Chocolate mixtures can stick to baking pans. Parchment paper helps produce cleaner edges and simpler removal.
6. Cutting Before the Bars Set
Warm or insufficiently chilled bars may smear, crumble or lose their shape. Refrigerate for the recommended 2–3 hours and check their firmness.
7. Cutting Oversized Pieces
The condensed milk, chocolate and peanut butter create a rich dessert. Small squares are often more enjoyable than large portions.
8. Leaving the Bars in a Warm Room
The texture can soften as the chocolate warms. Keep the bars refrigerated until they are needed.
9. Using Uneven Peanut Pieces
Large whole peanuts can make cutting more difficult. Chopped peanuts distribute more evenly throughout the mixture.
Optional Recipe Variations
The original recipe is delicious as written, but these optional ideas provide different textures and flavour combinations. They are suggestions rather than changes to the original ingredient list.
1. Dark Chocolate Crunch Bars
Replace some of the milk chocolate chips with dark chocolate for a more pronounced cocoa flavour and a less sweet impression.
2. Extra Peanut Butter Flavour
Add a small peanut butter drizzle to the surface before refrigeration for a more distinctive nutty finish.
3. Salted Chocolate Peanut Bars
Sprinkle a little flaky sea salt over the top before chilling. The salty contrast works particularly well with sweetened condensed milk.
4. Pretzel Crunch Bars
Replace part of the crispy rice cereal with small pieces of crushed pretzel for an additional salty crunch.
5. White Chocolate Drizzle
Decorate the chilled bars with a little melted white chocolate for a contrasting finish.
6. Mixed Nut Crunch Bars
Substitute part of the chopped peanuts with chopped almonds or cashews for a different nut flavour.
7. Mini Chocolate Chip Topping
Sprinkle a few miniature chocolate chips over the pressed mixture before chilling for a more textured surface.
Serving Suggestions
Chocolate peanut butter crunch bars are delicious straight from the refrigerator. Their firm texture makes them easy to arrange on a platter, and their small size is ideal for serving alongside other desserts.
For an afternoon treat, enjoy one or two squares with freshly brewed coffee, tea or a cold glass of milk. The slight bitterness of coffee is a pleasant contrast to the sweet, creamy chocolate.
For a party, arrange the bars on a large serving tray with homemade biscuits, brownies or fruit. Alternating different desserts creates an attractive assortment without requiring elaborate presentation.
These bars also make a lovely addition to holiday sweet trays. Their chocolate colour and simple square shape look appealing beside lighter-coloured treats.
If serving to guests, clearly identify that the bars contain peanuts and dairy, and check chocolate and cereal labels for other allergens.
Storage and Make-Ahead Tips
Refrigerator Storage
Place the cut bars in an airtight container, separating layers with parchment paper to prevent sticking. Keep them refrigerated and aim to enjoy them within approximately one week for the best flavour and texture.
Freezing
For longer storage, individually wrap the bars or separate them with parchment paper inside a freezer-safe container. For best quality, use within approximately two months.
Thaw frozen pieces in the refrigerator before serving. Freezing may slightly change the crispness of the cereal.
Make-Ahead Preparation
These bars are a convenient make-ahead dessert because refrigeration is already part of the preparation process. Making them the day before a gathering allows plenty of time for the mixture to become firm.
Do They Need Reheating?
No. These are chilled no-bake dessert bars and should not be reheated before eating.
Serving Temperature
For the firmest texture, serve directly from the refrigerator. If you prefer a slightly softer bite, allow individual portions to stand briefly at a cool room temperature before eating.
Frequently Asked Questions
1. Are chocolate peanut butter crunch bars baked?
No. The ingredients are gently melted on the hob, combined with cereal and peanuts, and chilled until firm.
2. How long do the bars need to chill?
The original recipe recommends 2–3 hours in the refrigerator, or until completely firm.
3. Can I use crunchy peanut butter?
Yes, although it will create a different texture. Creamy peanut butter is recommended for the original recipe.
4. Can I use only milk chocolate?
You can experiment with it, but the result will be sweeter and may set differently. The original combination of milk and semi-sweet chocolate offers better flavour balance.
5. Can I use dark chocolate instead?
Yes. Replacing part of the chocolate with dark chocolate is an optional way to produce a deeper cocoa flavour.
6. Why are my bars too soft?
They may need additional refrigeration, or the ingredient proportions may have changed. Check that you used the correct quantities and sweetened condensed milk rather than evaporated milk.
7. Why is my chocolate mixture grainy?
Overheating or moisture contamination may be responsible. Use low heat, dry utensils and gentle stirring.
8. Can I leave out the chopped peanuts?
Yes, as an optional variation, but the bars will lose some of their characteristic crunch and peanut texture.
9. Can I replace crispy rice cereal?
Crushed pretzels or another crisp cereal may work, although the resulting flavour and texture will differ from the original.
10. Can I make these bars in a smaller pan?
Yes, but the bars will be thicker and may require additional chilling. The original recipe uses a 9×13-inch pan.
11. What is the best way to remove them from the pan?
Line the pan with parchment paper and leave enough overhang to lift the chilled slab out.
12. Can children help make this recipe?
Children can help measure dry ingredients, line the pan and arrange the finished squares. An adult should handle the hot saucepan and melted chocolate.
13. Do I need an electric mixer?
No. A saucepan, spoon and spatula are sufficient.
14. Can I make these bars ahead of time?
Yes. They are particularly suitable for making the day before a gathering.
15. Can I freeze chocolate peanut butter crunch bars?
Yes. Wrap them well, freeze in an airtight container and thaw in the refrigerator. Their crunch may soften slightly after freezing.
16. Can I use natural peanut butter?
You can try a thoroughly stirred natural peanut butter, but its oil separation and consistency may affect how firmly the mixture sets.
17. Why is my cereal no longer crunchy?
Cereal can absorb moisture from the surrounding mixture during storage. Using fresh cereal and keeping the bars properly chilled helps preserve the texture.
18. Can I use a microwave to melt the chocolate?
As an optional technique, a microwave-safe bowl and short, gentle heating intervals may work. However, the original recipe uses a saucepan over low heat, which offers straightforward control.
19. Are these bars gluten-free?
Not necessarily. Check the labels on the crispy rice cereal, chocolate and other packaged ingredients. Some crispy rice cereals contain barley malt or other gluten-containing ingredients.
20. Are these bars suitable for people with peanut allergies?
No. The original recipe contains both peanut butter and chopped peanuts. It should not be served to anyone with a peanut allergy.
21. How many squares does this recipe make?
Approximately 40–48 small squares is a reasonable estimate for a 9×13-inch pan. The actual yield depends on cutting size.
22. Can I add a chocolate topping?
Yes. An optional drizzle of melted chocolate can be added for decoration, although the original bars already contain a rich chocolate base.
Chocolate Peanut Butter Crunch Bars Recipe Card
Recipe Description
Easy no-bake chocolate peanut butter crunch bars made with milk chocolate, semi-sweet chocolate, creamy peanut butter, sweetened condensed milk, crispy rice cereal and chopped peanuts. Rich and creamy with a delightful crunchy bite.
- Course: Dessert
- Method: No-bake, hob melting and chilling
- Prep Time: Approximately 15–20 minutes
- Melting Time: Approximately 5–10 minutes
- Chill Time: 2–3 hours
- Yield: Approximately 40–48 small bars
- Pan: 9×13 inches
Ingredients
- 2 cups milk chocolate chips
- 1 cup semi-sweet chocolate chips
- 1 cup creamy peanut butter
- 2 tablespoons unsalted butter
- 1 can sweetened condensed milk
- 2 cups crispy rice cereal
- 1 cup chopped peanuts
- 1 teaspoon vanilla extract
- Pinch of salt
How to Make
- Line a 9×13-inch pan with parchment paper or lightly grease it.
- Place the milk chocolate chips, semi-sweet chocolate chips, peanut butter, butter and sweetened condensed milk in a saucepan.
- Heat over low heat, stirring constantly, until completely melted and smooth.
- Remove from the heat and stir in the vanilla extract and salt.
- Gently fold in the crispy rice cereal and chopped peanuts until evenly coated.
- Transfer the mixture to the prepared pan and spread it evenly.
- Smooth the top with a spatula.
- Refrigerate for 2–3 hours, or until firm.
- Remove from the pan and cut into small squares.
- Serve chilled or store in an airtight container in the refrigerator.
Recipe Notes
- Always melt the chocolate mixture over low heat.
- Use sweetened condensed milk, not evaporated milk.
- Fold the cereal gently to preserve its crunch.
- Chill thoroughly before cutting.
- Store the bars in the refrigerator for the best texture.
- Contains peanuts and dairy; check product labels for additional allergens.
Hashtags: #ChocolatePeanutButter #NoBakeDessert #ChocolateCrunchBars #EasyDessertRecipes #HomemadeTreats
Final Thoughts
Chocolate peanut butter crunch bars are a wonderful option when you want a rich homemade dessert without turning on the oven. The smooth chocolate mixture, creamy peanut butter and crunchy additions create an enjoyable combination of flavour and texture.
Prepare a batch for your next family gathering, save a few squares for an afternoon treat or share them with friends. If you try this recipe, leave a comment with your results, save it for later and follow along for more easy homemade recipes.