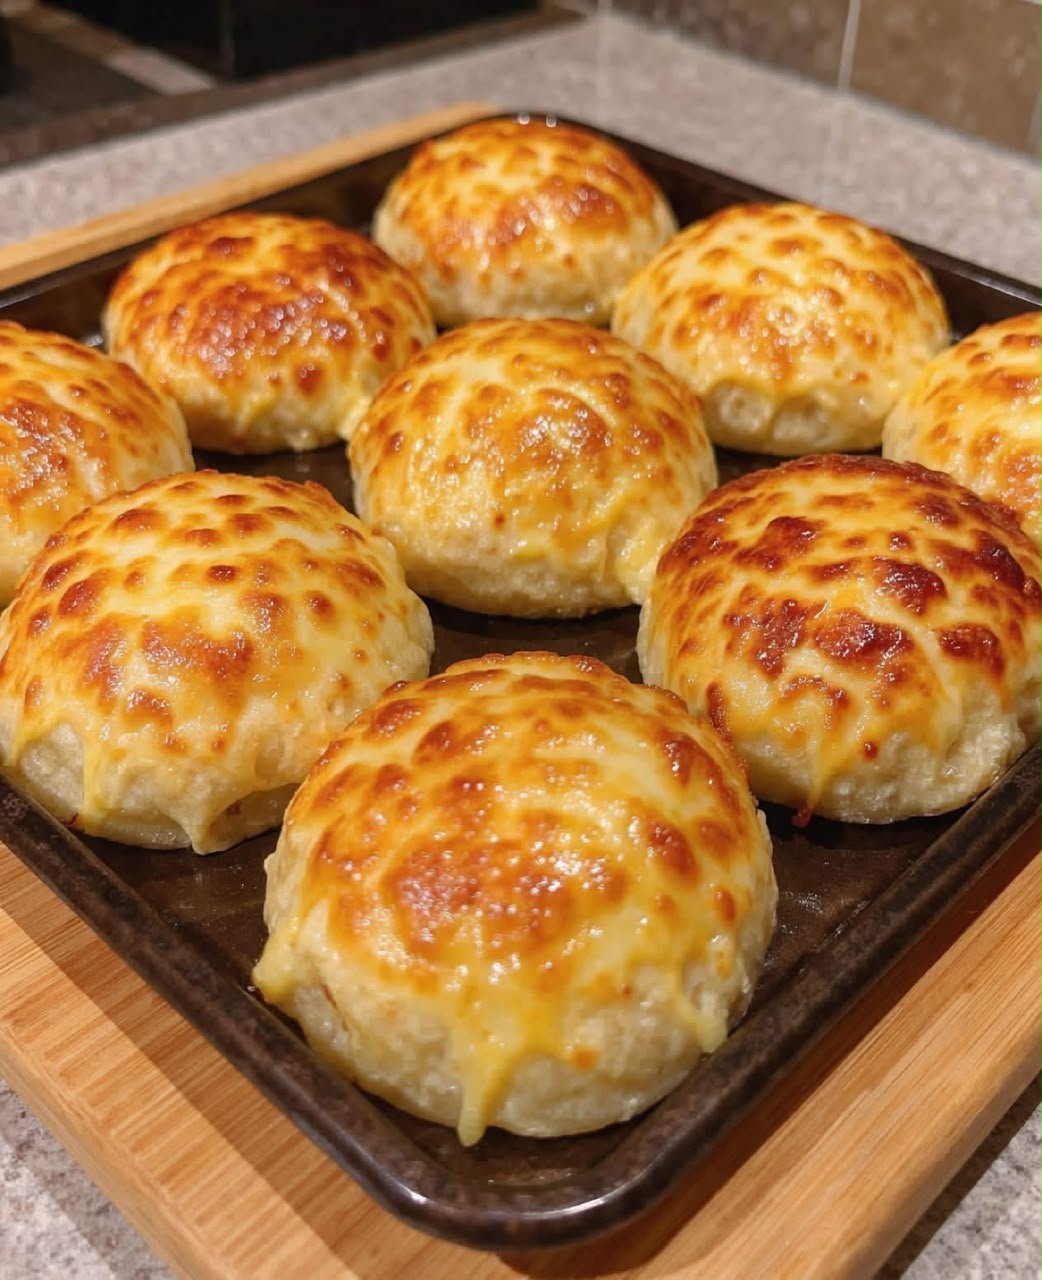
Cheesy Stuffed Bread Rolls
There is something irresistible about freshly baked bread filled with warm, melted cheese. These cheesy stuffed bread rolls combine soft, fluffy homemade dough with a delicious mozzarella and cheddar filling, creating golden little buns that are perfect for sharing.
Each roll has a tender, pillowy interior and a beautifully browned surface. The combination of mozzarella and cheddar creates a rich, savoury filling that becomes wonderfully gooey when served straight from the oven.
What makes these homemade cheese rolls special is their simplicity. You only need a few everyday baking ingredients, a little patience while the dough rises and two familiar cheeses to create something that feels like a bakery treat.
The rolls are particularly appealing because they work for so many occasions. Serve them alongside a comforting bowl of soup, add them to a family dinner or enjoy one as a warm afternoon snack.
If you have never made yeast bread before, this recipe is an approachable place to start. The dough is straightforward to mix, easy to shape and forgiving enough for beginners who follow the rising and kneading instructions carefully.
Best of all, the aroma of warm bread and golden cheese filling the kitchen makes the baking process nearly as enjoyable as eating the finished rolls.
Recipe Overview
- Recipe: Cheesy Stuffed Bread Rolls
- Category: Bread, Snacks, Side Dishes
- Style: Homemade savoury yeast bread
- Preparation time: Approximately 25 minutes of active work
- First rise: Approximately 1 hour
- Second rise: 20–30 minutes
- Baking time: 18–22 minutes
- Estimated total time: 2 hours 5 minutes to 2 hours 20 minutes
- Yield: Approximately 8 medium rolls
- Oven temperature: 375°F (190°C)
- Cooking method: Oven baking
- Difficulty: Beginner-friendly
The yield is an estimate because the original recipe does not specify how many portions to divide the dough into. Making eight rolls gives a convenient medium-sized bun, although you may shape smaller ones if preferred.
Why You’ll Love These Rolls
- Soft homemade bread: Milk, butter and egg help create a tender, fluffy texture.
- Gooey cheese filling: Mozzarella melts beautifully while cheddar provides a richer flavour.
- Golden finish: The egg wash gives the bread an attractive colour and gentle sheen.
- Simple ingredients: Most of the ingredients are familiar baking essentials.
- Perfect for sharing: These individual rolls are convenient for parties, family meals and gatherings.
- Versatile serving options: They pair well with soups, salads, pasta and savoury dips.
- Easy to customise: The cheese combination can be adjusted with optional herbs and seasonings.
- Excellent warm: Freshly baked rolls offer the best combination of fluffy bread and melted cheese.
Ingredients
For the Bread Dough
- 2 cups all-purpose flour (plain flour, approximately 250 g)
- 2¼ teaspoons instant yeast (approximately 7 g)
- ¾ cup warm milk (approximately 180 ml)
- 2 tablespoons sugar (approximately 25 g)
- 2 tablespoons melted butter (approximately 28 g)
- 1 large egg
- ½ teaspoon salt
For the Cheese Filling
- 1½ cups shredded mozzarella cheese (approximately 170 g)
- ½ cup shredded cheddar cheese (approximately 55–60 g)
For the Golden Topping
- 1 teaspoon garlic powder
- ½ teaspoon Italian seasoning
- 1 egg, beaten, for brushing
Important: The recipe uses two eggs in total: one incorporated into the dough and a separate beaten egg for brushing the rolls before baking.
Ingredient Notes
Plain Flour
Plain flour forms the structure of the bread. Its moderate protein content helps create soft rolls rather than a particularly chewy loaf. Measure carefully because too much flour can make the dough heavy and dry.
Instant Yeast
Instant yeast helps the dough rise and gives the finished rolls their light texture. It can be mixed directly into the dough ingredients without a separate activation step.
Warm Milk
Milk provides moisture and contributes to a softer crumb. Aim for comfortably warm milk, approximately 38–43°C (100–110°F), rather than very hot milk that could damage the yeast.
Sugar
Sugar adds a subtle sweetness that balances the savoury filling. It also supports browning during baking.
Melted Butter
Butter enriches the dough, helping produce a tender texture and pleasant flavour. Allow it to cool slightly before mixing so it does not overheat the yeast mixture.
Egg
The egg incorporated into the dough contributes richness, structure and softness. The additional egg used for brushing helps create the glossy golden finish.
Mozzarella
Mozzarella is the main melting cheese in this recipe. Low-moisture mozzarella is particularly convenient because it melts smoothly without releasing excessive liquid into the dough.
Cheddar
Cheddar adds a stronger, more savoury cheese flavour. Medium or mature cheddar both work, depending on how pronounced you want the filling to taste.
Garlic Powder and Italian Seasoning
These seasonings provide a gently aromatic finish. Sprinkling them over the egg-washed dough gives the rolls extra flavour without overpowering the cheese.
Equipment You’ll Need
- Large mixing bowl
- Measuring cups and spoons
- Kitchen scales, if available
- Wooden spoon or dough spatula
- Clean work surface for kneading
- Clean tea towel or reusable bowl cover
- Baking tray
- Pastry brush
- Small bowl for the egg wash
- Wire cooling rack
How to Make Cheesy Stuffed Bread Rolls
Step 1: Prepare the Liquid Ingredients
Pour the warm milk into a large mixing bowl. Add the sugar, instant yeast, melted butter, egg and salt. Mix until the ingredients are well combined.
Make sure the milk is warm rather than hot. The mixture should feel comfortable to the touch.
Step 2: Form the Dough
Gradually add the flour while mixing with a wooden spoon or spatula. Continue until the mixture comes together into a soft dough.
The dough may feel slightly sticky at first. Avoid adding large amounts of extra flour because the final bread should remain soft and fluffy.
Step 3: Knead Until Smooth
Transfer the dough to a lightly floured work surface. Knead for approximately 8 minutes until it becomes smoother, more elastic and easier to handle.
Proper kneading develops the gluten that allows the rolls to rise and maintain their rounded shape.
Step 4: Allow the First Rise
Place the dough in a bowl, cover it and leave it in a warm, draught-free location for approximately 1 hour, or until doubled in size.
Rising time can vary depending on the temperature of your kitchen. Look for a noticeable increase in volume rather than relying entirely on the clock.
Step 5: Divide and Flatten
Gently release the excess air from the risen dough. Divide it into equal portions, approximately eight for medium-sized rolls.
Flatten each piece into a small round, keeping the centre substantial enough to support the cheese filling without tearing.
Step 6: Add the Cheese
Combine the shredded mozzarella and cheddar. Place a generous portion of the cheese mixture in the centre of each dough round, distributing it evenly between the rolls.
Leave sufficient space around the edges so the dough can be sealed properly.
Step 7: Seal and Shape
Bring the edges of each dough round towards the centre. Pinch firmly to enclose the cheese, then gently shape the filled dough into a smooth ball.
Place the sealed side underneath to help prevent the filling from escaping as the rolls bake.
Step 8: Arrange on the Tray
Place the shaped rolls on a greased baking tray, leaving a little space between them to accommodate their final rise.
Arrange them neatly so they bake evenly.
Step 9: Allow the Second Rise
Cover the rolls lightly and leave them to rise for another 20–30 minutes.
They should appear noticeably puffier and feel airy when gently touched.
Step 10: Brush and Season
Preheat the oven to 375°F (190°C).
Brush the tops of the rolls gently with the beaten egg. Sprinkle the garlic powder and Italian seasoning evenly over the surfaces.
A light, even coating is enough to help the bread develop a beautiful colour.
Step 11: Bake Until Golden
Bake for 18–22 minutes, until the bread rolls are puffed, deeply golden and cooked through.
If the tops begin browning too quickly, loosely cover the tray with foil towards the end of baking.
The bread should be set rather than doughy around the centre. For additional reassurance, the bread portion can be checked with a thermometer, aiming for approximately 90–93°C (194–200°F), without placing the probe directly into the melted cheese.
Step 12: Cool Briefly and Serve
Remove the baking tray from the oven and leave the rolls to rest for a few minutes.
Serve warm, when the bread is tender and the cheese filling is deliciously melted. Take care when breaking open a freshly baked roll because the filling can be extremely hot.
How to Make Soft, Fluffy Bread Dough
The texture of these rolls depends on balancing moisture, gluten development and fermentation.
Begin with accurately measured flour. Scooping flour directly with a measuring cup can compress it and add more than the recipe requires. For greater consistency, weigh approximately 250 g.
During kneading, the dough should gradually change from rough and slightly sticky to smooth and elastic. If it sticks heavily to your hands, allow it to rest briefly before deciding whether a tiny dusting of extra flour is necessary.
Good gluten development allows the dough to stretch around the cheese without breaking. This is especially important because each roll needs to hold its filling during the final rise and baking.
Finally, let the dough rise until it has genuinely expanded. A cool kitchen may require extra time, while a warm kitchen may produce a faster rise.
How to Keep the Cheese Filling Inside
A well-sealed roll gives you the best chance of enjoying a soft bread exterior with melted cheese inside.
First, keep the cheese away from the outer edges of the flattened dough. Cheese trapped in the seam can interfere with the dough sticking together.
Next, gather the edges carefully and pinch them firmly. Avoid stretching the dough so thinly that small holes appear around the filling.
When shaping each ball, keep the sealed seam underneath. This gives the top a smooth finish and reduces the chance of cheese escaping onto the baking tray.
A small amount of cheese leakage is not necessarily a problem. Melted cheddar or mozzarella can form delicious golden edges, but a secure seal produces a more consistent stuffed roll.
How to Get Beautiful Golden Bread Rolls
The attractive colour of these rolls comes from the enriched dough and beaten egg wash.
Use a pastry brush to apply a thin, even layer of beaten egg before baking. Avoid allowing large puddles of egg to collect around the bottoms, where they may cook unevenly.
The garlic powder and Italian seasoning should be scattered lightly over the top so that the bread still browns evenly.
For reliable results, bake the rolls on the middle oven shelf and begin checking them near the lower end of the suggested baking time.
The supplied recipe uses cheese inside the rolls. If you prefer the more heavily cheese-covered appearance visible in the reference photograph, an optional variation is to reserve a little of the original cheese mixture for sprinkling over the tops before baking. This will reduce the amount of cheese inside each roll unless you deliberately increase the overall quantity.
Expert Tips for Perfect Cheese Rolls
- Use fresh yeast that is within its expiry date for reliable rising.
- Keep the milk comfortably warm rather than hot.
- Allow the melted butter to cool slightly before adding it.
- Measure the flour carefully to avoid making a dry dough.
- Knead until the dough becomes smooth and elastic.
- Cover the dough during rising to stop its surface drying out.
- Divide the dough into equal pieces for consistent baking.
- Use low-moisture mozzarella to minimise excess liquid.
- Keep the cheese in the centre and away from the seams.
- Pinch every seam securely before placing the rolls on the tray.
- Give the shaped rolls enough time for their second rise.
- Brush the tops gently to avoid deflating the dough.
- Check for doneness before removing the rolls from the oven.
- Allow a brief cooling period before serving the hot cheese filling.
Common Mistakes to Avoid
Using Milk That Is Too Hot
Excessively hot milk can damage yeast and prevent the dough from rising properly. Use pleasantly warm milk instead.
Adding Too Much Flour
A stiff, heavily floured dough can produce dense rolls. Add flour gradually and aim for a soft, manageable consistency.
Skipping Proper Kneading
Under-kneaded dough may struggle to hold its shape. Knead for the recommended time and check that the surface feels elastic.
Rushing the First Rise
If the dough has not expanded sufficiently, the rolls may turn out heavy. Give it enough time to approximately double in size.
Overfilling the Rolls
Too much cheese can make sealing difficult and cause excessive leakage. Divide the filling evenly while leaving sufficient dough around the edges.
Leaving the Seams Loose
Open seams allow the cheese to escape during baking. Pinch firmly and position each seam underneath.
Skipping the Second Rise
The second rise helps the shaped rolls become light and fluffy. Baking immediately after shaping can produce a tighter crumb.
Overbaking
Too much oven time can dry out the bread. Start checking at 18 minutes and remove the rolls once they are properly cooked.
Optional Recipe Variations
The following ideas are optional changes to the original recipe.
Extra-Cheesy Topped Rolls
Reserve a small portion of the mozzarella and cheddar mixture to sprinkle over the egg-washed tops before baking. This creates a more pronounced golden cheese topping.
Garlic Butter Rolls
Brush the baked rolls with a little additional melted butter mixed with minced garlic for a more aromatic finish.
Herb Cheese Rolls
Mix a small amount of chopped parsley or dried oregano into the cheese filling for extra flavour.
Spicy Cheddar Rolls
Add a pinch of chilli flakes or a little finely chopped jalapeño to the filling.
Three-Cheese Rolls
Replace part of the mozzarella or cheddar with Parmesan, Gruyère or another suitable melting cheese.
Mini Party Rolls
Divide the dough into smaller portions for bite-sized appetisers. Reduce the baking time as needed and check that the bread is thoroughly cooked.
Wholemeal Cheese Rolls
Replace a portion of the plain flour with wholemeal flour. The dough may require a small amount of additional liquid because wholemeal flour absorbs moisture differently.
What to Serve with Cheesy Stuffed Bread Rolls
These savoury rolls work beautifully as a side dish, snack or light meal accompaniment.
- Tomato soup: The rich cheese filling complements the acidity of tomatoes.
- Vegetable soup: Soft rolls are excellent for dipping into a warm bowl of soup.
- Pasta dishes: Serve alongside baked pasta or spaghetti for a comforting dinner.
- Fresh green salad: Crisp vegetables provide contrast to the rich bread and cheese.
- Marinara sauce: A warm tomato dip adds a pizza-inspired flavour.
- Garlic yoghurt dip: A cool, tangy dip balances the melted cheese.
- Party platters: Arrange several warm rolls on a board with small bowls of dipping sauces.
For the best eating experience, serve the rolls while they are still pleasantly warm, but not so hot that the filling could burn your mouth.
Storage, Freezing and Reheating
Refrigerating Leftovers
Allow the rolls to cool, then transfer them to an airtight container and refrigerate promptly, within two hours of baking. For best quality, enjoy within 3–4 days.
Reheating in the Oven
Place refrigerated rolls on a baking tray and warm them in an oven at approximately 160°C (320°F) for 8–12 minutes, or until heated thoroughly. Larger rolls may need additional time.
Reheating in the Microwave
Microwave an individual roll in short intervals until thoroughly heated. The bread may become slightly softer, and the cheese filling can develop very hot spots.
Freezing
Fully baked rolls can be cooled, wrapped individually and frozen in a suitable freezer container for up to 2–3 months for best quality.
Thawing
Thaw frozen rolls in the refrigerator and reheat until hot throughout before serving.
Preparing Ahead
You can prepare the dough and shape the rolls in advance, then refrigerate them covered for a short overnight rise. This is an optional adjustment to the original method. Allow the shaped rolls to become visibly puffy before baking, as cold dough often needs extra time.
Frequently Asked Questions
1. Can I use bread flour instead of plain flour?
Yes. Bread flour can be used, although the finished rolls may have a slightly chewier texture because of its higher protein content.
2. Can I use active dry yeast?
Yes, but follow the activation instructions on the yeast packaging and adjust the process accordingly.
3. Why did my dough not rise?
The yeast may have been inactive, the liquid may have been too hot or the kitchen may have been too cold. Check yeast freshness and allow sufficient rising time.
4. Can I make the dough without a stand mixer?
Absolutely. The original recipe uses hand mixing and kneading, so no stand mixer is required.
5. How sticky should the dough be?
It should feel soft and slightly tacky, but become smoother and easier to handle after kneading.
6. How do I know when the first rise is finished?
The dough should have increased to approximately twice its original size.
7. Can I use only mozzarella?
Yes. Replace the cheddar with additional mozzarella if you prefer a milder cheese flavour.
8. Can I use only cheddar?
Yes, although the filling will generally be richer and less stretchy than a mozzarella-based filling.
9. Why did the cheese leak out?
The dough may have been overfilled, stretched too thinly or not sealed securely.
10. Can I add cheese on top?
Yes. Reserving a little of the original cheese mixture for the topping creates a beautifully browned cheese crust.
11. Do I need to grease the baking tray?
Yes. The original instructions call for a greased baking tray to help prevent sticking.
12. Can I use baking parchment?
Yes. Suitable oven-safe baking parchment is a convenient alternative to greasing the tray.
13. Why are my rolls dense?
Insufficient kneading, too much flour or inadequate rising time can contribute to dense bread.
14. Can I make smaller rolls?
Yes. Divide the dough into more portions, reduce the filling in each and begin checking for doneness earlier.
15. How do I know when the rolls are baked?
The bread should be deeply golden, puffed and cooked through rather than sticky or raw inside.
16. Can I replace the milk with water?
Yes, although water will produce a somewhat different flavour and texture. Milk contributes to the richness of the original dough.
17. Can I use plant-based milk?
Unsweetened plant-based milk may work as a substitution, although the flavour, browning and softness can vary.
18. Can I make the rolls ahead of time?
Yes. Bake them in advance, refrigerate safely and reheat before serving.
19. Can I freeze the baked rolls?
Yes. Wrap cooled rolls well and freeze for up to 2–3 months for best quality.
20. What is the best way to reheat them?
A moderate oven is ideal for warming the filling while maintaining a pleasant bread texture.
21. Can I add herbs to the dough?
Yes. Finely chopped herbs or a little dried seasoning can be added as an optional variation.
22. Can I serve these rolls cold?
Yes, if they have been stored safely, but the cheese filling is softer and more enjoyable when warm.
Cheesy Stuffed Bread Rolls Recipe Card
Description: Soft homemade yeast bread rolls stuffed with mozzarella and cheddar, brushed with egg and baked until fluffy and golden.
- Category: Bread and Savoury Snacks
- Method: Oven Baking
- Active Preparation: Approximately 25 minutes
- First Rise: Approximately 1 hour
- Second Rise: 20–30 minutes
- Cook Time: 18–22 minutes
- Total Time: Approximately 2 hours 5–20 minutes
- Yield: Approximately 8 rolls
- Oven: 375°F (190°C)
Ingredients
- 2 cups all-purpose flour
- 2¼ teaspoons instant yeast
- ¾ cup warm milk
- 2 tablespoons sugar
- 2 tablespoons melted butter
- 1 large egg
- ½ teaspoon salt
- 1½ cups shredded mozzarella cheese
- ½ cup shredded cheddar cheese
- 1 teaspoon garlic powder
- ½ teaspoon Italian seasoning
- 1 egg, beaten, for brushing
Instructions
- Mix the warm milk, sugar, yeast, melted butter, egg and salt in a large bowl.
- Gradually add the flour and mix until a soft dough forms.
- Knead for approximately 8 minutes until smooth and elastic.
- Cover the dough and leave to rise for approximately 1 hour, or until doubled in size.
- Divide the dough into equal portions and flatten each piece into a small round.
- Combine the mozzarella and cheddar and place a generous portion in the centre of each round.
- Bring the edges together, pinch firmly to seal and shape into smooth balls.
- Arrange on a greased baking tray with the seams underneath.
- Cover and allow to rise for another 20–30 minutes.
- Preheat the oven to 375°F (190°C). Brush the rolls with beaten egg and sprinkle with garlic powder and Italian seasoning.
- Bake for 18–22 minutes until puffed, deeply golden and thoroughly cooked.
- Allow to cool briefly before serving warm.
Recipe Notes
- Keep the dough soft and slightly tacky for fluffy rolls.
- Use low-moisture mozzarella for a more manageable filling.
- Seal every roll securely to reduce cheese leakage.
- For a cheese-covered finish, reserve some of the original filling mixture to sprinkle on top before baking.
- Store leftovers in the refrigerator and reheat thoroughly.
Hashtags: #CheesyBreadRolls #StuffedBread #HomemadeBread #CheeseLovers #EasyBaking
Final Thoughts
These cheesy stuffed bread rolls are a wonderful combination of fluffy homemade bread, creamy melted mozzarella and flavourful cheddar. With a little kneading, two gentle rises and a short time in the oven, you can make an inviting tray of golden rolls that are perfect for family meals, snacks or sharing with friends.
Try the recipe, save it for your next baking day and share your results in the comments. Follow our pages for more comforting homemade recipes and easy baking ideas.