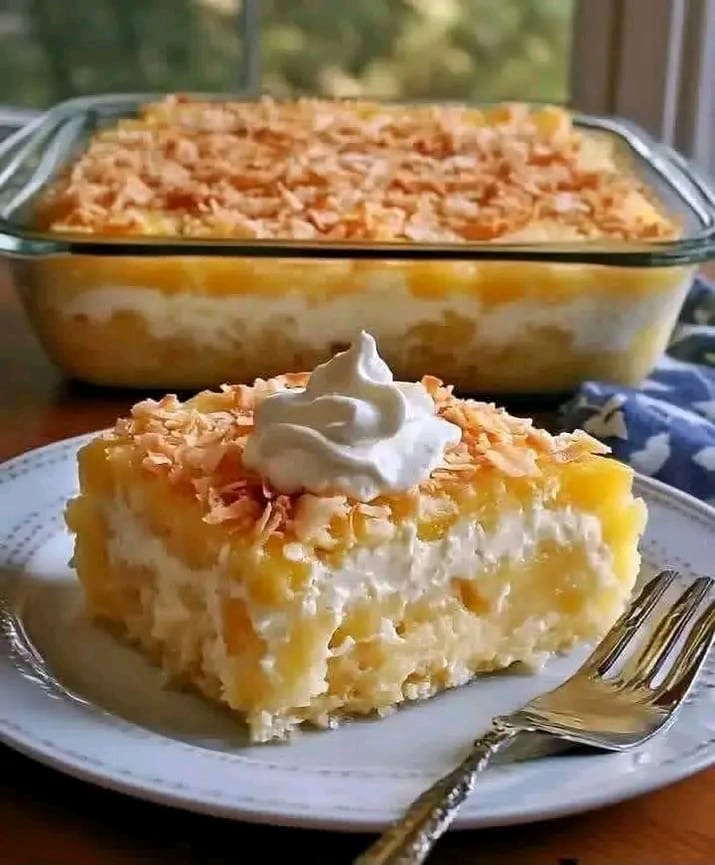
If you love a dessert that tastes like sunshine but does not require complicated baking skills, this easy Hawaiian pineapple cake is exactly what you need. It is soft, extra moist, layered with a cool cream cheese filling, studded with juicy pineapple, and finished with toasted coconut and a swirl of whipped cream. It looks like a bakery cake, but it comes together with simple pantry ingredients and one baking dish.
The cake stays tender because crushed pineapple bakes right into the batter. After it cools, a thick creamy layer is spread over the top, then golden toasted coconut adds crunch. Serve it chilled for the best texture. It is perfect for family dinners, potlucks, holidays, or anytime you want a make-ahead dessert that disappears fast.
Why You’ll Love This Pineapple Cake
There are plenty of reasons to keep this recipe in your regular rotation:
No fancy decorating skills required
Made with simple, affordable ingredients
Extra moist from crushed pineapple
Cool, creamy middle layer
Toasted coconut adds crunch and flavor
Beautiful when sliced
Perfect make-ahead dessert
Crowd-pleasing for potlucks and holidays
Easy to customize
Tastes even better the next day
The secret is baking the pineapple into the cake so the crumb stays juicy, then chilling the cream layer so every slice holds together cleanly.
Easy Hawaiian Pineapple Sunshine Cake Recipe
Ingredients
For the Cake
- 1 box yellow cake mix (about 15.25 oz / 432 g)
- 1 can (20 oz / 567 g) crushed pineapple in juice, undrained
- 3 large eggs
- â…“ cup vegetable oil
- 1 teaspoon vanilla extract
For the Cream Layer
- 8 oz (225 g) cream cheese, softened
- 1 cup powdered sugar
- 1 teaspoon vanilla extract
- 1 tub (8 oz / 225 g) whipped topping, thawed, or 2 cups freshly whipped cream
For the Topping
- 1 to 1½ cups sweetened shredded coconut, toasted
- Extra crushed pineapple or pineapple tidbits, optional
- Whipped cream, for serving
Optional Additions
For extra flavor, you can add:
- ½ teaspoon coconut extract in the cake batter
- 1 tablespoon pineapple juice extra in the cream layer
- A pinch of salt in the cream layer to balance sweetness
- Chopped pecans or macadamia nuts with the coconut
- Maraschino cherries on each slice
- A little lime zest over the cream
You can also brush the warm cake with a spoonful of reserved pineapple juice before adding the cream layer.
How to Make Hawaiian Pineapple Sunshine Cake
Step 1: Prepare the Pan and Oven
Preheat the oven to 350°F (175°C).
Grease a 9×13-inch (23×33 cm) glass baking dish. A glass dish works especially well because you can see the golden edges and it presents beautifully at the table.
Step 2: Make the Cake Batter
Add the yellow cake mix, the entire can of crushed pineapple with its juice, eggs, oil, and vanilla to a large mixing bowl.
Beat until the batter is smooth and well combined, about 1–2 minutes. Do not overmix. The batter will look looser than a regular cake batter because of the pineapple juice. That is what keeps the cake moist.
Step 3: Bake the Cake
Pour the batter into the prepared baking dish and spread it into an even layer.
Bake for 28–35 minutes, or until the top is golden and a toothpick inserted in the center comes out clean or with a few moist crumbs.
The cake should spring back lightly when touched. Do not overbake, or it will lose the soft texture you want.
Step 4: Cool Completely
Place the pan on a wire rack and let the cake cool completely.
This step is important. If the cake is even slightly warm, the cream layer will melt and slide.
For faster cooling, you can refrigerate the baked cake for 20–30 minutes after it is no longer hot.
Step 5: Make the Cream Layer
In a mixing bowl, beat the softened cream cheese until completely smooth.
Add the powdered sugar and vanilla and beat again until creamy and lump-free.
Fold in the whipped topping gently until the mixture is light, thick, and spreadable.
The cream should be fluffy but stable enough to slice later.
Step 6: Assemble the Cake
Spread the cream layer evenly over the cooled cake, going all the way to the edges.
If you like extra pineapple in every bite, spoon a thin layer of well-drained crushed pineapple or pineapple tidbits over the cream.
Step 7: Toast the Coconut
Add the shredded coconut to a dry skillet over medium-low heat.
Stir constantly until the flakes turn light golden brown and smell fragrant, about 3–6 minutes.
Watch it closely. Coconut goes from golden to burnt very quickly.
Let the coconut cool for a minute, then sprinkle it generously over the cream layer.
Step 8: Chill Before Slicing
Cover the cake and refrigerate for at least 2 hours, preferably 4 hours or overnight.
Chilling firms the cream layer, makes cleaner slices, and lets the pineapple flavor settle into the cake.
Just before serving, add a dollop of whipped cream to each slice.
The Best Way to Keep the Cake Soft and Creamy
Keep the finished cake covered in the refrigerator.
The pineapple keeps the crumb moist, and the cream layer stays thick when cold.
If you leave it out at room temperature for too long, the topping can soften and the slices will be messier.
For the best presentation, cut squares with a sharp knife wiped clean between slices.
How to Serve Hawaiian Pineapple Cake
This cake is wonderful chilled, straight from the refrigerator.
For Family Dessert
Serve squares with:
- A swirl of whipped cream
- Extra toasted coconut
- Fresh pineapple pieces
- A maraschino cherry
For Potlucks and Gatherings
Cut the cake into neat squares and keep the pan cold until serving time. It travels well and does not need last-minute frosting.
For Holidays and Summer Tables
Pair it with:
- Fresh fruit
- Iced coffee
- Vanilla ice cream
- Coconut ice cream
- A light citrus drink
You can also serve smaller pieces after a heavy meal because the cake is rich but refreshing.
Pina Colada Variation
Want a more tropical version?
Add to the cake batter:
- ½ teaspoon coconut extract
- 2 tablespoons rum or 1 teaspoon rum extract
Then fold 2 tablespoons well-drained crushed pineapple into the cream layer and finish with toasted coconut.
The flavor will remind you of a pina colada, without being heavy.
From-Scratch Cake Variation
If you prefer not to use a cake mix, use this simple yellow cake base:
- 2 cups all-purpose flour
- 1½ cups sugar
- 2 teaspoons baking powder
- ½ teaspoon salt
- ½ cup vegetable oil
- 3 large eggs
- 1 teaspoon vanilla
- 1 can (20 oz) crushed pineapple in juice, undrained
Mix the dry ingredients, then add the wet ingredients and pineapple. Bake as directed, adding a few extra minutes if needed.
Cream Cheese Pudding Variation
For an even thicker middle layer, beat together:
- 8 oz cream cheese, softened
- 1 box (3.4 oz) instant vanilla or coconut pudding mix
- 1 cup cold milk
- 1 tub whipped topping
This version slices especially cleanly and holds up well overnight.
Tips for Perfect Pineapple Cake Every Time
- Do Not Drain the Pineapple for the Cake. The juice is what makes the crumb extra moist. Use the whole can in the batter.
- Cool the Cake Completely. A warm cake will melt the cream layer and ruin the look of the slice.
- Soften the Cream Cheese Properly. Cold cream cheese leaves lumps. Let it sit at room temperature until it beats smooth.
- Toast the Coconut Yourself. Pre-toasted coconut is convenient, but freshly toasted coconut has better color, crunch, and aroma.
- Chill Before Serving. This is not a cake you want to cut hot. Cold slices show the layers clearly.
- Don’t Overbake. Pull the cake as soon as the center is set. Overbaking dries out even a pineapple cake.
- Use a Glass Dish if Possible. It heats evenly and looks beautiful on the table, just like the classic version of this dessert.
Can I Make This Cake Ahead of Time?
Yes. This is an excellent make-ahead dessert.
Bake the cake one day, add the cream and coconut, then refrigerate overnight. The texture is even better the next day because the pineapple flavor has more time to settle into the crumb.
You can make it up to 24 hours in advance. Add the final whipped cream dollops just before serving so they stay tall and fresh.
Can I Freeze Hawaiian Pineapple Cake?
Yes, with a few precautions.
Freeze the baked cake layer alone, tightly wrapped, for up to 2 months. Thaw in the refrigerator, then add the cream layer and coconut.
You can freeze fully assembled slices, but the cream layer may weep slightly after thawing. For the best texture, freeze the cake base only.
How to Store Leftover Cake
Store leftover cake covered in the refrigerator for 3–4 days.
Keep it in the original baking dish with plastic wrap or a tight lid so the coconut does not dry out and the cream layer does not absorb fridge odors.
If the top looks a little dry after a day, add a fresh spoonful of whipped cream when serving.
Frequently Asked Questions
Can I use fresh pineapple instead of canned?
Canned crushed pineapple is best for this recipe because the juice is consistent and the fruit is already broken down. If you use fresh pineapple, chop it very finely and add about ¾ cup pineapple juice so the cake stays moist.
Can I use white cake mix or pineapple cake mix?
Yes. Yellow cake mix gives the classic golden color. White cake mix works too. Pineapple cake mix makes the flavor even stronger.
Why is my cake soggy?
Too much extra liquid or underbaking can make the center wet. Use one standard 20-ounce can of crushed pineapple and bake until the center is set.
Why is my cream layer runny?
The cream cheese may have been too warm, or the whipped topping was overmixed. Beat the cream cheese first until thick, then fold the topping in gently. Chill before slicing.
Can I leave off the coconut?
Yes. The cake is still delicious with only whipped cream and pineapple on top. Toasted nuts are a good substitute if you want crunch without coconut.
Can I make this in a round pan?
Yes, but a 9×13 pan is the classic shape and gives the look of the sliced square with visible layers. Two 9-inch round pans can be used; start checking for doneness a few minutes earlier.
Final Thoughts
Hawaiian pineapple sunshine cake is one of those desserts that looks impressive and tastes like it took much more work than it did. The pineapple keeps the cake soft, the cream layer makes every bite cool and rich, and the toasted coconut adds the golden finish that makes people ask for the recipe.
Keep it simple with cake mix and canned pineapple, or dress it up with a pina colada twist and a swirl of whipped cream on each square. Either way, it is the kind of dessert that belongs on a weekend table, a holiday spread, or any time you want something bright, creamy, and easy.
Once you make it, you may find yourself keeping a box of yellow cake mix and a can of pineapple in the pantry just for this.
Printable Recipe
Easy Hawaiian Pineapple Sunshine Cake
Prep Time: 20 minutes
Bake Time: 28–35 minutes
Chill Time: 2–4 hours
Total Time: About 3 hours
Servings: 12–15 squares
Cake
- 1 box yellow cake mix
- 1 can (20 oz) crushed pineapple in juice, undrained
- 3 large eggs
- â…“ cup vegetable oil
- 1 teaspoon vanilla extract
Cream Layer
- 8 oz cream cheese, softened
- 1 cup powdered sugar
- 1 teaspoon vanilla extract
- 8 oz whipped topping, thawed
Topping
- 1 to 1½ cups shredded coconut, toasted
- Whipped cream, for serving
Instructions
- Preheat oven to 350°F (175°C). Grease a 9×13-inch baking dish.
- Mix cake mix, undrained crushed pineapple, eggs, oil, and vanilla until smooth.
- Pour into the pan and bake 28–35 minutes, until golden and set.
- Cool the cake completely.
- Beat cream cheese until smooth. Add powdered sugar and vanilla, then fold in whipped topping.
- Spread the cream layer over the cooled cake.
- Toast the coconut in a dry skillet until golden. Sprinkle over the top.
- Refrigerate at least 2 hours.
- Slice and serve with a dollop of whipped cream.
Pro Tip: For the cleanest bakery-style slices, chill the cake overnight and wipe the knife between cuts. The softer you keep the cake layer and the colder you keep the cream, the better every square will look.