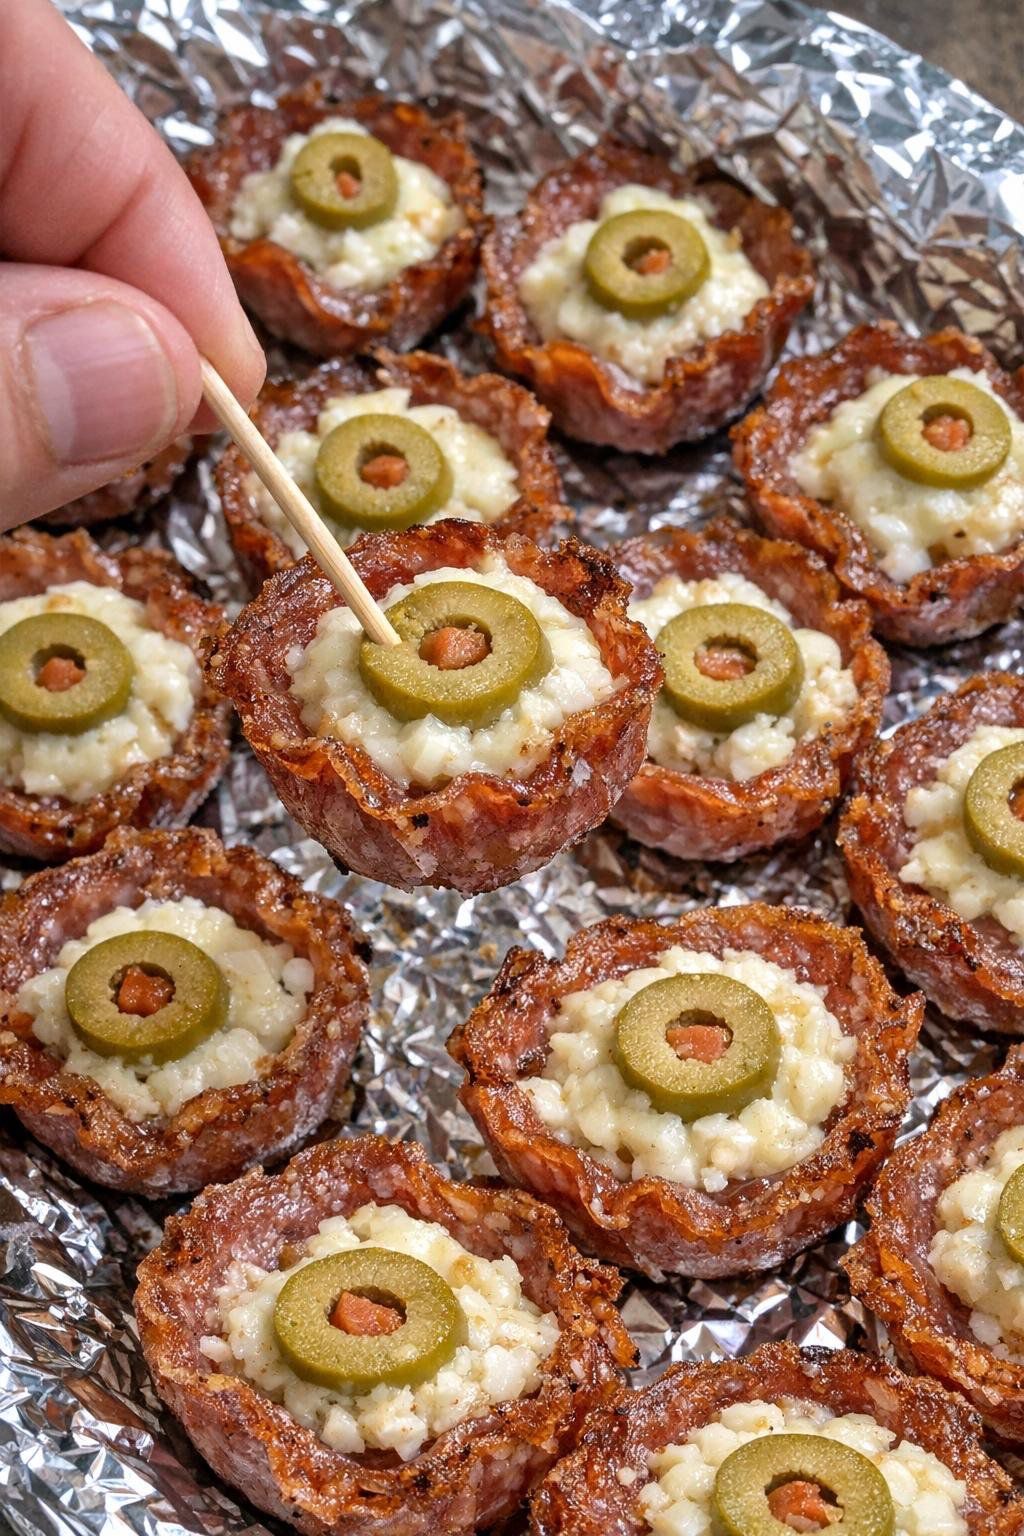
These Crispy Salami Cheese Cups with Green Olives are a simple bite-sized appetizer made with crispy salami shells, a warm creamy cheese filling, and sliced green olives on top. They are savory, cheesy, slightly salty, and perfectly sized for serving with toothpicks at parties.
The salami becomes crisp around the edges while baking, creating a little edible cup that holds the melted cheese mixture. The green olive adds a tangy finish that balances the richness of the meat and cheese.
These mini appetizers are perfect for game day, holiday parties, family gatherings, potlucks, New Year’s celebrations, or an easy weekend snack.
Why You’ll Love These Salami Cups
This recipe delivers plenty of flavor from only a few basic ingredients.
Instead of preparing pastry dough, slices of salami become the appetizer cups themselves. Once baked in a mini muffin pan, they develop crisp edges and hold their shape.
The creamy cheese filling contrasts beautifully with the crispy meat, while green olives provide acidity and a salty bite.
Another advantage is portion size. Each cup is already an individual serving, so guests can simply grab one with a toothpick.
Ingredients
For approximately 24 mini cups:
- 24 large slices salami
- 8 ounces (225 g) cream cheese, softened
- 1 cup shredded mozzarella cheese
- ½ cup finely grated Parmesan cheese
- 2 garlic cloves, minced
- ½ teaspoon garlic powder
- ½ teaspoon Italian seasoning
- ¼ teaspoon black pepper
- ¼ teaspoon smoked paprika
- 12 pimento-stuffed green olives, sliced
- 1 tablespoon finely chopped parsley, optional
- Pinch of red pepper flakes, optional
Choosing the Salami
Choose round slices large enough to fit inside the cavities of a mini muffin pan.
Thin-to-medium slices work especially well because they become crisp without being excessively tough.
Very thick salami may remain softer and greasier.
Pepperoni can also work, although its smaller diameter means you may need a smaller muffin pan or overlapping slices.
Prepare the Green Olives
Pimento-stuffed green olives are an excellent choice because their tangy, salty flavor complements the cheese and salami.
Drain the olives thoroughly.
Place them on paper towels and pat away excess brine.
Slice each olive into rings.
Removing excess moisture is important because too much olive brine can make the cheese filling watery.
Make the Creamy Cheese Filling
Place softened cream cheese in a mixing bowl.
Add mozzarella, Parmesan, minced garlic, garlic powder, Italian seasoning, black pepper, and optional red pepper flakes.
Mix until evenly combined.
The filling should be thick rather than runny.
Avoid adding extra salt before tasting the mixture. Salami, Parmesan, and olives already contain significant salt.
How to Make the Salami Cups
Preheat your oven to 375°F (190°C).
Lightly grease a mini muffin pan if necessary.
Place one salami slice into each muffin cavity.
Gently press the center downward so the edges rise around the sides, creating a small cup.
Don’t worry if the edges fold slightly. Those folds become crisp during baking and give the appetizers their rustic appearance.
Pre-Bake for Crispier Cups
For an especially crispy result, bake the empty salami cups for approximately 5–7 minutes before adding the cheese.
During this first bake, some fat will render from the salami.
Carefully remove the pan and blot away excessive grease with paper towels.
This small extra step helps prevent greasy or soft bottoms.
Fill the Cups
Place approximately 1–2 teaspoons of cheese filling into each partially baked salami cup.
Don’t completely overfill them because the cheese will soften and expand slightly as it heats.
Return the muffin pan to the oven.
Bake for another 6–8 minutes, or until the cheese is hot and melted and the salami edges look crisp.
Add the Green Olives
During the final few minutes of baking, place one green olive ring over each cheese-filled cup.
Press it gently into the warm cheese.
Return the tray to the oven just long enough to warm the olives and finish melting the cheese.
The green olive should remain clearly visible on top.
How to Get Extra-Crispy Edges
The secret is removing some of the salami’s rendered fat.
If the slices are sitting in a pool of grease, they are more likely to remain soft than become crisp.
Pre-baking the salami before filling also helps tremendously.
After baking, transfer the finished cups to a paper-towel-lined plate for approximately one minute before arranging them on your serving platter.
Garlic Parmesan Variation
For stronger garlic flavor, increase the fresh garlic slightly and add extra Parmesan.
You can also sprinkle a tiny amount of Parmesan over each cup before the final bake.
The cheese around the edges will become golden and slightly crispy.
Finish with chopped parsley for freshness.
Spicy Salami Cups
These appetizers are easy to turn spicy.
Add crushed red pepper flakes or finely diced jalapeño to the cheese filling.
You can also replace mozzarella with pepper Jack.
Top each cup with a jalapeño slice instead of an olive—or use both.
A small drizzle of spicy mayonnaise can also be added immediately before serving.
Pizza-Style Salami Cups
For a pizza-inspired variation, place approximately ½ teaspoon of thick marinara sauce inside each salami cup.
Add mozzarella and Parmesan.
Top with a sliced olive.
Keep the amount of tomato sauce very small because excess liquid can soften the crispy salami shell.
Cream Cheese and Cheddar Version
Mozzarella creates a mild, stretchy filling, but cheddar gives the cups a stronger flavor.
Try combining:
- 8 ounces cream cheese
- ½ cup cheddar
- ½ cup mozzarella
- ¼ cup Parmesan
This combination creates a rich filling that works particularly well with green olives.
Bacon and Cheese Variation
For an even more indulgent appetizer, add a small amount of finely crumbled cooked bacon to the cheese mixture.
Because both bacon and salami are salty, avoid adding additional salt.
You can also use the bacon only as a garnish, sprinkling a few crispy pieces over each cup after baking.
What to Serve With Salami Cheese Cups
These appetizers have plenty of flavor on their own, but they can also be included on a larger party platter.
Serve them alongside:
- Crackers
- Fresh vegetables
- Pickles
- Cherry tomatoes
- Cheese cubes
- Grapes
- Toasted bread
- Roasted nuts
- Creamy dipping sauce
They also pair well with a fresh salad when you want to serve them as part of a casual lunch.
Dipping Sauce Ideas
Although these cups don’t require sauce, a small dipping bowl can make the platter more interesting.
Try creamy garlic sauce, ranch dressing, honey mustard, marinara, or spicy mayonnaise.
A tangy sauce generally works best because the salami and cheese are already rich.
Perfect Game-Day Finger Food
These mini salami cups are particularly convenient for game-day parties.
They can be picked up using a toothpick, don’t require cutting, and can be prepared in large batches.
Arrange them on a large platter and place a bowl of dipping sauce in the center.
If you’re feeding a crowd, simply double or triple the recipe and bake the cups in batches.
Make-Ahead Instructions
You can prepare the cheese filling several hours ahead.
Cover and refrigerate it until needed.
The olives can also be drained, dried, and sliced ahead of time.
For the best crispy texture, however, bake the salami cups close to serving time.
If they sit refrigerated after baking, the salami will gradually lose some crispness.
How to Store Leftovers
Place cooled leftovers in an airtight container and refrigerate promptly.
For best quality, enjoy them within approximately 3–4 days.
Because these contain cooked meat and dairy, don’t leave them sitting at room temperature for extended periods.
Best Way to Reheat
The oven or air fryer is the best choice.
Reheat at approximately 350°F (175°C) until the centers are hot and the salami edges become crisp again.
Avoid overheating because the cheese can separate and release excess oil.
A microwave works in a hurry, but it will usually make the salami softer.
Common Mistakes to Avoid
Using very wet olives: Drain and dry them thoroughly.
Overfilling the cups: Leave a little room because the cheese softens during baking.
Skipping the pre-bake: Pre-baking helps create much crispier salami edges.
Adding too much salt: Salami, Parmesan, and olives already provide plenty.
Leaving rendered grease in the muffin pan: Carefully remove excessive fat when possible.
Overbaking: Salami can become hard if baked too long.
Frequently Asked Questions
Can I use pepperoni instead of salami?
Yes. Large pepperoni slices work particularly well.
What cheese melts best?
Mozzarella provides excellent melt, while cream cheese keeps the filling creamy. Parmesan adds stronger savory flavor.
Can I use black olives?
Absolutely. Black olives have a milder flavor and work well in this recipe.
Can I make these without cream cheese?
Yes. You can use primarily mozzarella and Parmesan, although the filling will be stretchier rather than creamy.
Can I prepare them in an air fryer?
Yes. Use a suitable small mold or silicone muffin cups that fit your air fryer and cook in batches.
Why did my salami cups turn greasy?
Salami naturally releases fat as it cooks. Pre-baking the shells and carefully removing excess rendered fat before adding the filling helps.
Final Thoughts
These Crispy Salami Cheese Cups with Green Olives turn a few simple ingredients into an eye-catching party appetizer.
The salami creates crispy, savory edges, the center stays warm and cheesy, and the green olive adds just enough tanginess to balance each bite.
Serve them warm with toothpicks for an easy appetizer that works especially well for game days, holidays, potlucks, and family gatherings. 🫒🧀🔥