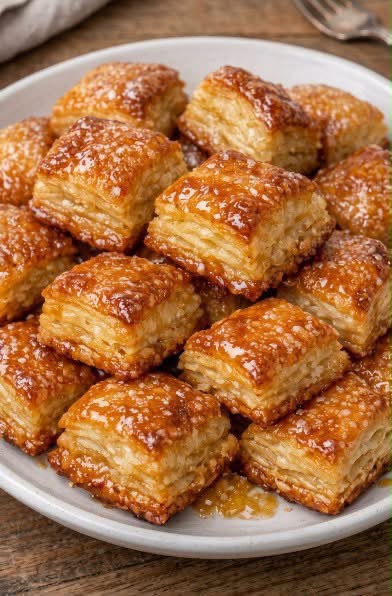
Honey Butter Puff Pastry Bites
Golden, buttery and irresistibly flaky, these honey butter puff pastry bites are the kind of simple homemade treat that makes an ordinary afternoon feel special. Each little square has delicate, crisp pastry layers beneath a glossy coating of warm honey, melted butter and brown sugar.
The first bite offers a satisfying crunch, followed by tender, airy layers and a rich sweetness that gently melts across the tongue. A hint of vanilla and cinnamon gives the glaze a comforting bakery-style aroma without overpowering the delicate flavour of the puff pastry.
One of the best things about this recipe is its simplicity. There is no need to prepare homemade pastry, knead dough or wait for anything to rise. A sheet of ready-made puff pastry does most of the work, transforming into beautifully golden bites in the oven.
These pastries are ideal for weekend breakfasts, afternoon tea, family gatherings, holiday dessert platters or a sweet treat alongside your favourite hot drink. Their small size also makes them convenient for sharing.
The honey butter glaze is what makes these pastries particularly appealing. Brushed onto the pastry while it is still warm, it creates a shiny, lightly sticky finish that contrasts beautifully with the crisp layers underneath.
If you enjoy easy baking recipes that deliver attractive results without complicated preparation, these honey butter puff pastry bites deserve a place in your collection. With a few everyday ingredients and less than half an hour of preparation and baking, you can create a delicious homemade pastry treat.
Recipe Overview
- Recipe: Honey Butter Puff Pastry Bites
- Category: Dessert, sweet snack, pastry
- Style: Homemade bakery-style treat
- Preparation time: Approximately 10 minutes
- Baking time: 15–18 minutes
- Resting time: Approximately 3–5 minutes
- Total time: Approximately 28–33 minutes
- Yield: Approximately 16–24 bites, depending on size
- Difficulty: Easy
- Oven temperature: 400°F (200°C)
- Cooking method: Oven baking
- Main ingredients: Puff pastry, butter, honey, brown sugar, vanilla and cinnamon
The preparation time and yield are practical estimates because puff pastry sheets vary in size and thickness. The original baking temperature and baking time remain unchanged.
Why You’ll Love This Recipe
- Simple ingredients: The recipe uses one sheet of puff pastry and a handful of familiar baking ingredients.
- Beautiful flaky texture: Ready-made puff pastry develops light, airy layers and crisp golden edges in a hot oven.
- Sweet buttery flavour: Honey, brown sugar and melted butter create a rich but straightforward glaze.
- Quick preparation: The pastries require very little hands-on work before baking.
- Ideal for sharing: Bite-sized portions are convenient for parties, family gatherings and afternoon tea.
- Easy to customise: Optional additions such as citrus zest, nuts or spices can introduce new flavours.
- Attractive presentation: The glossy honey finish makes the pastries look inviting without elaborate decoration.
- Delicious served warm: Freshly baked pastry offers an especially enjoyable combination of crisp layers and soft, buttery centres.
Ingredients
These quantities follow the original supplied recipe.
For the Puff Pastry
- 1 sheet puff pastry, thawed
- 1 egg, beaten, for brushing
- 1 tablespoon coarse sugar, optional
For the Honey Butter Glaze
- 3 tablespoons unsalted butter, melted
- 3 tablespoons honey
- 2 tablespoons brown sugar
- 1 teaspoon vanilla extract
- ½ teaspoon cinnamon
Using good-quality puff pastry and a pleasantly flavoured honey will make a noticeable difference to the finished pastries. The glaze is naturally sweet, so no additional sweetener is necessary for the original recipe.
Ingredient Notes
Puff Pastry
Ready-made puff pastry is the foundation of this dessert. During baking, moisture trapped between the pastry layers turns into steam, helping those layers expand and separate.
Choose a sheet that is fully thawed according to its packaging instructions but still feels cool to the touch. Pastry that becomes too warm or sticky can be more difficult to cut neatly and may rise less evenly.
Unsalted Butter
Melted unsalted butter gives the glaze a smooth, rich flavour and helps it spread evenly across the warm pastry.
Unsalted butter is particularly useful because it allows the sweetness of the honey to remain the dominant flavour. Salted butter can be used as an optional substitution, although the final taste will be slightly different.
Honey
Honey contributes sweetness, aroma and a naturally glossy finish. A mild honey produces a delicate flavour, while a darker variety can make the glaze taste more robust.
Use a pourable honey so it mixes easily with the melted butter. If your honey has crystallised, warm it gently until fluid before measuring.
Brown Sugar
Brown sugar introduces a gentle caramel-like flavour that complements the butter and honey.
Because the original glaze is mixed rather than cooked, some sugar grains may remain. Stirring thoroughly and allowing the sugar to sit briefly in the warm mixture can help soften them.
Vanilla Extract
Vanilla adds a rounded bakery-style aroma. It brings the individual glaze ingredients together and helps the pastries taste more complete.
Cinnamon
Just half a teaspoon of cinnamon provides a subtle warmth. It works particularly well alongside honey and brown sugar.
Egg Wash
A lightly beaten egg helps the pastry tops develop an appealing golden colour. Apply only a thin coating so it does not run heavily down the cut edges and interfere with the pastry layers.
Coarse Sugar
Coarse sugar is optional. Sprinkled over the glazed pastries, it provides a little sparkle and extra crunch. The pastries are already sweet enough without it.
Equipment You’ll Need
- Oven
- Large baking tray
- Baking parchment
- Sharp knife or pastry cutter
- Rolling pin
- Small mixing bowl
- Small whisk or spoon
- Pastry brush
- Measuring spoons
- Wire cooling rack, optional
A sharp knife is particularly helpful for puff pastry because it cuts through the dough without compressing the delicate layers unnecessarily.
Step-by-Step Instructions
Step 1: Preheat the Oven
Preheat your oven to 400°F (200°C). Line a large baking tray with baking parchment to prevent sticking and make cleaning easier.
Allow the oven to reach the correct temperature before baking. Puff pastry rises most effectively when it enters a properly heated oven.
Step 2: Prepare the Puff Pastry
Place the thawed puff pastry sheet on a clean, lightly prepared work surface.
Roll it out slightly to even the thickness without flattening it excessively. The aim is to create a consistent sheet while preserving the layers responsible for the pastry’s characteristic rise.
Step 3: Cut into Small Squares
Using a sharp knife or pastry cutter, cut the puff pastry into small, even squares.
Try to keep the pieces similar in size so that they bake at approximately the same rate. Depending on the dimensions of your sheet, you may obtain around 16–24 pieces.
Step 4: Arrange on the Baking Tray
Transfer the pastry squares to the prepared baking tray, leaving a little space between each one.
Avoid crowding the tray. Puff pastry expands during baking, and sufficient room encourages more even browning.
Step 5: Brush with Egg
Lightly brush the tops with the beaten egg.
Use a small amount and avoid letting it collect along the cut sides. A thin, even egg wash helps create the attractive golden surface seen on well-baked pastries.
Step 6: Bake Until Golden and Crisp
Place the tray in the preheated oven and bake for 15–18 minutes.
The pastry should become visibly puffed, deeply golden and crisp. Watch the pastries towards the end of baking because smaller pieces may brown quickly.
If the pastries are still pale or look damp between the layers, check whether they need a little more time, accounting for differences between ovens and pastry brands.
Step 7: Prepare the Honey Butter Glaze
While the pastries bake, combine the melted unsalted butter, honey, brown sugar, vanilla extract and cinnamon in a small bowl.
Stir thoroughly until the ingredients are well distributed and the glaze has a smooth, pourable consistency.
It is normal for a little brown sugar texture to remain in this uncooked glaze.
Step 8: Glaze the Warm Pastries
As soon as the puff pastry comes out of the oven, generously brush the warm honey butter glaze over the tops of each piece.
Work carefully, as the tray and pastry will be hot. The warmth of the freshly baked pastry helps the glaze spread into a shiny, even coating.
Step 9: Add Optional Coarse Sugar
If desired, sprinkle the pastries with the tablespoon of coarse sugar while the glaze is still sticky.
This optional finishing touch creates a sparkling appearance and adds a delicate sugary crunch.
Step 10: Rest and Serve
Allow the pastries to rest for a few minutes so the glaze settles and becomes glossy and slightly sticky.
Serve warm, when the layers are still crisp and the honey butter topping is soft and aromatic.
How to Create Beautiful Flaky Pastry Layers
The appeal of these honey butter puff pastry bites comes largely from their texture. A successful batch should have distinct layers, golden tops and edges that break apart delicately when bitten.
Keep the Pastry Cool
Puff pastry contains layers of dough separated by fat. When the dough is cool, these layers remain more distinct. During baking, steam pushes the layers apart, creating the familiar light and flaky structure.
If the pastry becomes sticky while you are preparing it, place it in the refrigerator briefly before continuing. Avoid working it excessively.
Use Clean, Sharp Cuts
A dull knife can press the pastry layers together, particularly around the edges. A sharp knife makes cleaner cuts and helps the individual squares expand more evenly.
Cut straight down whenever possible instead of dragging the blade repeatedly through the dough.
Avoid Over-Rolling
The original recipe calls for rolling the pastry slightly. This is enough to smooth any uneven areas without sacrificing the structure of the dough.
Pressing too firmly or making the sheet excessively thin can reduce the height and airy texture of the finished bites.
Start with a Hot Oven
The original temperature of 400°F (200°C) is suitable for producing a golden, puffed finish.
Putting pastry into an oven that has not fully preheated can allow some of its fat to melt before sufficient steam develops, resulting in a flatter or greasier texture.
How to Make the Perfect Honey Butter Glaze
The glaze brings together five straightforward ingredients: butter, honey, brown sugar, vanilla and cinnamon. Each contributes something different to the finished dessert.
Butter provides richness, honey creates the glossy finish, brown sugar contributes caramel notes, vanilla rounds out the sweetness and cinnamon adds gentle warmth.
Use Melted, Not Boiling, Butter
Melt the butter gently. It should be liquid and warm enough to combine with the honey, but it does not need to be boiling.
Extremely hot butter is unnecessary for this recipe and may make the mixture harder to handle safely.
Mix Thoroughly
Stir the glaze until the butter and honey are evenly distributed. Because the mixture contains both fat and water-based ingredients, it can separate slightly while standing.
Give it another quick stir immediately before brushing the pastries.
Apply While the Pastry Is Warm
Timing is important. Warm pastries accept the glaze more easily than completely cold ones.
Brush the tops generously, but try not to saturate the undersides. This helps preserve some of the crispness that makes puff pastry so enjoyable.
Allow a Short Rest
The glaze will not set into a hard sugar shell. Instead, it settles into a glossy, lightly sticky coating.
Letting the bites rest for a few minutes makes them easier to handle and allows the warm flavours to come together.
How to Keep Honey Butter Puff Pastry Crisp
Honey butter puff pastry bites taste best when there is a noticeable contrast between the crisp pastry layers and the soft glaze.
The most important step is baking the pastry fully before adding the topping. Properly baked pieces should have a golden surface and a light, airy interior rather than a dense, doughy centre.
Avoid adding the honey glaze before baking in the original recipe. Honey and brown sugar can darken quickly under high heat, and the extra moisture may affect the pastry’s rise.
After baking, coat mainly the tops of the pieces. If the pastries sit in a large pool of glaze, their lower layers can soften more quickly.
For the best texture, serve them shortly after glazing. Honey naturally attracts moisture, so even properly baked pastry will gradually lose some crispness during storage.
Expert Baking Tips
- Thaw the pastry correctly. Follow the manufacturer’s instructions so the sheet unfolds without cracking but remains cool.
- Work efficiently. Prepare the pastry before it becomes overly soft or sticky.
- Use a sharp cutter. Clean edges allow the pastry layers to separate more freely.
- Cut even portions. Uniform pieces produce more consistent baking results.
- Leave space between squares. This allows hot air to circulate and the pastries to expand.
- Apply a light egg wash. Heavy egg wash can drip down the sides and partially seal the layers.
- Preheat completely. A properly heated oven encourages a good initial rise.
- Use the middle oven shelf. This generally provides balanced heat for even baking.
- Watch for deep golden colour. Appearance is an important indication of doneness, alongside the original baking time.
- Stir the glaze again before using. This redistributes the butter and honey if they have begun to separate.
- Brush rather than soak. A generous top coating gives flavour without unnecessarily softening the pastry base.
- Serve freshly baked. These bites have their best flaky texture soon after leaving the oven.
Common Mistakes to Avoid
1. Using Overly Warm Puff Pastry
If the pastry feels greasy and sticky before baking, the fat layers may become less distinct. Keep the dough cool and refrigerate briefly when necessary.
2. Rolling the Dough Too Thin
Over-rolling can compress the delicate layers and reduce the finished pastry’s height. Flatten only enough to create an even sheet.
3. Cutting Uneven Squares
Very small pieces may brown before larger pieces finish baking. Try to maintain a consistent size throughout the tray.
4. Crowding the Baking Tray
Pastries placed too close together may touch as they expand. Leave a small gap around each square.
5. Using Too Much Egg Wash
Egg wash that drips down the sides can stick some pastry layers together. Brush the tops lightly.
6. Baking Before the Oven Is Ready
A cool oven may prevent the pastry from rising properly. Always preheat to the specified temperature before placing the tray inside.
7. Removing the Pastry Too Early
Pale pastry can have a soft, underbaked centre. Look for a deeply golden surface and crisp texture rather than relying on the timer alone.
8. Adding Too Much Glaze Underneath
Excess glaze pooling beneath the pastry can soften its crisp base. Focus the coating on the top surface.
9. Storing While Still Warm
Closing warm pastries in an airtight container traps steam and encourages condensation. Allow them to cool before storage.
Optional Variations
The following suggestions are alternatives to the original recipe. They are not additional required ingredients.
1. Honey Almond Pastry Bites
Sprinkle a small amount of finely chopped toasted almonds over the glazed pastries. The nuts introduce an extra crunchy texture and a gentle roasted flavour.
2. Lemon Honey Pastries
Add a little finely grated lemon zest to the finished honey butter glaze for a fresh citrus aroma.
3. Orange Cinnamon Bites
Mix a little orange zest into the glaze. Orange complements cinnamon and honey especially well.
4. Maple Butter Pastries
For an alternative flavour, replace the honey with maple syrup in equal volume. The glaze will be less distinctly honey-flavoured and may have a slightly different consistency.
5. Chocolate Drizzle Bites
After the glazed pastries have cooled slightly, add a thin drizzle of melted dark chocolate for a richer dessert-style finish.
6. Cardamom Honey Pastries
Replace part of the cinnamon with a small pinch of ground cardamom. Its fragrant flavour gives the pastries a different aromatic character.
7. Pecan Honey Pastries
Add finely chopped toasted pecans after glazing. Their buttery, nutty flavour pairs naturally with the brown sugar and honey.
8. Lightly Salted Honey Butter Bites
Finish the warm glazed pastries with a tiny pinch of flaky sea salt. This optional addition provides contrast to the sweetness.
Serving Suggestions
These pastries are versatile enough to serve as an informal snack or part of a more elaborate dessert spread.
With Tea or Coffee
Serve warm honey butter puff pastry bites alongside a cup of English breakfast tea, Earl Grey or freshly brewed coffee. The pastries’ sweetness pairs especially well with a drink that is not heavily sweetened.
As a Brunch Treat
Arrange the bites on a serving platter with fresh berries, sliced apples or citrus fruit. The fruit provides a refreshing contrast to the rich glaze.
With Vanilla Ice Cream
For a simple plated dessert, place a few warm bites beside a small scoop of vanilla ice cream. The temperature contrast makes the dish particularly appealing.
With Fresh Strawberries
Strawberries bring brightness and gentle acidity, helping balance the sweetness of the honey butter topping.
For Holiday Dessert Platters
Arrange the bites on a large plate alongside other small baked treats. Their golden colour and glossy finish make them attractive for festive gatherings.
As an Afternoon Snack
Enjoy one or two pastries while they are still slightly warm. Their small size makes them convenient for a quick homemade sweet treat.
Storage and Reheating
Storing at Room Temperature
For the best quality, enjoy the pastries on the day they are baked. Once completely cool, store them in an airtight container in a cool, dry place for up to 1 day.
Because the glaze contains honey, the surface will remain slightly sticky and the pastry may soften over time.
Refrigeration
For longer storage, refrigerate the cooled pastries in a covered container for approximately 2–3 days.
Refrigeration may reduce their crispness, so gentle reheating is recommended before serving.
Reheating in the Oven
Place the pastries on a parchment-lined tray and warm in a preheated oven at approximately 160°C (320°F) for 4–6 minutes, checking frequently.
The honey glaze can become very hot and may darken if reheated excessively. Allow the pastries to cool briefly before eating.
Can You Use a Microwave?
A microwave can warm the pastries, but it is not the best option for preserving their texture. The pastry can become soft and chewy instead of crisp.
Freezing
For best results, freeze the unbaked pastry squares rather than the finished glazed bites. Arrange them on a tray until firm, then transfer them to a suitable freezer container.
Bake according to the puff pastry manufacturer’s instructions, allowing extra time if baking from frozen. Prepare the honey butter glaze fresh.
Making Ahead
You can cut the pastry squares ahead of time and keep them chilled on a covered tray until ready to bake, following the pastry manufacturer’s storage guidance.
The glaze can also be measured and prepared shortly before baking. If the mixture separates or the butter firms up, warm it gently and stir before brushing.
Food Safety Reminder
Keep thawed puff pastry refrigerated according to the packaging instructions, handle the egg wash carefully and refrigerate leftovers promptly when appropriate. Do not leave egg-washed, unbaked pastry at room temperature for extended periods.
Frequently Asked Questions
1. Can I use frozen puff pastry?
Yes. Thaw the pastry according to the package instructions before rolling and cutting. It should be flexible enough to handle but still cool.
2. Do I need to make puff pastry from scratch?
No. This recipe is specifically designed to use one sheet of ready-made puff pastry, making it convenient for everyday baking.
3. Can I use salted butter?
Yes, as an optional substitution. Salted butter will add a mild salty contrast to the honey glaze.
4. What type of honey is best?
A mild, pourable honey is an excellent choice. Stronger-flavoured honey can also be used if you prefer a more distinctive taste.
5. Why didn’t my puff pastry rise?
Common causes include overly warm dough, excessive rolling, compressed edges or an oven that was not sufficiently preheated.
6. Can I skip the egg wash?
Yes, although the pastries may not develop quite the same rich golden colour. The original recipe uses beaten egg for brushing.
7. Can I replace the brown sugar?
As an optional change, you can use a little white granulated sugar. However, brown sugar provides a warmer caramel-like flavour.
8. Is the cinnamon necessary?
Cinnamon contributes warmth, but it can be omitted if you prefer a simpler honey and vanilla flavour.
9. Can I make the pastries larger?
Yes. Larger pieces may require a longer baking time. Look for a golden, puffed exterior and a properly cooked centre.
10. Can I make them smaller?
Yes. Miniature bites work well for party platters, although they may bake faster. Watch them carefully towards the end.
11. Should I glaze the pastry before baking?
No. In the original method, the pastry is baked first and brushed with the honey butter mixture immediately afterwards.
12. Why is my glaze separating?
Butter and honey do not always remain perfectly blended while standing. Stir the mixture again just before brushing the pastries.
13. Why does my glaze feel grainy?
The brown sugar is stirred into the glaze rather than cooked until fully dissolved. Stirring it into warm butter and allowing it to sit briefly can soften some of the grains.
14. Can I make the glaze less sweet?
You can experiment with slightly less brown sugar or honey, but this changes the original recipe and may affect the glaze’s texture.
15. Can I use an air fryer?
Yes, as an alternative cooking method. Air fryer settings vary, so use the manufacturer’s puff pastry guidance and monitor the pastry closely. The original recipe is oven-baked.
16. Can I use homemade puff pastry?
Certainly. Homemade puff pastry can work beautifully, provided it is properly chilled and rolled to a suitable thickness.
17. Why are the bottoms soft?
The pastries may be underbaked, or too much glaze may have collected beneath them. Bake thoroughly and concentrate the glaze on the tops.
18. How do I keep the bites crisp?
Bake them until golden, avoid soaking them in glaze and serve them shortly after preparation. Stored glazed pastry naturally softens with time.
19. Can I prepare the pastry the night before?
Yes. Cut the squares in advance and refrigerate them appropriately, covered, until baking. Brush with egg just before placing them in the oven.
20. Can I freeze the finished pastries?
Freezing is possible, but the glaze and delicate flaky texture may deteriorate after thawing. Freezing unbaked pastry squares is generally preferable.
21. Are these pastries suitable for a party?
Yes. Their bite-sized shape makes them easy to arrange on a platter and convenient for guests to enjoy without cutting.
22. Can I add nuts?
Yes. Chopped toasted almonds or pecans can be sprinkled over the glaze as an optional variation.
23. How do I know when the pastry is fully baked?
The pieces should be visibly puffed, deeply golden and crisp, with no obvious raw or wet dough in the centres.
24. Can I double the recipe?
Yes. Double all the ingredient quantities and divide the pastry between baking trays as needed. Avoid overcrowding, and bake in batches if your oven cannot accommodate both trays evenly.
25. When do these pastries taste best?
They taste best shortly after baking, when the honey butter glaze is glossy and the pastry layers are still warm and crisp.
Complete Recipe Card
Honey Butter Puff Pastry Bites
Description: Golden, flaky puff pastry squares finished with a sweet honey butter glaze flavoured with brown sugar, vanilla and cinnamon.
- Course: Dessert or sweet snack
- Method: Baking
- Prep time: Approximately 10 minutes
- Cook time: 15–18 minutes
- Rest time: Approximately 3–5 minutes
- Total time: Approximately 28–33 minutes
- Yield: Approximately 16–24 bites
- Oven: 400°F (200°C)
Ingredients
- 1 sheet puff pastry, thawed
- 3 tablespoons unsalted butter, melted
- 3 tablespoons honey
- 2 tablespoons brown sugar
- 1 teaspoon vanilla extract
- ½ teaspoon cinnamon
- 1 egg, beaten, for brushing
- 1 tablespoon coarse sugar, optional
Instructions
- Preheat the oven to 400°F (200°C) and line a baking tray with baking parchment.
- Roll out the thawed puff pastry slightly, keeping its thickness even.
- Cut the pastry into small, evenly sized squares.
- Place the squares on the prepared tray, leaving some space between them.
- Brush the tops lightly with beaten egg.
- Bake for 15–18 minutes, until the pieces are puffed, deeply golden and crisp.
- While the pastry bakes, mix the melted butter, honey, brown sugar, vanilla extract and cinnamon in a small bowl.
- Immediately after removing the pastries from the oven, generously brush the warm glaze over each piece.
- Sprinkle with coarse sugar if desired.
- Rest for a few minutes until the glaze becomes glossy and slightly sticky.
- Serve warm to enjoy the flaky layers, crisp edges and sweet buttery honey finish.
Recipe Notes
- Keep puff pastry cool before baking for the best rise.
- Use a sharp knife to cut the squares without compressing the pastry layers.
- Do not allow the egg wash to pool along the edges.
- Brush with honey butter only after baking.
- Stir the glaze before applying if it has separated.
- Serve freshly baked for the best texture.
- Preparation time and yield are estimates and depend on the pastry sheet.
Relevant Hashtags
#HoneyButterPuffPastry #PuffPastryBites #EasyDessertRecipes #HomemadePastries #HoneyGlazedPastry
Share Your Honey Butter Puff Pastry Bites
These honey butter puff pastry bites prove that an impressive homemade dessert does not need complicated ingredients or hours of preparation. With their crisp golden layers and glossy cinnamon-scented honey glaze, they are a lovely treat to share with friends and family.
Have you tried this recipe? Share how your pastries turned out in the comments. Did you enjoy the original honey butter glaze, or did you experiment with a little citrus zest, chocolate or toasted nuts?
Save this recipe for your next baking day, share it with someone who loves sweet pastries and follow along for more easy homemade desserts, comforting family recipes and practical kitchen tips.