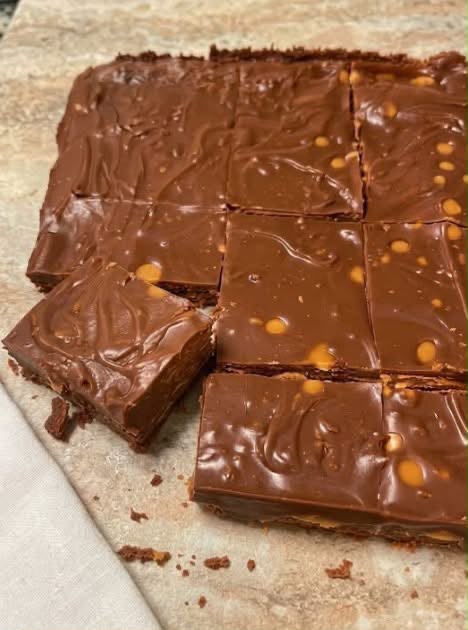
Chocolate Peanut Butter Fudge Bars
Rich, creamy and wonderfully chocolatey, these Chocolate Peanut Butter Fudge Bars combine smooth melted chocolate with sweet condensed milk, creamy peanut butter and little bursts of peanut butter chips. Each square has a soft, dense texture and a delicious balance of chocolate and nutty sweetness.
If you love homemade fudge but prefer recipes that do not require complicated sugar boiling or specialist equipment, this easy refrigerator fudge is an excellent choice. Everything comes together in a saucepan before being spread into a lined tin and chilled until firm.
The combination of semi-sweet and milk chocolate creates a particularly satisfying flavour. Semi-sweet chocolate brings depth, while milk chocolate adds a mellow sweetness that complements the peanut butter beautifully.
One of the best things about this recipe is its versatility. Cut the fudge into generous dessert bars, smaller bite-sized squares or neat pieces for sharing at parties and family gatherings.
These bars are also convenient to prepare ahead of time. A little patience while the chocolate sets in the refrigerator rewards you with beautifully sliceable fudge that is ready whenever you want a sweet treat.
Whether you are preparing a homemade gift, a holiday dessert platter or an easy weekend indulgence, this chocolate peanut butter fudge recipe deserves a place in your collection.
Recipe Overview
- Recipe Name: Chocolate Peanut Butter Fudge Bars
- Category: Dessert and sweet treats
- Style: American-inspired homemade fudge
- Preparation Time: Approximately 15 minutes
- Cooking Time: Approximately 5–10 minutes
- Chilling Time: 2–3 hours
- Total Time: Approximately 2 hours 20 minutes to 3 hours 25 minutes
- Yield: Approximately 16 large bars or 25 smaller squares
- Difficulty: Easy
- Cooking Method: Gentle stovetop melting followed by refrigeration
- Equipment: 8×8-inch or 9×9-inch square baking tin
- Oven Required: No
The timings and yield are practical estimates. Actual chilling time depends on the depth of the fudge, refrigerator temperature and the ingredients used.
Why You Will Love These Fudge Bars
- Rich chocolate flavour: Two varieties of chocolate create a wonderfully balanced taste.
- Creamy texture: Sweetened condensed milk helps produce soft, smooth fudge without traditional sugar boiling.
- Delicious peanut butter: Creamy peanut butter adds a subtle savoury contrast to the chocolate sweetness.
- Easy preparation: The recipe requires only basic saucepan cooking and refrigeration.
- No oven needed: Ideal when you want dessert without turning on the oven.
- Perfect for sharing: The bars can be cut into portions suitable for gatherings and dessert trays.
- Make-ahead convenience: Prepare the fudge in advance and keep it chilled until needed.
- Easy to customise: Optional toppings and flavour variations make it simple to create different versions.
Ingredients
This recipe uses eight ingredients, including the optional salt. For the best texture, measure everything before you begin heating the chocolate.
Chocolate Fudge Base
- 2 cups semi-sweet chocolate chips
- 1 cup milk chocolate chips
- 1 can sweetened condensed milk
- 2 tablespoons unsalted butter
- 1 teaspoon vanilla extract
- Pinch of salt
Peanut Butter Mixture
- ¾ cup creamy peanut butter
- ½ cup peanut butter chips
Important: Use sweetened condensed milk rather than evaporated milk. The two products have different sugar contents and will not produce the same fudge texture.
Ingredient Notes
Semi-Sweet Chocolate Chips
Semi-sweet chocolate provides the deeper cocoa flavour that forms the foundation of these fudge bars. Its slightly bitter notes prevent the finished dessert from tasting excessively sweet.
Choose chocolate chips that melt smoothly. Good-quality chocolate generally produces a more pleasant flavour and texture.
Milk Chocolate Chips
Milk chocolate makes the fudge sweeter and creamier. Combining it with semi-sweet chocolate gives these squares a rounded chocolate flavour.
Because milk chocolate is sensitive to excessive heat, keep the saucepan temperature low throughout melting.
Sweetened Condensed Milk
Condensed milk provides sweetness and helps bring the melted chocolate together into a thick fudge mixture. Most recipes of this kind use a standard can of approximately 397 g or 14 oz, although the original ingredient list specifies one can without a weight.
For the most predictable consistency, use a standard full-sized can and avoid changing its quantity without adjusting the chocolate.
Creamy Peanut Butter
Peanut butter adds rich roasted peanut flavour and creates the beautiful marbled appearance when gently swirled through the chocolate.
A smooth, well-mixed peanut butter is easiest to incorporate. If using natural peanut butter, stir it thoroughly so the separated oil is evenly distributed.
Unsalted Butter
A small amount of butter adds richness and helps the warm chocolate mixture feel silky. Unsalted butter also allows better control of the overall saltiness.
Vanilla Extract
Vanilla rounds out the chocolate flavour and adds a gentle aromatic sweetness. Stirring it in after removing the pan from the heat helps preserve its fragrance.
Peanut Butter Chips
These little chips provide additional peanut butter flavour and small pockets of sweetness. Some are folded into the fudge, while the rest can be scattered over the top.
Salt
A pinch of salt balances the sweetness and highlights the flavour of both chocolate and peanuts.
Equipment You Will Need
- 8×8-inch or 9×9-inch square baking tin
- Non-stick baking parchment
- Medium heavy-bottomed saucepan
- Heatproof spatula or wooden spoon
- Measuring cups and spoons
- Small spoon for swirling the peanut butter
- Refrigerator
- Sharp kitchen knife for slicing
- Cutting board
A heavy-bottomed saucepan is particularly helpful because it distributes heat more evenly, reducing the risk of scorching the chocolate.
How to Make Chocolate Peanut Butter Fudge Bars
Step 1: Prepare the Baking Tin
Line an 8×8-inch or 9×9-inch square baking tin with parchment paper. Leave extra parchment extending above two opposite sides so you can easily lift out the finished fudge.
Press the parchment into the corners, keeping the base as flat as possible for even bars.
Step 2: Combine the Chocolate Ingredients
Add the 2 cups of semi-sweet chocolate chips, 1 cup of milk chocolate chips, sweetened condensed milk, 2 tablespoons of unsalted butter and a pinch of salt to a medium saucepan.
Stir briefly to distribute the condensed milk around the chocolate.
Step 3: Melt Gently
Place the saucepan over low heat. Stir continuously, scraping the base and sides, until the chocolate and butter melt completely and the mixture becomes smooth.
The mixture should appear glossy, thick and evenly coloured, without dry lumps or separate oily patches.
Avoid boiling it. Excessive heat can cause the chocolate to become grainy or scorch against the bottom of the pan.
Step 4: Add the Vanilla
Remove the saucepan from the heat. Stir in 1 teaspoon of vanilla extract until evenly incorporated.
At this stage, the chocolate should still be warm and spreadable.
Step 5: Swirl in the Peanut Butter
Add ¾ cup of creamy peanut butter to the chocolate mixture.
Using a spoon or spatula, gently swirl the peanut butter through the chocolate. Make a few broad folding motions rather than stirring vigorously.
This creates ribbons of peanut butter throughout the fudge while allowing the chocolate flavour to remain distinct.
Step 6: Fold in the Peanut Butter Chips
Add most of the ½ cup of peanut butter chips, reserving a small handful for decorating if desired.
Fold gently to distribute the chips without overworking the mixture.
For more distinct chips, allow the hot fudge mixture to cool very slightly before folding them in, while keeping it soft enough to spread.
Step 7: Transfer to the Tin
Pour the chocolate peanut butter mixture into the parchment-lined tin.
Use a spatula to push the fudge into the corners and smooth the surface. Work while the mixture is still warm because it thickens as it cools.
Step 8: Add the Topping
Sprinkle the reserved peanut butter chips evenly over the top.
Press them very lightly into the surface so they remain attached after the fudge sets.
Step 9: Refrigerate Until Firm
Place the tin in the refrigerator for 2–3 hours, or until the fudge feels completely firm when gently pressed.
Keep the tin level while chilling so the finished bars have an even thickness.
Step 10: Lift Out the Fudge
Once firm, grasp the parchment overhang and carefully lift the slab from the baking tin.
Transfer it to a clean cutting board and peel away the parchment from the sides.
Step 11: Slice and Serve
Use a sharp knife to cut the fudge into thick squares or rectangular bars.
Wipe the knife between cuts for tidy edges. Serve chilled for a firmer bite or allow the pieces to stand briefly at room temperature for a softer texture.
How to Melt Chocolate Without Burning It
Chocolate is one of the most important ingredients in this recipe, and gentle heating makes a noticeable difference to the final texture.
When chocolate becomes too hot, its texture may turn grainy, thick or oily. This is particularly important when working with milk chocolate, which can scorch more easily than darker varieties.
Start with a cool saucepan and combine the chocolate, condensed milk and butter before applying heat. Keep the heat low and stir steadily rather than leaving the mixture unattended.
As the chocolate melts, it will gradually blend with the condensed milk into a thick, glossy mixture. Once the last small pieces disappear, take the pan off the heat immediately.
If your hob runs particularly hot, a heatproof bowl set over a saucepan of barely simmering water can provide more gentle heating. This is an optional technique rather than a change to the original saucepan method. Keep water and steam out of the chocolate.
How to Create a Creamy Peanut Butter Swirl
The peanut butter swirl is what makes these fudge bars especially appealing. Instead of being fully blended into the chocolate, the peanut butter can form soft, nutty ribbons throughout the mixture.
For a visible swirl, spoon the peanut butter into several places across the warm chocolate mixture. Draw the spatula through the mixture in broad, gentle motions.
Stop while some peanut butter streaks are still visible. Overmixing produces a more uniform fudge, which is still delicious but has less marbling.
If the peanut butter is very stiff, stir it separately until smooth before adding it. Avoid adding extra liquid, as this may affect the consistency of the fudge.
Because the mixture contains plenty of chocolate, the finished bars should remain rich and chocolate-forward, with peanut butter flavour in every bite.
How to Cut Perfect Fudge Squares
Neatly cut fudge looks especially attractive on dessert platters and in homemade gift boxes. The key is to allow the slab to become fully firm before slicing.
Use the parchment paper to remove the fudge rather than cutting directly inside the baking tin. This protects the tin and gives you better control over portion sizes.
For large dessert bars, divide an 8-inch square slab into four rows in each direction to create approximately 16 pieces. For smaller portions, cut five rows in each direction to create 25 squares.
A long, sharp knife is more effective than a serrated one. Press down in a single steady movement rather than sawing through the chocolate.
If the fudge sticks to the blade, wipe the knife clean after each cut. A slightly warmed, thoroughly dried knife can also help create smoother edges.
Expert Tips for the Best Fudge
- Measure before heating: Once melted, the chocolate begins thickening, so having the remaining ingredients ready is helpful.
- Use gentle heat: Low heat protects the chocolate from scorching.
- Stir constantly: Keep the mixture moving to prevent hot spots.
- Choose smooth peanut butter: A creamy consistency makes swirling easier.
- Avoid extra liquids: Water or milk can change the texture of the chocolate mixture.
- Line the tin properly: Parchment overhang makes removal simple.
- Use a smaller tin for thicker bars: An 8×8-inch tin gives a deeper slab than a 9×9-inch tin.
- Do not overmix the swirl: Gentle folding preserves the marbled appearance.
- Reserve some chips: A few on the surface make the peanut butter flavour immediately recognisable.
- Chill thoroughly: Cutting too early can cause the bars to bend or crumble.
- Use a clean knife: Wiping between cuts creates attractive squares.
- Serve in small portions: The rich flavour means modest pieces are often satisfying.
- Store in layers: Place parchment between stacked bars to reduce sticking.
- Allow brief softening: A few minutes outside the refrigerator can make chilled fudge pleasantly creamy.
Common Mistakes to Avoid
1. Heating the Chocolate Too Quickly
High heat can burn chocolate before the entire mixture has melted. Use low heat and steady stirring.
2. Using Evaporated Milk
Evaporated milk is not a direct replacement for sweetened condensed milk. It lacks the same concentrated sugar content and can make the fudge too soft.
3. Using Poorly Mixed Natural Peanut Butter
Separated peanut oil may produce an uneven texture. Stir natural peanut butter thoroughly before measuring.
4. Overmixing the Chocolate
Stir enough to make the melted chocolate smooth, but avoid excessive cooking and unnecessary mixing after adding the peanut butter.
5. Adding the Chips While the Mixture Is Extremely Hot
The peanut butter chips may melt completely. Allow the fudge to cool slightly before folding them in if you want distinct pieces.
6. Forgetting the Parchment Overhang
Without it, removing the entire slab becomes more difficult and may damage the edges.
7. Cutting Before the Fudge Has Set
Soft fudge may drag against the knife and lose its shape. Refrigerate until firm.
8. Leaving the Fudge Uncovered for Long Periods
Extended exposure to refrigerator air can dry out the surface or allow it to absorb other food aromas. Transfer the set pieces to an airtight container.
9. Storing Near Heat
Chocolate fudge can soften considerably in warm conditions. Keep the bars cool and away from direct sunlight.
Optional Fudge Variations
The original recipe is delicious as written, but the following optional ideas allow you to change the flavour or texture.
1. Dark Chocolate Peanut Butter Fudge
Replace some or all of the milk chocolate chips with dark chocolate for a less sweet, more intense cocoa flavour.
2. Crunchy Peanut Butter Fudge
Use crunchy peanut butter in place of creamy peanut butter for extra pieces of roasted peanut.
3. Sea Salt Chocolate Fudge
Sprinkle a small amount of flaky sea salt over the surface before chilling for a sweet-and-salty finish.
4. Chocolate Pretzel Fudge
Add a small handful of crushed pretzels on top for crunch. Add them shortly before serving if you want to preserve their crispness.
5. White Chocolate Drizzle
Once set, drizzle the bars with a little melted white chocolate for a decorative finish.
6. Roasted Peanut Topping
Sprinkle finely chopped roasted peanuts over the warm surface before refrigerating.
7. Mini Fudge Bites
Cut the finished fudge into small cubes for party platters or homemade sweet assortments.
8. Extra Vanilla Fudge
Add a little extra vanilla extract for a warmer, more aromatic flavour, taking care not to introduce too much additional liquid.
Serving Suggestions
These chocolate peanut butter fudge bars are rich enough to enjoy on their own, but they also work well as part of a larger dessert spread.
- With coffee: A cup of strong coffee balances the sweetness of the chocolate.
- With cold milk: Milk makes a classic accompaniment to chocolate and peanut butter.
- On a dessert platter: Arrange smaller squares alongside biscuits, brownies and fresh strawberries.
- With vanilla ice cream: Add a small fudge square to a scoop of vanilla ice cream.
- For celebrations: Present the bars in individual paper cases or on a decorative serving tray.
- As homemade gifts: Pack fully chilled squares in a food-safe box with parchment between layers.
For the most appealing texture, serve the fudge cool rather than frozen solid. A short rest at room temperature allows the chocolate to soften slightly without losing its shape.
Storage and Make-Ahead Tips
Refrigerator Storage
Keep the fudge in an airtight container in the refrigerator for approximately one week. Separate layers with parchment paper to prevent the squares from sticking together.
Room Temperature
For serving, the bars can stand at room temperature for a short period. In a warm kitchen, they may soften quickly, so refrigerate them again when they are no longer needed.
Freezing
For longer storage, wrap the fudge tightly and place it in a freezer-safe airtight container. For best quality, use within approximately two months.
Thaw overnight in the refrigerator before serving. Keep the fudge wrapped while thawing to reduce surface condensation.
Making the Fudge Ahead
This recipe is ideal for preparing the day before a gathering. Allow the fudge to chill completely, cut it into portions and store it covered until serving.
Food Safety
Use clean utensils and store the finished fudge in a cool, hygienic environment. Refrigerate promptly after preparation and avoid prolonged exposure to warm temperatures.
Frequently Asked Questions
1. Do chocolate peanut butter fudge bars need baking?
No. The chocolate mixture is melted on the hob and then refrigerated until firm. No oven baking is required.
2. How long does the fudge take to set?
Allow approximately 2–3 hours in the refrigerator, although thicker bars may need a little longer.
3. Can I use only semi-sweet chocolate?
Yes, as an optional variation. The finished fudge will have a deeper chocolate flavour and may taste less sweet.
4. Can I use only milk chocolate?
You can experiment with milk chocolate, but the resulting fudge may be sweeter and softer than the original blend.
5. Can I replace condensed milk with regular milk?
No. Regular milk has a much higher water content and does not provide the concentrated sweetness needed for this style of fudge.
6. Why is my fudge too soft?
It may not have chilled long enough, the ingredient proportions may have changed, or the chocolate may have been affected by excess liquid.
7. Why is my fudge grainy?
Chocolate that becomes overheated can develop a grainy texture. Use gentle heat and remove the pan as soon as the mixture is smooth.
8. Can I use natural peanut butter?
Yes, provided it is thoroughly stirred. However, its looser consistency may affect how firmly the fudge sets.
9. Can I use crunchy peanut butter?
Yes. Crunchy peanut butter creates a nuttier texture with small peanut pieces throughout the bars.
10. Do I have to add peanut butter chips?
They are included in the original recipe, but you can omit them as a variation. The fudge will still contain peanut butter flavour.
11. Can I use a larger baking tin?
Yes, but the fudge will be thinner and may set more quickly. An 8×8-inch or 9×9-inch tin provides the intended thickness.
12. How do I keep the top smooth?
Spread the mixture immediately after transferring it to the lined tin. A broad spatula works well for smoothing the surface.
13. Can I make this fudge the night before?
Absolutely. Overnight refrigeration gives the bars plenty of time to become firm and easy to slice.
14. Can the fudge be frozen?
Yes. Wrap the pieces well and freeze in an airtight container for up to approximately two months for best quality.
15. How can I make clean cuts?
Use a sharp knife and wipe it clean between slices. Make sure the fudge is fully chilled first.
16. Can I add chopped nuts?
Yes. Chopped roasted peanuts or pecans are suitable optional additions for extra crunch.
17. Is this fudge gluten-free?
The basic ingredients may be gluten-free, but this depends on the specific chocolate chips and other packaged products. Check every label if preparing the recipe for someone who must avoid gluten.
18. Can I make it dairy-free?
The original recipe contains dairy in the chocolate, condensed milk and butter. A dairy-free version would require tested replacements and may set differently.
19. Why did my peanut butter chips disappear?
They probably melted into the warm chocolate mixture. Allow the mixture to cool slightly before folding them in to retain more of their shape.
20. Can I prepare these bars for a party?
Yes. They are easy to make ahead, transport chilled and portion into small pieces for guests.
21. Should I serve the bars cold?
They can be enjoyed chilled or after standing briefly at room temperature. Chilled fudge is firmer, while slightly warmer fudge feels creamier.
22. How many bars does this recipe make?
Expect approximately 16 large bars or 25 smaller squares, depending on how you cut the slab.
Chocolate Peanut Butter Fudge Bars Recipe Card
Recipe Description
Thick, creamy chocolate fudge bars made with semi-sweet chocolate, milk chocolate, sweetened condensed milk and swirls of peanut butter. An easy homemade dessert with a rich, smooth texture and delicious peanut butter chips.
- Category: Dessert
- Method: Stovetop and refrigeration
- Preparation: Approximately 15 minutes
- Cooking: Approximately 5–10 minutes
- Chilling: 2–3 hours
- Yield: Approximately 16–25 pieces
- Difficulty: Easy
Ingredients
- 2 cups semi-sweet chocolate chips
- 1 cup milk chocolate chips
- 1 can sweetened condensed milk
- ¾ cup creamy peanut butter
- 2 tablespoons unsalted butter
- 1 teaspoon vanilla extract
- ½ cup peanut butter chips
- Pinch of salt
Instructions
- Line an 8×8-inch or 9×9-inch square tin with parchment paper, leaving an overhang.
- Place the semi-sweet chocolate chips, milk chocolate chips, sweetened condensed milk, butter and salt in a saucepan.
- Heat over low heat, stirring constantly, until completely melted and smooth.
- Remove the saucepan from the heat and stir in the vanilla extract.
- Add the creamy peanut butter and gently swirl it through the chocolate mixture.
- Fold in most of the peanut butter chips, reserving a few for the top if desired.
- Pour the fudge into the prepared tin and spread evenly.
- Sprinkle the remaining peanut butter chips over the surface.
- Refrigerate for 2–3 hours, until completely firm.
- Lift the fudge out of the tin using the parchment overhang.
- Cut into thick square bars and serve chilled or at room temperature.
Recipe Notes
- Use low heat when melting chocolate to prevent scorching.
- Sweetened condensed milk is essential to the original recipe.
- For thicker bars, use the 8×8-inch tin.
- Allow the fudge to set fully before cutting.
- Store in an airtight container in the refrigerator for approximately one week.
- For a decorative finish, reserve a few peanut butter chips for the surface.
Recipe Hashtags
#ChocolateFudge #PeanutButterFudge #NoBakeDessert #HomemadeFudge #EasyDessertRecipes