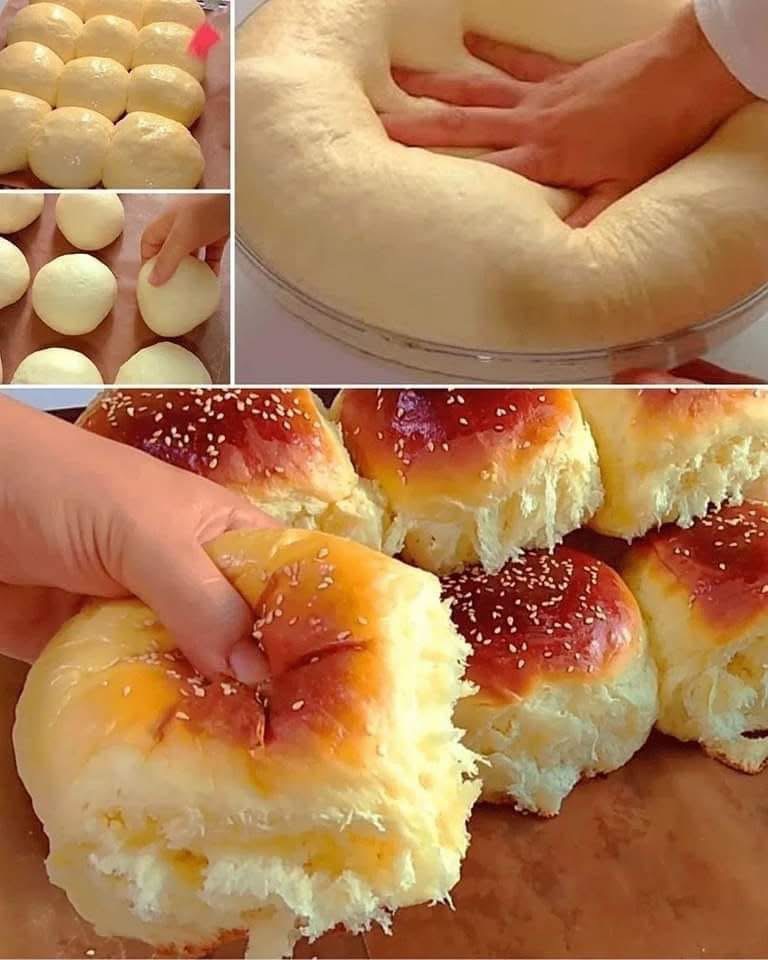
Ultimate Cloud-Like Easy Milk Brioche Guide
This master guide provides everything you need to bake the ultimate, ultra-soft, cloud-like Easy Milk Brioche right at home.
1. Introduction
Brioche represents the pinnacle of enriched bread making. It strikes a balance between a pastry and a traditional bread loaf. This Easy Milk Brioche recipe delivers a crumb so soft, light, and airy that it mimics the texture of a literal cloud. By increasing the liquid milk ratio and managing temperature, this recipe eliminates the intimidating, multi-day process of classic French baking. Instead, it offers an accessible route to premium bread.
Whether you tear it apart by hand or slice it for French toast, this brioche maintains its pillow-soft texture for days. It relies on straightforward structural techniques and everyday kitchen staples. This ultimate guide breaks down every variable to guarantee a successful bake on your first attempt.
2. Comprehensive Ingredients List
Success in bread baking depends on precise ratios. For the best accuracy, use a digital kitchen scale to measure these ingredients in grams.
The Dough Base
- Bread Flour: 500 grams (approx. 4 cups). Use flour with at least 12% to 14% protein content to form a strong gluten network.
- Whole Milk: 240 milliliters (approx. 1 cup). Warm it to exactly 105°F–110°F (40°C–43°C) to activate the yeast without killing it.
- Instant Dry Yeast: 9 grams (approx. 1 tablespoon). This ensures a fast, reliable rise without requiring a separate blooming phase.
- Granulated White Sugar: 70 grams (approx. 1/3 cup). Provides flavor and feeds the yeast.
- Fine Sea Salt: 8 grams (approx. 1.5 teaspoons). This tightens the gluten structure and controls yeast fermentation.
The Enrichment Ingredients
- Large Whole Eggs: 2 items (approx. 100 grams total). Bring them to room temperature so they incorporate into the dough smoothly.
- Unsalted Pure Butter: 80 grams (approx. 6 tablespoons). Soften to room temperature (around 68°F / 20°C). It should yield to gentle thumb pressure without melting.
- Pure Vanilla Extract (Optional): 5 milliliters (approx. 1 teaspoon). Adds an aromatic, pastry-like fragrance.
The Topping and Glaze
- Egg Wash: 1 large egg yolk beaten with 15 milliliters (1 tablespoon) of whole milk.
- Sugar Coating (Optional): 20 grams of pearl sugar or coarse sanding sugar for a crunchy exterior texture.
3. Step-by-Step Instructions
Follow these chronological steps carefully to achieve a light, cloud-like structure.
[Activate Yeast/Mix] ➔ [Initial Knead] ➔ [Incorporate Butter] ➔ [First Proof] ➔ [Shape] ➔ [Second Proof] ➔ [Egg Wash & Bake]
Step 1: Liquid Activation and Base Mixing
- Whisk the warm whole milk (105°F) and granulated sugar together in a large mixing bowl or the bowl of a stand mixer.
- Sprinkle the instant dry yeast across the surface of the milk. Let it sit for 3 minutes until a light foam appears.
- Whisk the two room-temperature eggs and vanilla extract into the milk mixture until completely smooth.
Step 2: Incorporating the Dry Ingredients
- Sift the bread flour and fine sea salt together in a separate container.
- Add the flour mixture to your liquid base. Use a sturdy spatula or a stand mixer fitted with a dough hook on low speed.
- Mix for 3 to 4 minutes until the flour absorbs the liquid. The dough will look shaggy, dense, and sticky at this stage.
Step 3: The Kneading and Butter Incorporation Process
- Turn the mixer up to medium speed (or transfer the dough to a clean, unfloured work surface if kneading by hand).
- Knead the shaggy dough for 5 minutes until it begins to pull away from the sides of the bowl and develops a basic elasticity.
- Add the softened butter one tablespoon at a time. Wait until each piece is completely absorbed by the dough before adding the next.
- Once all the butter is added, knead on medium speed for an additional 8 to 10 minutes. The dough will transform from a slick, greasy mass into an incredibly smooth, shiny, and elastic dough.
Step 4: The First Fermentation (Bulk Proof)
- Shape the kneaded dough into a tight, smooth ball.
- Place the ball into a large, lightly greased glass bowl.
- Cover the bowl tightly with plastic wrap or a damp kitchen towel to retain moisture.
- Leave the bowl in a warm, draft-free spot (75°F to 80°F) for 60 to 90 minutes, or until the dough doubles in size.
Step 5: Punching Down and Shaping
- Gently press your fist into the center of the risen dough to release accumulated carbon dioxide gases.
- Turn the dough onto a lightly oiled work surface. Avoid adding extra flour, which can dry out the final crumb.
- Divide the dough into equal portions using a bench scraper. For individual buns, cut into 12 pieces (approx. 75g each). For a loaf, divide into 3 or 4 equal portions.
- Flatten each piece out slightly, fold the outer edges into the center, and roll it against the counter under your cupped hand to create a smooth skin.
Step 6: The Final Secondary Proof
- Arrange your shaped dough pieces into a greased baking pan or onto a parchment-lined baking sheet, leaving 1 inch of space between them.
- Cover the dough loosely with a lightweight cloth.
- Let the dough rise a second time for 45 to 60 minutes. The portions should double in size, look puffy, and spring back slowly when poked gently.
Step 7: Glazing and Baking
- Preheat your conventional oven to 350°F (175°C) during the last 15 minutes of the second proof.
- Use a soft pastry brush to apply a thin, even layer of the egg wash across the top of each puffy dough portion.
- Sprinkle pearl sugar across the surface if desired.
- Place the pan on the center rack of the preheated oven. Bake for 22 to 25 minutes for buns, or 30 to 35 minutes for a full loaf. The crust should turn a deep golden brown, and the internal temperature should reach 190°F (88°C) on an instant-read thermometer.
- Remove the brioche from the oven. Let it sit in the pan for 5 minutes, then transfer it to a wire rack to cool completely.
4. Advanced Methods and Techniques
To get the softest texture possible, you need to understand the science behind baking. Focus on these three core technical methods:
The Tangzhong Method Addendum
For an exceptionally soft crumb that stays fresh for days, incorporate a Tangzhong water roux:
- Deduct 30 grams of flour and 120 milliliters of milk from the main recipe ingredients.
- Whisk these two quantities together in a small saucepan over medium-low heat.
- Stir constantly for 3 to 4 minutes until the mixture thickens into a translucent paste.
- Let the paste cool down to room temperature before adding it to your primary liquid base in Step 1. This paste traps moisture within the starch network, keeping the bread soft for up to a week.
The Windowpane Test
Never guess if your dough is kneaded enough. Use the windowpane test:
- Tear off a golf-ball-sized piece of dough.
- Hold it between your thumbs and index fingers.
- Gently stretch the dough outward from the center.
- If the dough stretches into a thin, translucent membrane without tearing, your gluten network is fully developed. If it rips quickly, continue kneading for another 2 to 3 minutes.
Temperature and Ingredient Management
- Butter State: Never use melted butter. Melted butter destroys the emulsion, separating fat from liquids and leaving you with a heavy, greasy dough.
- Ambient Proofing: If your kitchen is cool, place the covered dough inside an unlit oven next to a mug of boiling water. This creates an ideal warm, humid environment for fermentation.
5. History of Brioche
Brioche dates back to 14th-century Normandy, France, a region famous for its high-quality dairy and butter production. The word “brioche” stems from the Old Norman verb brier, which means “to knead with a wooden roller.”
14th Century (Normandy origins) ➔ 17th Century (Parisian refinement) ➔ 18th Century (The French Revolution myth) ➔ Modern Era (Global adaptations)
Historically, the amount of butter used in brioche determined a household’s wealth. Richer families baked “Brioche du Riche” with a 70% to 80% butter-to-flour ratio, while less affluent families made “Brioche du Pauvre,” which used a lower butter content and relied on milk for hydration.
The bread became famous through a line attributed to Marie Antoinette during the flour shortages of the French Revolution: “Qu’ils mangent de la brioche” (often translated as “Let them eat cake”). Today, brioche is a staple in French pastry culture and has evolved into modern variations like French toast, slider buns, and tender breakfast loaves worldwide.
6. Nutritional Profile
This nutritional breakdown is calculated per serving, assuming the recipe is divided into 12 equal-sized brioche buns (approx. 75 grams per baked serving).
| Nutrient Component | Value Per Serving | Daily Reference Percentage (% DV) |
|---|---|---|
| Calories | 245 kcal | 12% |
| Total Fat | 8.5 grams | 11% |
| Saturated Fat | 4.8 grams | 24% |
| Trans Fat | 0.2 grams | 0% |
| Cholesterol | 55 milligrams | 18% |
| Sodium | 290 milligrams | 13% |
| Total Carbohydrates | 36 grams | 13% |
| Dietary Fiber | 1.2 grams | 4% |
| Sugars | 6.2 grams | 12% |
| Protein | 6.5 grams | 13% |
| Calcium | 42 milligrams | 4% |
| Iron | 2.1 milligrams | 12% |
7. Benefits of Homemade Milk Brioche
Baking your own milk brioche offers several advantages over store-bought alternatives:
- Zero Artificial Preservatives: Commercial breads often use chemical softeners and artificial shelf-life extenders. This homemade recipe achieves its soft texture naturally through proper gluten development and dairy fats.
- Cost-Efficient Luxury: High-end artisanal bakeries often charge premium prices for fresh brioche. You can recreate that same gourmet quality at home for a fraction of the cost.
- Versatile Kitchen Use: This dough works well for both sweet and savory dishes. Use it for morning toast with jam, sweet cinnamon rolls, savory burger buns, or rich holiday bread puddings.
- Stress Relief: The rhythmic process of measuring, kneading, and shaping dough can serve as a calming, rewarding screen-free activity.
8. Dough Formation and Structural Development
The texture of a brioche depends entirely on its structural development. When flour mixes with water and milk, its proteins (gliadin and glutenin) link together to form a flexible gluten network.
[Flour Proteins + Liquids] ➔ [Initial Sticky Gluten Matrix] ➔ [Fat Coating Insulates Strands] ➔ [Elongated Gas-Retaining Pockets]
Fat plays a unique role in this process. Butter acts as a shortener, coating the developing gluten strands and keeping them from becoming too tough or rigid. Adding butter gradually is key; if you add it too early, the fat insulates the flour proteins, preventing them from bonding with the liquids.
By kneading a strong base structure before introducing the fat, you create a network that can expand and trap carbon dioxide gas. This structural balance is what gives the brioche its characteristic pull-apart texture and ultra-light, cloud-like lift when baked.
9. For the Lovers of Baking: Serving and Pairing Suggestions
This Easy Milk Brioche is a favorite for bakers who appreciate fine details and subtle flavors. Here are the best ways to enjoy it:
The Ultimate Breakfast Pairing
Slice the loaf thick, dip it into an egg custard flavored with cinnamon and orange zest, and sear it in brown butter to make the ultimate French toast. Pair it with fresh espresso or a dark roast coffee; the bitterness of the coffee balances the rich, buttery notes of the bread perfectly.
The Savory Twist
Lightly toast a brioche bun and use it for a premium burger, a fried chicken sandwich, or soft scrambled eggs with chives. The slight sweetness of the dough cuts through rich, savory fats, enhancing the overall flavor of your dish.
Sweet Accompaniments
Tear a warm bun in half and spread it with homemade triple-berry jam, hazelnut spread, or clotted cream. For a classic French treat, press a square of high-quality dark chocolate into a warm roll for an afternoon snack (Goûter).
10. Summary Troubleshooting & Pro-Tips
| Issue Encountered | Primary Root Cause | Corrective Action Strategy |
|---|---|---|
| Dough is too sticky to handle | Too much liquid or under-kneaded | Knead for 3 more minutes before adding flour; chill for 30 minutes to make handling easier. |
| The bread is dense and heavy | Yeast did not activate or proofing time was cut short | Make sure milk is warm (105°F); let the dough rise until it passes the poke test. |
| Crust is too dark or burned | High sugar content caramelizing too quickly | Tent the top loosely with aluminum foil after 15 minutes of baking. |
| Dough tears when shaping | Gluten network is tight and tense | Cover the dough and let it rest for 10 minutes to relax the gluten before shaping. |
11. Conclusion
Mastering this Easy Milk Brioche gives you a reliable base recipe for your baking repertoire. By learning how to properly hydrate flour and incorporate fats, you can skip the lengthy, complicated steps of traditional recipes without sacrificing quality. The result is a golden, buttery loaf with a remarkably soft, cloud-like texture. Take your time with the kneading process, keep an eye on your proofing temperatures, and enjoy the wonderful aroma of fresh brioche baking in your kitchen.
If you would like to customize your bake, please let me know:
- Do you plan to mix this by hand or use a stand mixer?
- Are you making a single large loaf or individual slider buns?
- Would you like suggestions for dairy-free or alternative ingredient swaps?