Introduction
Imagine a warm, pillowy soft bread, fresh from the skillet, ready to soak up your favorite curry, cradle a juicy kebab, or simply be enjoyed on its own with a sprinkle of sea salt. That’s exactly what you get with our Soft Homemade Skillet Flatbread! This recipe is a game-changer for anyone who loves the idea of freshly baked bread but doesn’t want the fuss of an oven or the wait for yeast to rise. It’s incredibly simple, uses basic pantry staples, and delivers a delicious, versatile bread that will quickly become a household staple.
What makes this flatbread truly special is its incredible softness and flexibility. Unlike some flatbreads that can turn stiff or cracker-like, ours stays wonderfully pliable, making it perfect for wraps, dipping, or tearing. The magic happens right on your stovetop, transforming a simple dough into golden, bubbly rounds in just minutes. Forget store-bought alternatives; once you taste the fresh, nuanced flavor and tender texture of homemade, there’s no going back.
Whether you’re a seasoned baker or a complete novice, this recipe is designed for success. Its forgiving nature and straightforward steps mean you can whip up a batch for breakfast, lunch, or dinner without any stress. Prepare to impress your family and friends with this effortlessly delicious bread that elevates any meal.
Nutritional Information
Per serving (approximate values):
- Calories: 220
- Protein: 7g
- Carbohydrates: 40g
- Fat: 4g
- Fiber: 2g
- Sodium: 250mg
Ingredients
- 2 cups (240g) all-purpose flour, plus more for dusting
- 1 teaspoon baking powder
- 1/2 teaspoon salt
- 1 tablespoon olive oil (or other neutral oil), plus more for brushing skillet
- 3/4 cup (180ml) warm water (about 100-110°F / 38-43°C)
Instructions
- In a large mixing bowl, whisk together the all-purpose flour, baking powder, and salt. Make sure there are no lumps and the ingredients are well combined.
- Add 1 tablespoon of olive oil to the dry ingredients.
- Gradually pour in the warm water, starting with about half of it. Mix with a wooden spoon or your hands until a shaggy dough forms. Continue adding water a little at a time, until the dough comes together and is soft but not sticky. You might not need all the water, or you might need a tiny bit more, depending on the humidity and your flour.
- Turn the dough out onto a lightly floured surface. Knead the dough for 5-7 minutes. The dough should become smooth, elastic, and spring back when gently poked. Avoid over-kneading, as this can make the flatbread tough.
- Form the dough into a ball. Lightly grease the mixing bowl with a tiny bit of oil, place the dough ball back in, and turn it once to coat. Cover the bowl with a clean kitchen towel or plastic wrap and let the dough rest at room temperature for at least 20-30 minutes. This resting period is crucial for relaxing the gluten, which will make the dough easier to roll and result in a softer flatbread.
- After resting, gently punch down the dough to release any air. Divide the dough into 6-8 equal portions. For uniform flatbreads, you can weigh each portion. Roll each portion into a smooth ball.
- Lightly flour your work surface and a rolling pin. Take one dough ball and flatten it slightly with your hand. Roll it out into a thin circle, about 6-8 inches (15-20 cm) in diameter and about 1/8 inch (3mm) thick. Try to keep the shape as round as possible. Repeat with the remaining dough balls, stacking them with a piece of parchment paper or a light dusting of flour in between to prevent sticking.
- Heat a dry cast-iron skillet or a heavy-bottomed non-stick pan over medium-high heat. You want the pan to be hot, but not smoking. A good test is to flick a tiny bit of water into the pan; it should sizzle immediately.
- Lightly brush the hot skillet with a tiny amount of olive oil, butter, or ghee.
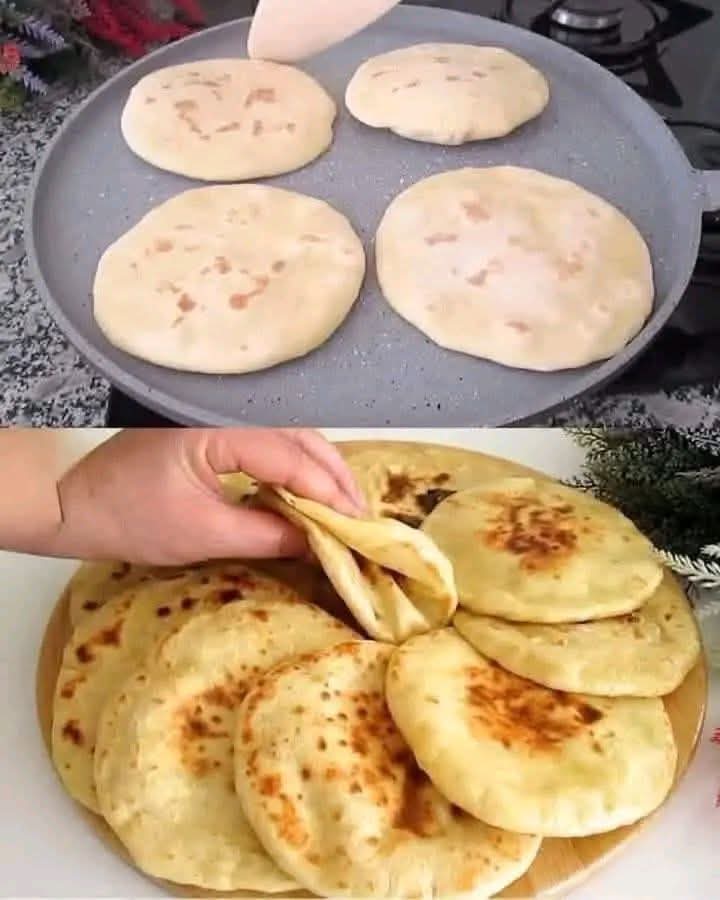
- Carefully place one rolled-out flatbread into the hot skillet. Cook for 1-2 minutes, or until bubbles start to appear on the surface and the underside is golden brown with some darker spots.
- Flip the flatbread and cook for another 1-2 minutes on the second side, until it’s also golden brown and cooked through. It should puff up nicely.
- Once cooked, remove the flatbread from the skillet and immediately place it in a clean kitchen towel or a covered container to keep it warm and soft. This steaming process helps maintain its pliability.
- Repeat the cooking process with the remaining flatbreads, lightly brushing the skillet with oil between each one if needed.
- Serve warm and enjoy your delicious homemade skillet flatbreads!
Cooking Tips and Variations
Achieving that perfect soft and pliable texture is key to a great flatbread. One crucial tip is to ensure your dough is well-rested. The 20-30 minutes of resting time allows the gluten to relax, making the dough much easier to roll out thinly and contributing to a tender crumb. If your dough is fighting you and springing back when you try to roll it, let it rest for another 5-10 minutes. Another important aspect is the skillet temperature. Too low, and the flatbread will dry out and become tough; too high, and it will burn before cooking through. Medium-high heat is ideal, allowing the flatbread to cook quickly, puff up, and develop those beautiful golden-brown spots without becoming brittle. Don’t overcrowd your pan; cook one flatbread at a time to maintain consistent heat.
To prevent your flatbread from becoming too dry, be mindful of overcooking. Each side usually only needs 1-2 minutes. As soon as you see those lovely golden spots and the flatbread puffs up, it’s ready. Immediately transfer the cooked flatbreads to a stack wrapped in a clean kitchen towel or placed in a covered container. The residual heat and steam trapped inside the towel or container will keep them wonderfully soft and pliable, ready for dipping or wrapping. For an extra touch of flavor and a richer texture, you can brush the hot flatbreads with melted butter or ghee infused with garlic and fresh herbs like parsley or cilantro immediately after they come off the skillet.
This basic recipe is a fantastic canvas for variations. For a whole wheat version, substitute up to half of the all-purpose flour with whole wheat flour. You might need a tiny bit more water, as whole wheat flour absorbs more liquid. For a more savory flatbread, knead in 1-2 tablespoons of finely chopped fresh herbs like rosemary, thyme, or chives into the dough. You could also add a pinch of garlic powder or onion powder for an extra layer of flavor. For a slightly richer dough, you can replace a tablespoon of water with a tablespoon of plain yogurt or milk. This can add a subtle tang and even more tenderness to the final product. Experiment with different flours like bread flour for a chewier texture or a gluten-free blend (ensure it’s a blend suitable for bread) for dietary needs, though adjustments to water content will be necessary.
Storage and Reheating
Storing your homemade skillet flatbreads properly is key to maintaining their deliciousness. Once cooled completely, stack the flatbreads with a piece of parchment paper or wax paper in between each one to prevent them from sticking. Place the stack in an airtight container or a large resealable plastic bag. Stored at room temperature, they will stay fresh and soft for 2-3 days. For longer storage, you can refrigerate them for up to 5 days, or freeze them for up to 2-3 months. If freezing, make sure they are completely cool before wrapping them tightly in plastic wrap and then placing them in a freezer-safe bag.
Reheating these flatbreads is simple and brings them back to their fresh-from-the-skillet glory. From room temperature or refrigerated, you can reheat them quickly in a dry skillet over medium heat for about 30 seconds to 1 minute per side, until warmed through and soft. You can also pop them into a toaster oven for a minute or two. If reheating from frozen, there’s no need to thaw. Simply place the frozen flatbreads directly into a warm skillet over medium heat, flipping occasionally, until they are soft and heated through. You can also microwave them for 15-30 seconds, though this method can sometimes make them a little chewier. For best results and to retain their soft texture, avoid overheating, which can dry them out.
Frequently Asked Questions
What makes this flatbread soft without yeast?
The softness in this flatbread comes primarily from the baking powder, which acts as a leavening agent to create air pockets, and the proper hydration of the dough. The resting period also plays a crucial role by allowing the gluten to relax, resulting in a more tender and pliable texture. Unlike yeast breads that rely on fermentation, this recipe uses chemical leavening for a quicker rise and a soft crumb.
Can I make the dough ahead of time?
Yes, you can! You can prepare the dough, knead it, and then store it in an airtight container in the refrigerator for up to 24 hours. When you’re ready to cook, take the dough out of the fridge about 30 minutes before rolling to allow it to come closer to room temperature, which will make it easier to work with. Then proceed with dividing, rolling, and cooking as per the instructions.
My flatbreads are coming out tough or hard, what am I doing wrong?
There are a few common culprits for tough flatbreads. The most frequent reason is overcooking – cooking them for too long on the skillet will dry them out. Keep the cooking time short, just until golden spots appear and they puff up. Another reason could be insufficient dough resting time, leading to tight gluten that’s hard to roll and results in a dense flatbread. Lastly, too much flour during kneading or rolling can also dry out the dough, so use flour sparingly when dusting your surface.